Subversioning plays a very vital role for Developers. It keeps track of changes to a file over time. It maintains the history of all the changes. This way you do not end up with millions of copies of the project that you cannot make heads or tails out of. With a version control system, every time you commit a set of changes you write a comment describing what you did. Then you can look at the log to see what was changed when and by whom. You can easily look at the differences between versions and easily roll back changes if you need to. You also always have easy remote access to the current version of your project without having to remember which file name you used for it: you simply do an update of your working directory or check out the head version. For more information regarding version control please refer: http://en.wikipedia.org/wiki/Revision_control
While working on SVN, a question arrived in my mind that is there any way to setup SVN on the local network. Yes [Where there is will there is way] it’s possible. If you have any project and your team is working on the local network, then you can setup svn on the local network, it becomes easier for a team to work. It basically can be very much useful for the collegians. Collegians must use this approach in all projects. We can setup SVN on a local machine connected to a network and that will act as an SVN server for other teammates.
Prerequisites
– Tortoise SVN (Subversion client) and
Ankh SVN (Subversion plugins for Visual Studio)
– Tortoise SVN (Subversion client) and
Ankh SVN (Subversion plugins for Visual Studio)
Note: we already have created a visual studio solution.
Let’s have a step by step look at how to setup SVN in local.
1
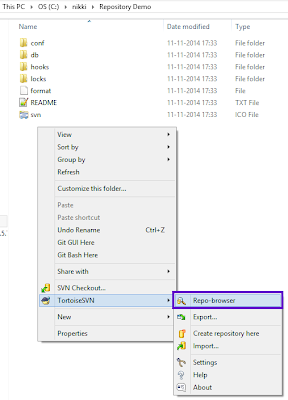
Create a folder where repository will reside. I have created a folder name Repository Demo where my solution’s repository
will be saved when I check In.
Create a folder where repository will reside. I have created a folder name Repository Demo where my solution’s repository
will be saved when I check In.
2)
Add project solution in Repository Browse the repository.
Add project solution in Repository Browse the repository.
Our next step is to add our solution to the SVN Repository we just created. We will add the solution/project files to the trunk folder.
Add the solution to repository directory.
You will see that your solution is now added to repository once you add solution folder in the repository.
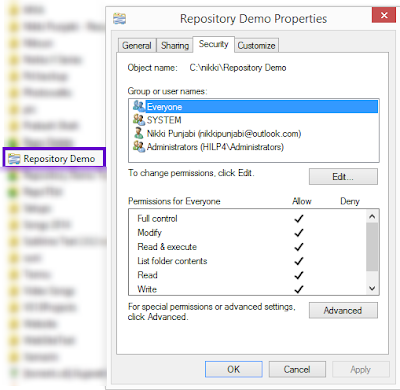
Provide the network access rights for repository directory to be accessible by network users. I am giving the Everyone access rights so now anyone having access to my machine in the network will be able to get the solution via this Repository.
3) Now we can provide repository access to anyone in your network. Example: file://Nikki-PC/Repository Demo/trunk
file://Nikki-PC/Repository Demo/trunk OR file://172.16.2.13/Repository Demo/trunk
Happy sub-versioning.


Thanks Leon.!
Nice work bro !