Automate Sitecore Workflow Approval Process and Email Report

Automation is the key to tech. It is the process by which tasks which were previously done by humans, are performed entirely by machines. In this post, I shall take you through how to automate Sitecore Workflow Approval for a more efficient way of working.

Why do you need Auto Approve?

Every project has a different set of requirements, and one of the requirements I was tasked to do was to automate the Workflow approval process. You may think, what is the purpose of having a workflow if you want things to be approved automatically. Well, as mentioned earlier, there are different scenarios that may deem such a requirement necessary.

It is not because of the risk in approving content that may be incorrect. It is due to that fact that there are a lot of items in the workflow coming in from the translation agency and in order to verify the content, it requires physical approval to push on to Stage. The automation to be implemented here will help us to know that translations are coming in and send it to the respective content team member to verify. Once verification is done, then in one simple, a user can push it Live.

Read More

Get Sitecore Workflow Items

In this post, you’ll see how to get Sitecore workflow items that are in the specific state of the workflow. I’ve described both the possible ways by which you can do it, Code and Sitecore PowerShell. 🙂

We need, workflow Id and workflow state Id.

var db = Factory.GetDatabase("master");
var workflow = db.WorkflowProvider.GetWorkflow(txtWorkflowID.Text);
var listofWorkflowItems = workflow.GetItems(txtWorkflowStateID.Text);

Above code, will get list of items in the given workflow state. I needed the report of these items along with the URLs. So I added the following code to get the required data. I are going to make use of this piece of code and bring in some more automation in further requirement. I’ll share more details in the upcoming posts.

Layout look as following:

<body>
    <form id="form1" runat="server">
        <h2>Get List of Workflow Items!</h2>
        <table>
            <tr>
                <td>Workflow ID:</td>
                <td>
                    <asp:TextBox ID="txtWorkflowID" runat="server" Width="400" Text="{115CBA9C-D124-49D5-B9D1-314B32155AAB}"></asp:TextBox></td>
            </tr>
            <tr>
                <td>Workflow State ID:</td>
                <td>
                    <asp:TextBox ID="txtWorkflowStateID" runat="server" Width="400" Text="{C8CB5D17-7F02-4A34-B2AE-36D1DB4A7089}"></asp:TextBox></td>
            </tr>
            <tr>
                <td>
                    <asp:Label ID="lblSummary" CssClass="positionAbsolute" Visible="false" Text="" runat="server"></asp:Label></td>
            </tr>
            <tr>
                <td>
                    <asp:Button ID="btnGetWorkflowItems" runat="server" Text="Get Items in Workflow" OnClick="btnGetItemsInWorkflow_Click" />

                </td>
            </tr>
            <tr>
                <td>
                    <asp:Label ID="lblCount" runat="server"></asp:Label></td>
            </tr>
            <tr>
                <td colspan="4">
                    <asp:GridView ID="grdLanguageReport" CssClass="table-style-three" runat="server"></asp:GridView>
                </td>
            </tr>
        </table>
    </form>
</body>

I created the DataTable and fed in the required data into it. Converted the path to URL if an item has any renderings.

Code:

        StringBuilder sb;
        DataTable tb;
        protected override void OnLoad(EventArgs e)
        {
            base.OnLoad(e);
            if (Sitecore.Context.User.IsAuthenticated == false)
            {
                Response.Redirect("login.aspx?returnUrl=GetWorkflowItems.aspx");
            }
        }

        protected void btnGetItemsInWorkflow_Click(object sender, EventArgs e)
        {
            lblSummary.Text = "";
            try
            {
                if (!string.IsNullOrEmpty(txtWorkflowID.Text) && !string.IsNullOrEmpty(txtWorkflowStateID.Text))
                {
                    tb = new DataTable();
                    tb.Columns.Add("Item ID");
                    tb.Columns.Add("Item Path");
                    tb.Columns.Add("Item URL");

                    var db = Factory.GetDatabase("master");
                    if (db != null)
                    {
                        var workflow = db.WorkflowProvider.GetWorkflow(txtWorkflowID.Text);

                        var listofWorkflowItems = workflow.GetItems(txtWorkflowStateID.Text);
                        if (listofWorkflowItems == null || listofWorkflowItems.Count() == 0)
                        {
                            lblSummary.Text = "No Items found";
                            lblSummary.Visible = true;
                        }
                        else
                        {
                            List<string> listofItemsInTheWorkflow = new List<string>();

                            foreach (var ii in listofWorkflowItems)
                            {
                                var currentItem = db.GetItem(ii.ItemID);

                                DataRow itemRow = tb.NewRow();
                                itemRow["Item ID"] = ii.ItemID.ToString();

                                //For Item Path == Get Item ID
                                itemRow["Item Path"] = currentItem.Paths.FullPath;

                                //convert Item Path to URL
                                string getURLWithLanguage = "";
                                if (currentItem.Fields["__Renderings"] != null && currentItem.Fields["__Renderings"].ToString() != string.Empty)
                                {
                                    string urlWithLanguage = "https://www.companywebsite.com/" + ii.Language + "/";
                                    
                                    //Here you can do additional processing if needed
                                    
                                    getURLWithLanguage = currentItem.Paths.FullPath.Replace("/sitecore/content/Home/", urlWithLanguage);
                                    
                                }

                                itemRow["Item URL"] = getURLWithLanguage.ToLower();
                                tb.Rows.Add(itemRow);
                            }
                        }
                    }
                    lblCount.Text = "Total items: " + tb.Rows.Count.ToString();
                    grdLanguageReport.DataSource = tb;
                    grdLanguageReport.DataBind();
                }
            }
            catch (Exception ex)
            {
                lblSummary.Text = ex.StackTrace.ToString();
            }

There is an option to provide the Sitecore Workflow Id and State Id in the text box, and fetch the results based on it. You can add the feature to download the report into a sheet.

Another best way to get it done is using Sitecore PowerShell, if you have power to access on a required environment.

Provide the workflow state ID, find the referrence items using Get-ItemReferrer and then do the required processing. As simple as that.

$workflowStateID = Get-Item -Path master: -ID "{46DA5376-10DC-4B66-B464-AFDAA29DE84F}"
$referringItems = Get-ItemReferrer -Item $workflowStateID

#EmptyArray
$listofWorkflowItems = @()

#$listofWorkflowItems

#Skip System Items
Foreach($item in $referringItems) { 

    $itemPaths = $item.Paths.FullPath
    if($item.Paths.FullPath.contains('/sitecore/content/'))
    {
        $rendering = $item | Get-Rendering
        
        $addInList = New-Object System.Object
        $addInList | Add-Member -type NoteProperty -name ID -Value $item.ID
        $addInList | Add-Member -type NoteProperty -name Path -Value $item.FullPath
        if($rendering){
            $addInList | Add-Member -type NoteProperty -name URL -Value $item.FullPath.Replace("/sitecore/content/Home","https://www.nikkipunjabi.com")
        }
        
        $listofWorkflowItems += $addInList
    }
}

$listofWorkflowItems | Show-ListView

Output:

Hope this will help you as well if you are looking for any similar solution.

Happy Sitecoring!


Sitecore Workflow QuickStart Guide: Part-3

This series is divided into three parts:
Part 1 : Sitecore Workflow QuickStart Guide : Part-1
Part 2 : Sitecore Workflow QuickStart Guide : Part-2
Part 3 : Sitecore Workflow QuickStart Guide : Part-3In Part-2, we saw creating roles and users and assigned workflow states based on our requirement.

When the reviewer clicks the Approve command, Sitecore triggers the Validation Action, which checks that the item has no validation errors. This occurs because the Approve command includes a Validation action. The validation action will cancel the movement of the item from the Awaiting Approval state to the Approve and Publish state if it finds errors.
If the validation action finds no errors, the Approve command moves the item to the Approve and Publish state.
Let’s do practical.
We won’t allow the duplicate workflow item name allowed to be published.
So when sitecoreReviewer try to approve any ProductPublishingWorkflow item with duplicate name then the guy will get an
error and reviewer won’t be allowed to approve that item.
Now where do comments go when Editor/Reviewer/Publisher apply comments to a workflow item?
You can see comments in the History section in Review Tab.
Let me know if you face any challenges or if you have any better idea. Suggestions/Comments/Feedback are most welcome.
I am very much thankful to Brijesh Patel (www.techitpro.com), Nilesh Thakkar (www.nileshthakkar.com) and Kiran Patil (sitecorebasics.wordpress.com) for helping me out in understanding the fundas.
References:

Sitecore Workflow QuickStart Guide: Part-2

This series is divided into three parts:

Part 1 : Sitecore Workflow QuickStart Guide : Part-1
Part 2 : Sitecore Workflow QuickStart Guide : Part-2
Part 3 : Sitecore Workflow QuickStart Guide : Part-3

In Part-1 we saw creating workflow in sitecore, Now let’s create roles and users and assign workflow states to appropriate roles.

1)      Creating Roles
Its best practice to assign workflow rules to the roles and not to the users, so we will first create the roles and then assign it to users. We will create three roles.
     1)      sitecoreEditor
     2)      sitecoreReviewer
     3)      sitecorePublisher

Now as we have created roles we have to assign roles to a role for authoring a user with this particular role to login into sitecore and do some actions.
We will assign Sitecore Client Authoring to all the three roles.
Open Role Manager and follow the steps given in screenshot.
     1)      Click on sitecore\SitecoreEditor
     2)      Click on Member Of
     3)      Click on Add
     4)      Click on sitecore\Sitecore Client Authoring
     5)      Click OK
Similarly apply Sitecore Client Authoring to sitecoreReviewer and sitecorePublisher.

Additionally we need to assign Sitecore Client Publishing role to sitecorePublisher. sitecorePublisher should be able to publish items so this guy needs Sitecore Client Publishing role. sitecoreEditor and sitecoreReviewer won’t be able to publish any item of ProductPublishingWokflow workflow.

Now for each particular role we have to assign what items that particular user having these roles should be able to access or perform actions.
It’s good to assign access on roles rather than on user because in future if you need to create multiple user who must be able to perform similar actions than it would be easy to create by just assigning the role.
By default Read access is assigned to all the roles.
In my case MySearch is the root item and child items are in workflow. Child item’s template is MyItem template as shown in figure above to whom we have assigned the workflow in standard values items.
Here we are assigning Read and Create access to MySearch Item and Read, Write, Rename, Create and Delete access to Descendants (Sub Items / Child Items).
Similarly we assign Read, Write access to sitecoreReviewer role.
Publisher can approve/reject and publish the items, once publisher approves the item, it will be moved to Done state and it will be automatically published. So similarly provide read/write access as in sitecoreReviewer role to sitecorePublisher role.  We already have given an additional role to publisher for publishing the items so publisher can publish the items that are moved Done state incase if the item is in workflow.
Now the very important thing is we have to give proper access of workflow States to these three roles.
Let’s do step by step. First assign it to sitecoreEditor
Ok now sitecoreEditor should only be able to create, edit and submit item to reviewer so we have to assign workflow states accordingly. sitecoreEditor should not be able to Approve or Publish Items. We have already assigned security settings to ProductsPublishingWorkflow and its Descendants. So Draft State is by default applied to the sitecoreEditor. Now we have to deny read access to Awaiting Approval, Approve and Publish and Done states from sitecoreEditor roles
Similarly sitecoreReviewer should not be able to create or submit item. It should only be able to approve or reject items.
sitecoreReviewer needs Awaiting Approval State access so we already have assigned it to Workflow and its descendants so it is by default applied to Awaiting Approval state. No need to assign or deny anything to Awaiting Approval state for sitecoreReviewer.
Remove Draft, Done, Approve and Publish states access from sitecoreReviewer as reviewer is not allowed to so.
And similarly for sitecorePublisher. Sitecore Publisher won’t be able to create item. It can only approve item for publish or reject item. So we have to deny read access for Awaiting Approval and Draft State.
2)      Creating Users
Now we will create three users and assign these three roles respectively.
     1)      WebsiteEditor
     2)      WebsiteReviewer
     3)      WebsitePublisher
 
Refer this link to know how to create new roles [pg. 29] and how to create new users [pg. 15].
While creating user you will get an option to assign the roles to each user so assign the appropriate roles i.e. WebsiteEditor user will have sitecoreEditor role, WebsiteReviewer user will have sitecoreReviewer role and WebsitePublisher user will have sitecorePublisher role respectively.
Refer below screen to create a user and assigning roles.
That’s it. We are done.
You can now test it with different users.
Continued in Part-3.

Sitecore Workflow QuickStart Guide: Part-1

This series is divided into three parts:
Part 1 : Sitecore Workflow QuickStart Guide : Part-1
Part 2 : Sitecore Workflow QuickStart Guide : Part-2
Part 3 : Sitecore Workflow QuickStart Guide : Part-3

Workflow in sitecore ensures that items move through a predefined set of states ­­­­before they are publishable, usually, it’s to ensure that content is reviewed appropriately before publishing on the live website.
Important things to consider in workflow are

1)      State
2)      Command
3)      Action

  • States are building blocks of the workflow. It represents steps in the workflow.
  • Commands allows users to transition content items from one state to another.
  • Actions automate functions in the workflow.

We will assign workflow to item template’s standard values so all the items that are published based on that template enters into the workflow which has to be followed.

In real scenario content item is created by one user it is then submitted and reviewed by another user, who will approve which will change the state to Approved then finally the publisher will approve and publish the item.
Workflow_1
Workflow Item follows ERP Formula.
Editor Reviewer Publisher
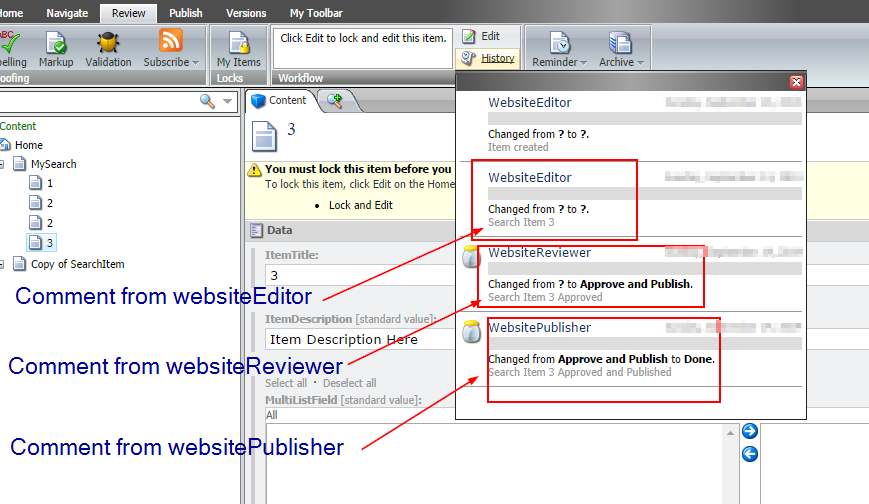
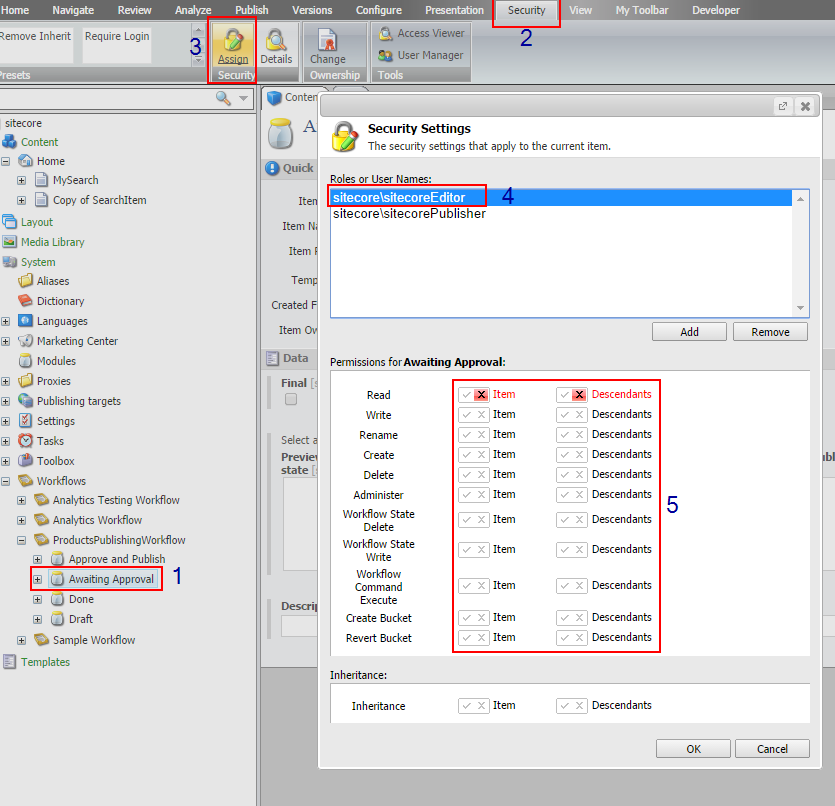
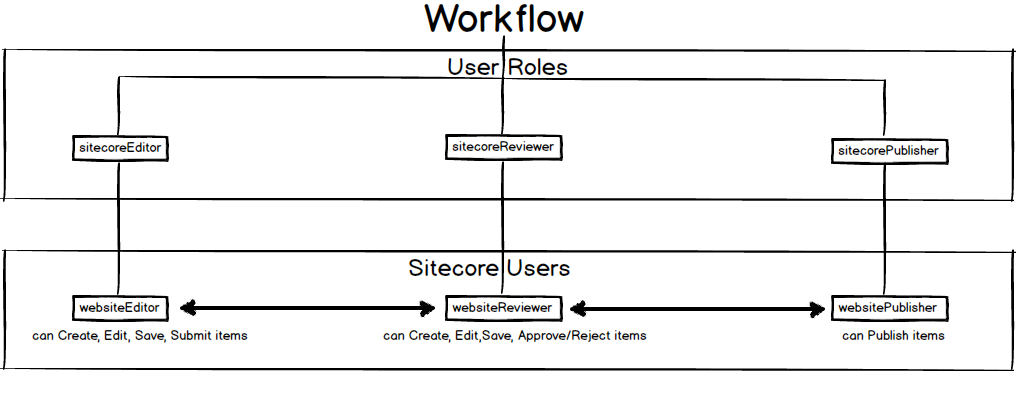
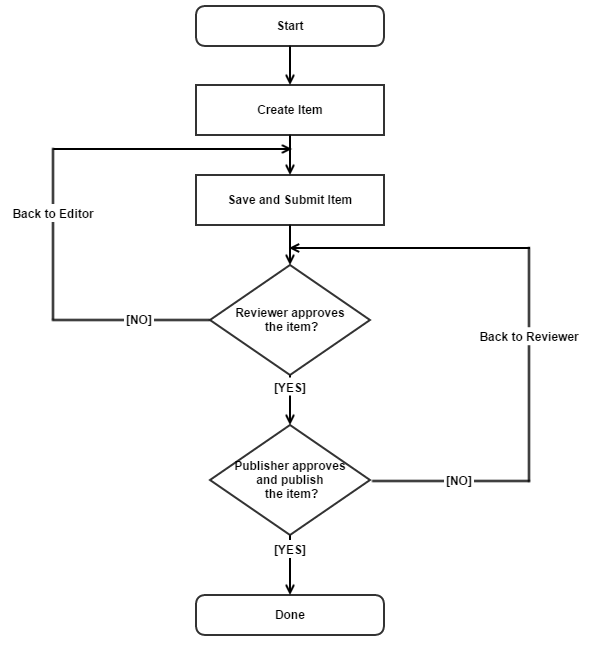
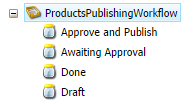
Editor creates item. Reviewer Approves item or Reject item.
If Item is rejected by reviewer then it will go back to Editor. If reviewer approves item it will then be in Approve and Publish state and can be approved and published by Publisher.
At the end we should have the following workflow implementation in sitecore:
1)      Creating workflow
Create a workflow using /sitecore/System/Workflows/ and enter the name
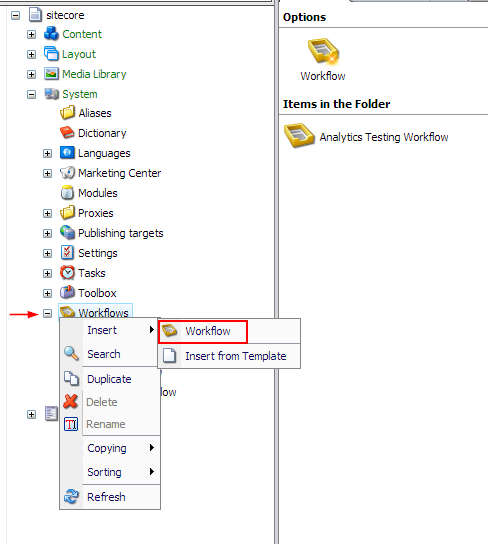
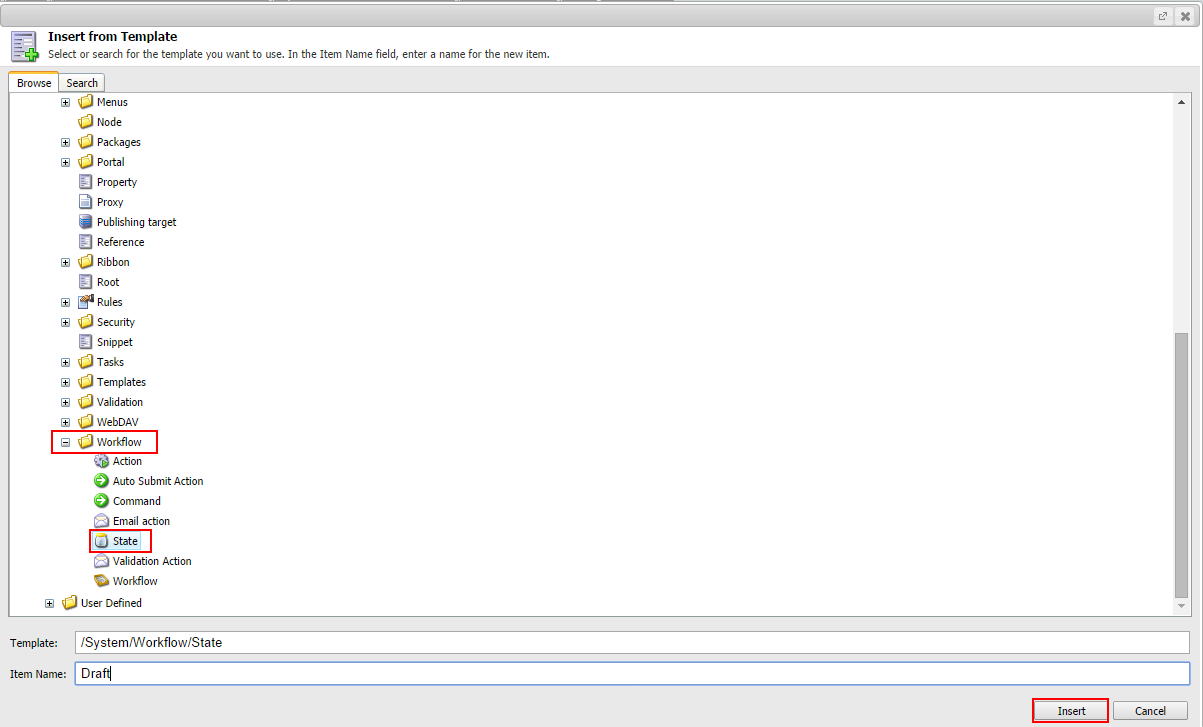
Before assigning the initial state to this workflow, we first have to create the state.
2)      Creating Workflow States
For that select workflow definition item and the select Insert from Template command and create the new workflow state using the /System/Workflow/State template.
Call the first state “Draft”.
 
Creating_Workflow_2_1
Similarly create three more workflow states –Awaiting Approval, Approve and Publish, Done.
It’s up to the requirement whether you have to create two levels or three of workflow. Here we will look at three levels of workflow where in as sitecore item reaches its final state i.e. Done then it will Auto Publish to Web Database.
At the end of this step you should have the following:
Sitecore_Workflow_2_2
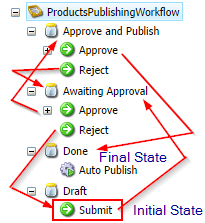
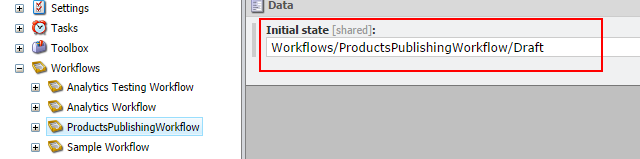
Now let’s set the Initial State as a Draft.
3)      Creating Workflow Commands
To add command to a workflow
state:
Creating_Workflow_Commands_3_1


Creating_Workflow_Commands_3_2
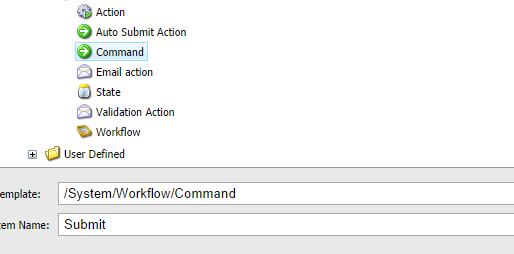
Create commands as shown in below diagram.
Creating_Workflow_Commands_3_3


Note: You can give any valid name to commands. Commands will appear to user. For example here publisher will have access to Approve and Publish State where we have provided Approve and Reject options, instead you can provide Approve and Publish or Reject.

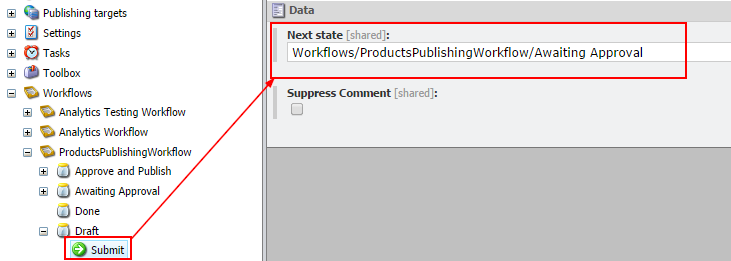
Now let’s set the transition from one state to another with the help of commands.
Click on Submit Command in Draft State and set the Next State to Awaiting Approval State.


Creating_Workflow_Commands_3_4

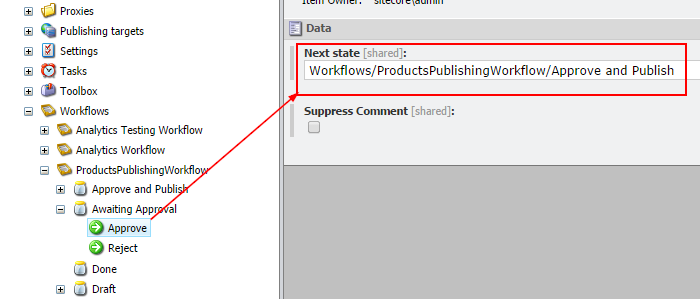
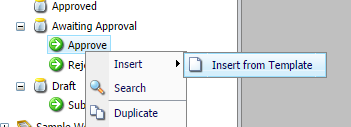
Similarly select Approve in Awaiting Approval and set the Next State to Approve and Publish.

Creating_Workflow_Commands_3_5
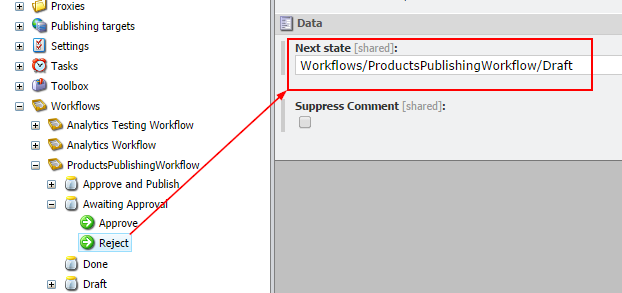
Select – Reject in Awaiting Approval State and set the Next State to Draft.
Creating_Workflow_Commands_3_6
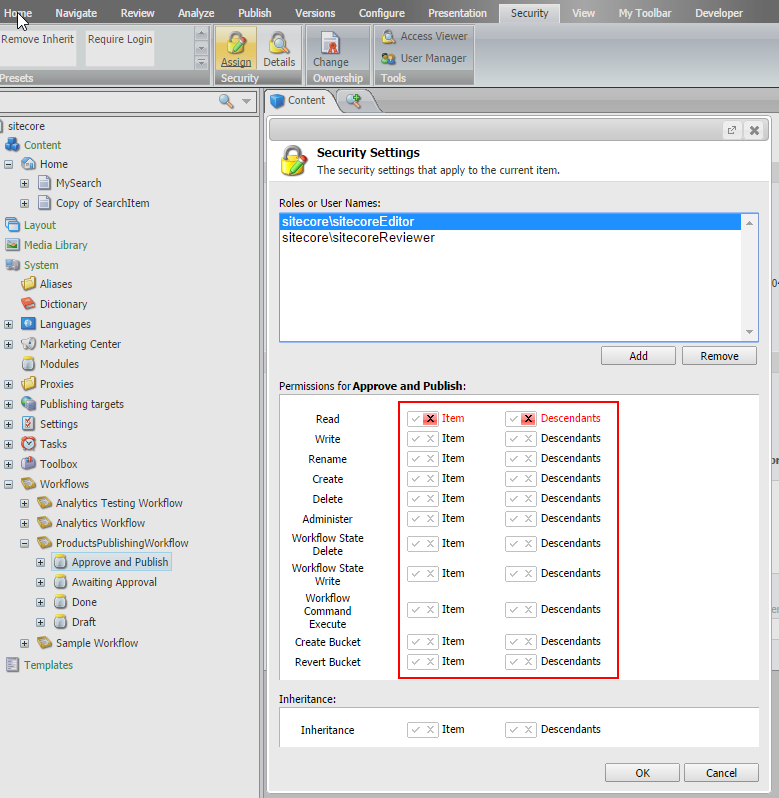
Similarly from Approve and Publish state Approve Command will point the Next state as Done and Reject Command will point the Next State to Awaiting Approval State.
 
Note: Suppress Comment: This checkbox defines whether or not users are prompted to enter a comment when a workflow command is executed. If the checkbox is cleared, users are prompted. If the checkbox is selected, users are not prompted.
4)      Creating Workflow Actions
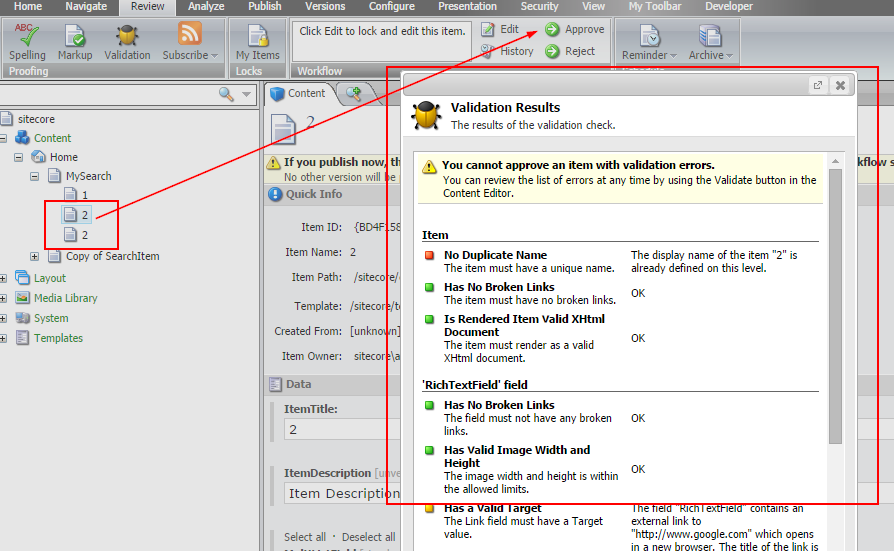
a.       Validation Actions
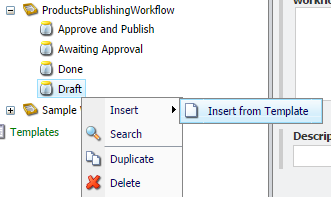
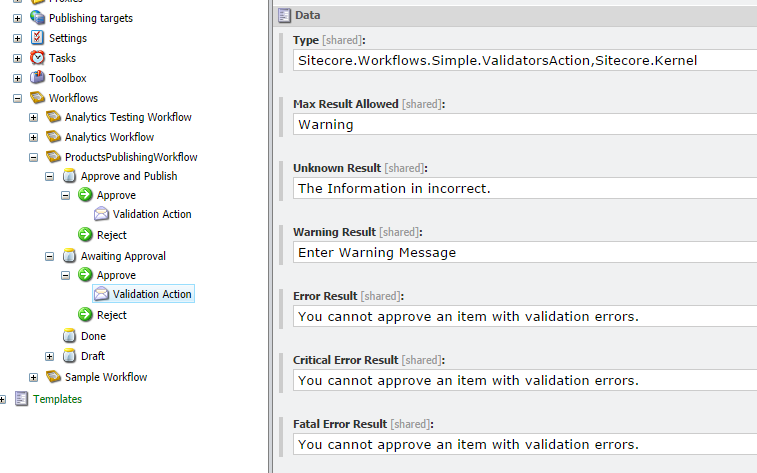
Select Approve Workflow Command, Right click and select Insert from Template Command and create the new workflow action using /System/Workflow/Validation Action template. Call the new command “Validation Action”.
Creating_Workflow_Actions_4_1
Creating_Workflow_Actions_4_2
You will get the below screen. Enter the following information in Fields.
Type Field: Sitecore.Workflows.Simple.ValidatorsAction,Sitecore.Kernel.
Max Result Allowed: Warning
The maximum response from the validator.
The possible values are:
Unknown
Valid
Suggestion
Warning
Error
CriticalError
FatalError
If the value of this field is “Error”, then items which have errors will pass, but the items which have critical errors will not pass.
Fill the error results with proper error messages that you want a user to see in case of validation errors.
Similarly add Validation Action at Approve in Approve and Publish State.
 
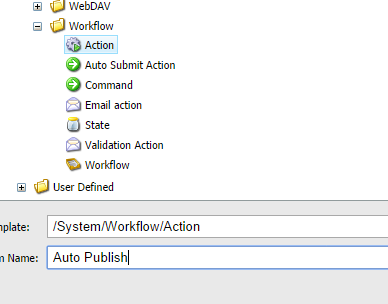
b.       Auto Publish Action
 
 
The data section of this workflow action contains the following fields:
Type:
The namespace.class, assembly name of the implementation class.
            For Example: Sitecore.Workflows.Simple.PublishAction, Sitecore.Kernel
Parameters:
The deep parameter that specifies whether or not the child items should be
published.
                deep=1
— publish children
                deep=0
— do not publish children
                related=1
— publish children (Sitecore 7.2 onwards)
 
 
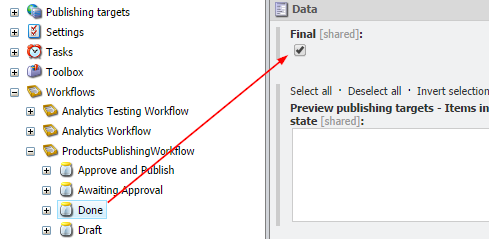
5)      Defining Workflow Final State
Select the state which is supposed to be the final state in workflow and select the Final Checkbox in the Data field:
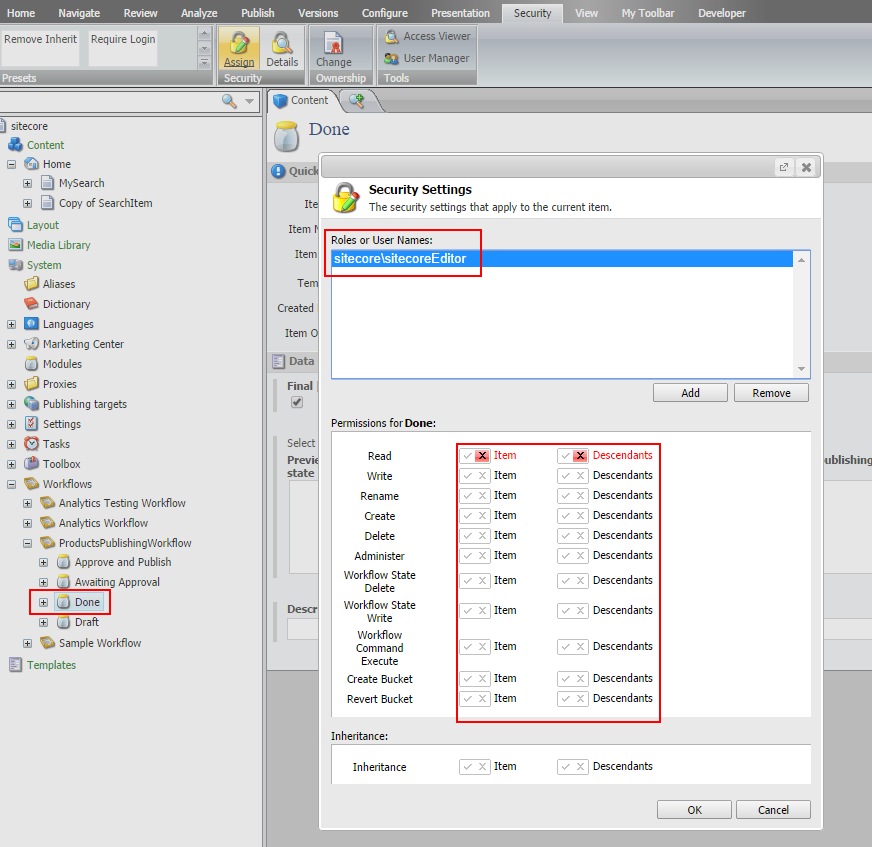
Only those items which are approved by publisher in Approve and Publish state will move on to Done State of workflow and it will be published automatically.
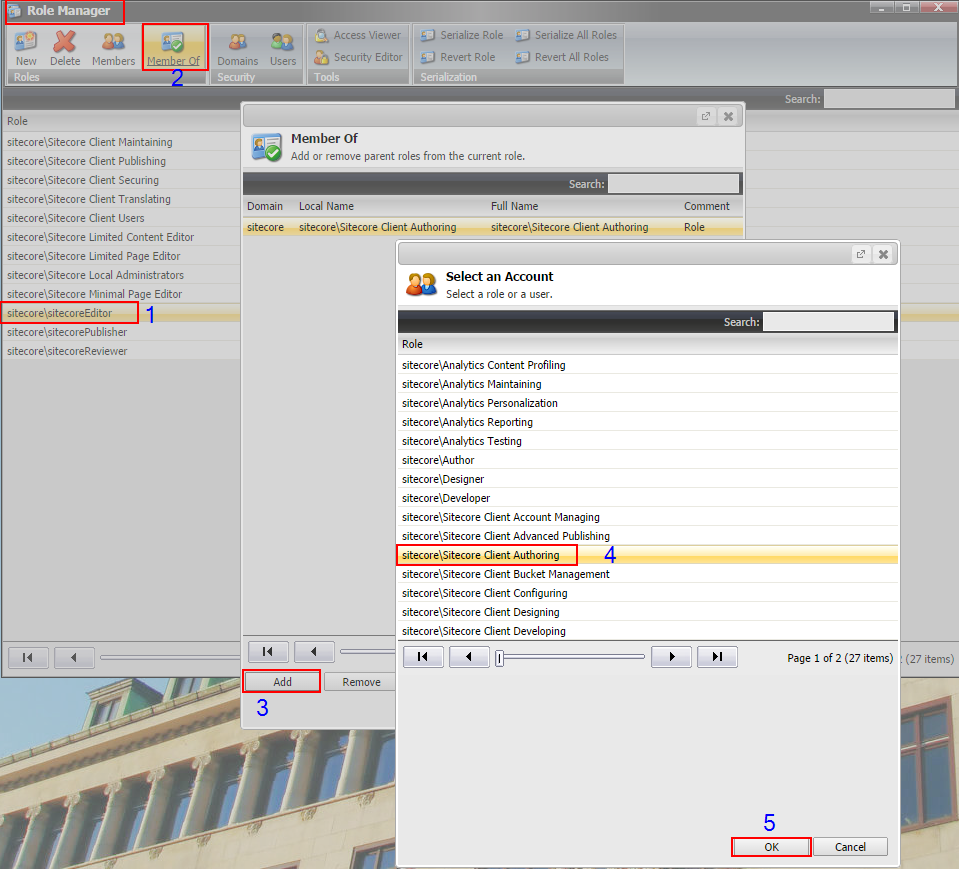
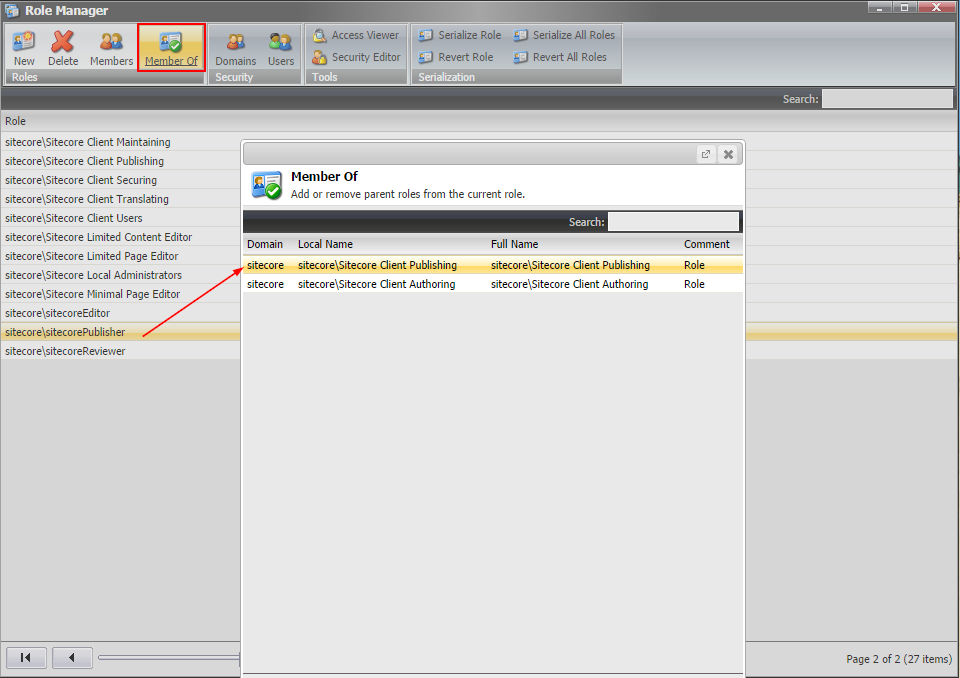
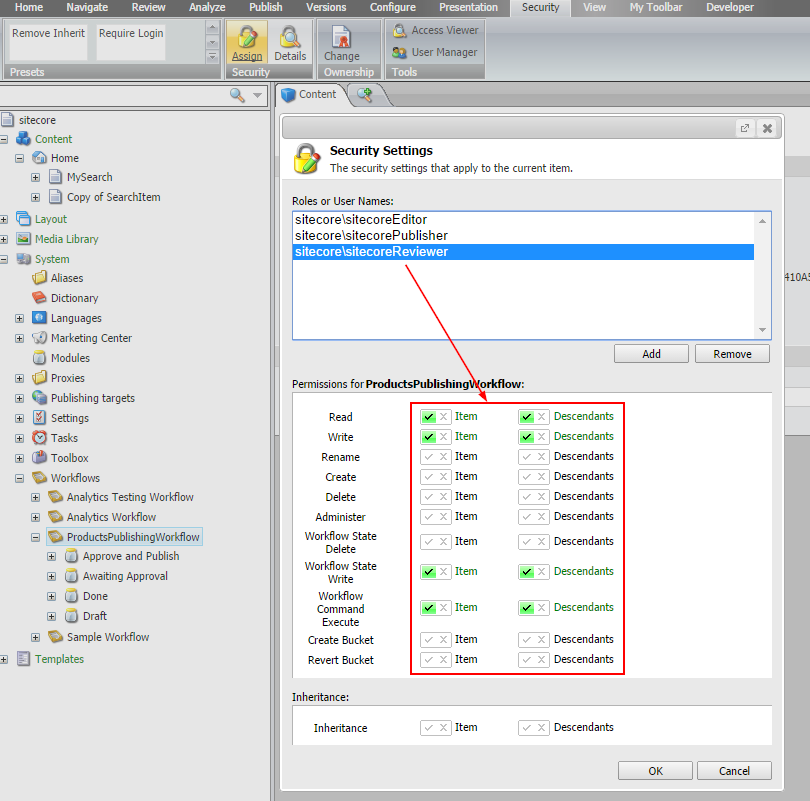
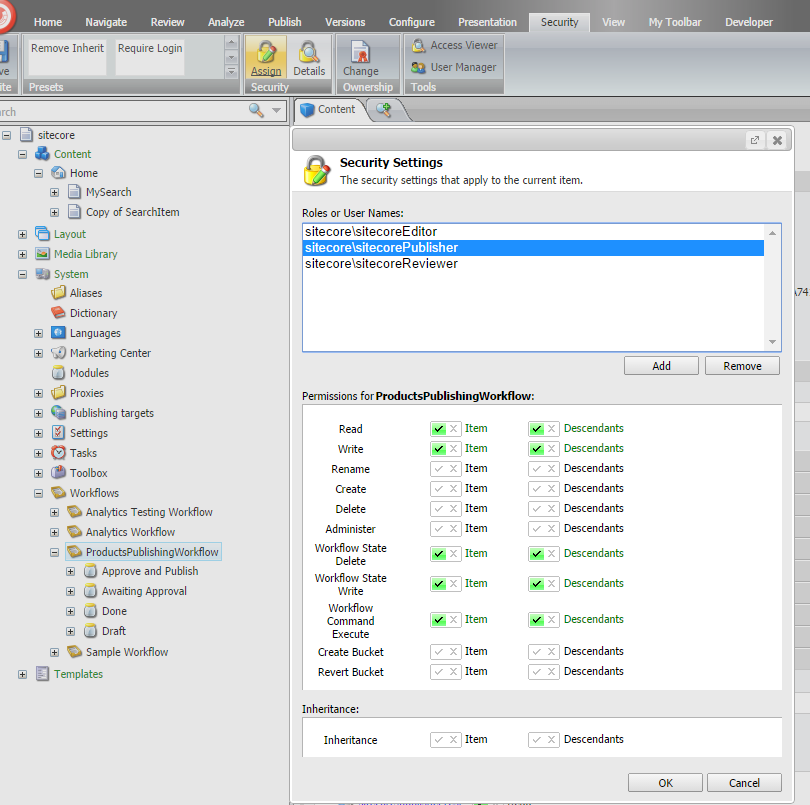
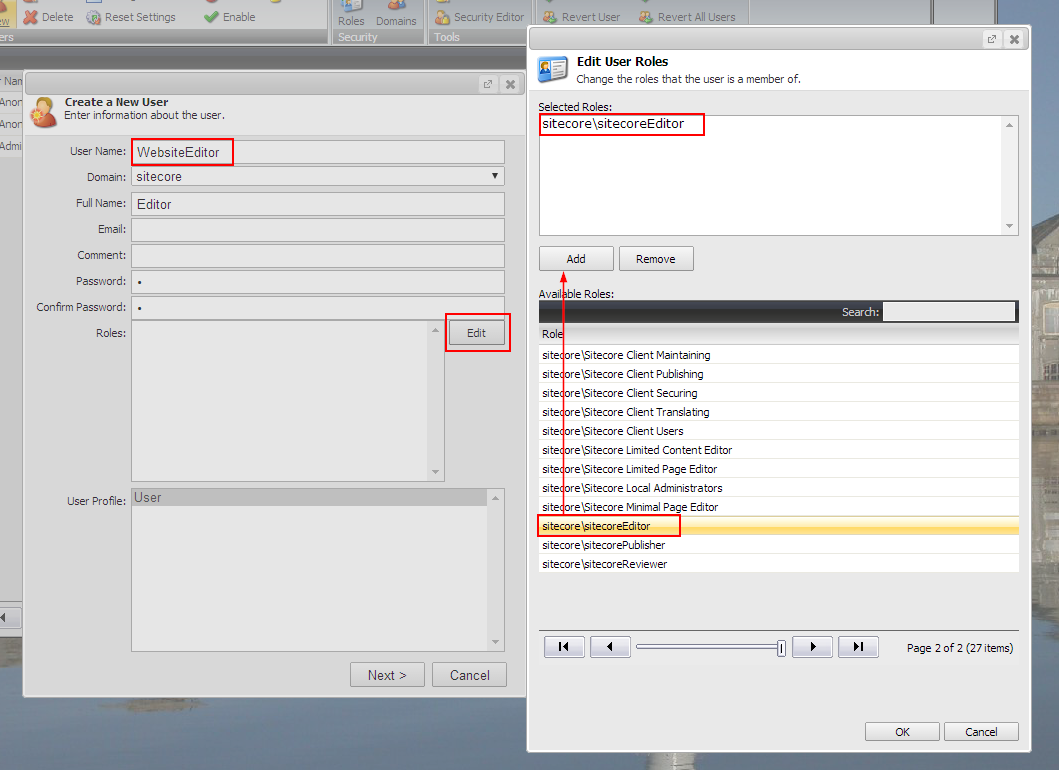
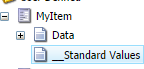
6)      Assigning workflow to a Template
It is always the best practice to assign the workflow to the standard values item of a template.
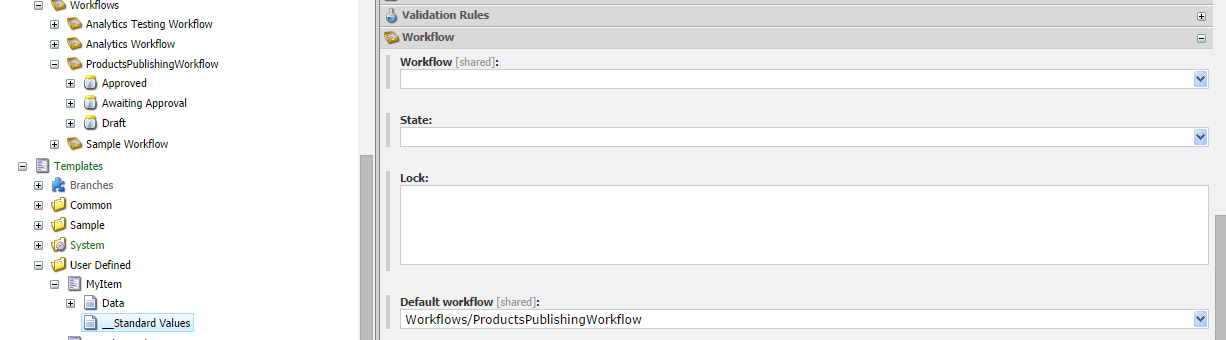
Select the Standard Fields Checkbox.
Leave the Workflow and the State field’s blank, as they will be filled automatically upon the item creation basing on the workflow settings. Leave the Lock field as it is.
Save the template and now it is ready to use with workflow support. First phase of creating a workflow is complete.
Now let’s see how to use workflow for creating-reviewing-publishing items in Part-2