Sitecore works best for storing users and custom user profile properties for a user. It works based on .Net Security Mechanism. Custom profile properties are very much useful when you need to store information of a user which you need to be available throughout the system. It can be accessed anytime. No need for doing database transactions for the values which are stored as a custom property for a user. It can be used to store values for a user like Full Name, Birthdate, Gender, etc.
Category: Sitecore
Migrate Visual Studio Solution from SVN to TFS
I love to work on Microsoft Technologies and while working with them recently we got a challenge to migrate our project from SVN to TFS. So I would be discussing about:
1) How to migrate visual studio solution from SVN to TFS.
2) Different approaches for migration
3) Challenges faced during migrating our solution.
As it is our basic approach to first always search on google and do some analysis and research before doing any such task, similar way we did and found two approaches – Manual and Automated.
SVN2TFS.EXE – (Automated) we didn’t dig much also read few comments by which we got unhappy.
Sitecore Smart HTML Cache Clearance
Hello, Folks, I hope you are all doing well.
Smart HTML Cache clearance – As the name suggests it clears HTML Cache for a site in a smarter way.
In Sitecore Content tree if you are building a site for two or more different countries/regions and as you publish any content in any of the sites that you can observe via Cache.aspx that HTML Cache for each site gets cleared. Which should not happen.
So in order to achieve this goal, I did analysis and found that we have to override the default implementation of cache clearance when we publish any item in the content tree. But what if we publish any template or media item or anything other than content than at that time whole HTML cache should get clear. Also when we publish the whole site at that time HTML cache for all the sites should get clear. Smart HTML Cache Clearance will handle all the scenarios efficiently and accurately when you publish any item on local or on remote site. Also when it needs to clear the entire HTML Cache for all the sites than the default implementation, as written by Sitecore, will handle our job.
So whenever we face such challenges we google it, so similarly I did and found the blog of Mark Stiles ( https://markstiles.net/Blog/2011/05/26/partial-html-cache-clearing.aspx ), which helped me to achieve the objective but that was for remote publishing, what if Sitecore is enabled on the production server? Or what if we want to test it in local? So for that, I tried to modify the code and got the solution.
Step 1: Create a class called SmartHtmlCacheClearer in your library.
public class SmartHtmlCacheClearer
    {
        #region Fields
        private readonly ArrayList _sites = new ArrayList();
        #endregion
        #region Properties
        public ArrayList Sites
        {
            get
            {
                return this._sites;
            }
        }
        #endregion
        #region Methods

        /// This method is called when publish:end or publish:end:remote events are triggered.
        public void ClearCache(object sender, EventArgs args)
        {
            Assert.ArgumentNotNull(sender, "sender");
            Assert.ArgumentNotNull(args, "args");
            try
            {
                Database database = null;
                Guid emptyGuid = Guid.Empty;
                //This will run on the local targets
                if (args.GetType().ToString().Equals("Sitecore.Events.SitecoreEventArgs",StringComparison.InvariantCultureIgnoreCase))
                {
                    SitecoreEventArgs eventArgs = (SitecoreEventArgs)args;
                    if (eventArgs.Parameters != null)
                    {
                        var publishOptions = ((Sitecore.Publishing.Publisher)(eventArgs.Parameters[0])).Options;
                        database = Factory.GetDatabase(publishOptions.TargetDatabase.Name);
                        ClearHtmlCache(database, publishOptions.RootItem != null ? publishOptions.RootItem.ID.ToGuid() : emptyGuid);
                    }
                }
                //THIS WILL RUN ON THE REMOTE TARGETS
                if (args.GetType().ToString().Equals("Sitecore.Data.Events.PublishEndRemoteEventArgs", StringComparison.InvariantCultureIgnoreCase))
                {
                    PublishEndRemoteEventArgs remoteEventArgs = (PublishEndRemoteEventArgs)args;
                    database = Sitecore.Configuration.Factory.GetDatabase(remoteEventArgs.TargetDatabaseName);
                    ClearHtmlCache(database, remoteEventArgs.RootItemId != null ? remoteEventArgs.RootItemId : emptyGuid);
                }
            }
            catch (Exception ex)
            {
                Log.Error("Error while Clearing HTML Cache : " + ex.Message, this);
            }
        }

        /// This method will verify that whether to clear the HTML cache for any particular site or for all sites and it will also clear the HTML Cache for particular site if verfication is for particular site.
        private void ClearHtmlCache(Database database, Guid ItemGuid)
        {
            if (database != null)
            {
                Item currentItem = database.GetItem(new ID(ItemGuid));
                if (currentItem != null)
                {
                    Item startItem = currentItem.HomeItem();
                    //If startItem is not Site Root item then we will clear full HTML caches
                    if (startItem != null && startItem.TemplateID.ToString().Equals(TemplateIdHelper.TemplateIds.SiteRoot, StringComparison.InvariantCultureIgnoreCase))
                    {
                        bool isSiteHTMLCacheCleared = false;
                        var siteInfo = currentItem.GetSiteInfo();
                        SiteContext siteContext = Factory.GetSite(siteInfo.Name);
                        Log.Info("SmartHtmlCacheClearer started clearing HTML cache of " + siteInfo.Name + " site.", this);
                        if (siteContext != null)
                        {
                            HtmlCache htmlCache = CacheManager.GetHtmlCache(siteContext);
                            if (htmlCache != null)
                            {
                                htmlCache.Clear(true);
                                isSiteHTMLCacheCleared = true;
                            }
                        }
                        if (isSiteHTMLCacheCleared)
                            Log.Info("SmartHtmlCacheClearer successfully cleared HTML cache of " + siteInfo.Name + " site.", this);
                        else
                            Log.Info("SmartHtmlCacheClearer failed while clearing HTML cache of " + siteInfo.Name + " site.", this);
                    }
                    else
                    {
                        //If startItem is anything other than Content Item (e.g. Template Item or Media Library Item) than clear HTML Cache for all sites.
                        ClearFullCache();
                    }
                }
                else
                {
                    //If currentItem is null. It means user selected Publish Site option.
                    //Clear Full HTML Cache
                    ClearFullCache();
                }
            }
            else
            {
                Log.Warn("SmartHtmlCacheClearer Failed as Target Database is null.", this);
            }
        }

        /// This method will clear the Full HTML Cache
        private void ClearFullCache()
        {
            Log.Info("SmartHtmlCacheClearer clearing HTML caches for all sites (" + this._sites.Count + ").", this);
            for (int iIndex = 0; iIndex < this._sites.Count; iIndex++)
            {
                string siteName = this._sites[iIndex] as string;
                if (siteName != null)
                {
                    SiteContext site = Factory.GetSite(siteName);
                    if (site != null)
                    {
                        HtmlCache htmlCache = CacheManager.GetHtmlCache(site);
                        if (htmlCache != null)
                        {
                            htmlCache.Clear();
                        }
                    }
                }
            }
            Log.Info("SmartHtmlCacheClearer done.", this);
        }
        #endregion
    }
Step 2: Replace publish:end and publish:end:remote handler to refer the SmartHtmlCacheClearer class in web.config
Now we have to add the reference to this class to the events section in web.config file and allow Sitecore to execute this code instead of Sitecore default code.
We just have to modify the handler for publish:end and publish:end:remote.
 <handler method="ClearCache" type="ABC.WCMS.Extensions.Pipelines.PublishItem.SmartHtmlCacheClearer, ABC.WCMS.Extension"></handler>
 <handler method="ClearCache" type="ABC.WCMS.Extension.Pipelines.PublishItem.SmartHtmlCacheClearer, ABC.WCMS.Extension"></handler>
That’s it.
Note: Please specify the exact method name in handler which should be executed.
Happy Sitecoring.!
Sitecore Workflow QuickStart Guide: Part-3
This series is divided into three parts:
Part 1 : Sitecore Workflow QuickStart Guide : Part-1
Part 2 : Sitecore Workflow QuickStart Guide : Part-2
Part 3 : Sitecore Workflow QuickStart Guide : Part-3In Part-2, we saw creating roles and users and assigned workflow states based on our requirement.
Part 2 : Sitecore Workflow QuickStart Guide : Part-2
Part 3 : Sitecore Workflow QuickStart Guide : Part-3In Part-2, we saw creating roles and users and assigned workflow states based on our requirement.
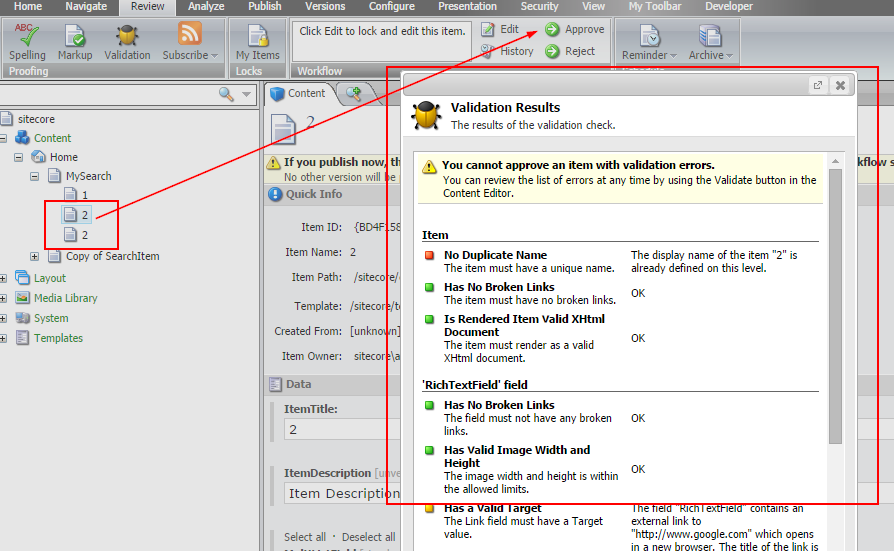
When the reviewer clicks the Approve command, Sitecore triggers the Validation Action, which checks that the item has no validation errors. This occurs because the Approve command includes a Validation action. The validation action will cancel the movement of the item from the Awaiting Approval state to the Approve and Publish state if it finds errors.
If the validation action finds no errors, the Approve command moves the item to the Approve and Publish state.
Let’s do practical.
We won’t allow the duplicate workflow item name allowed to be published.
So when sitecoreReviewer try to approve any ProductPublishingWorkflow item with duplicate name then the guy will get an
error and reviewer won’t be allowed to approve that item.
error and reviewer won’t be allowed to approve that item.
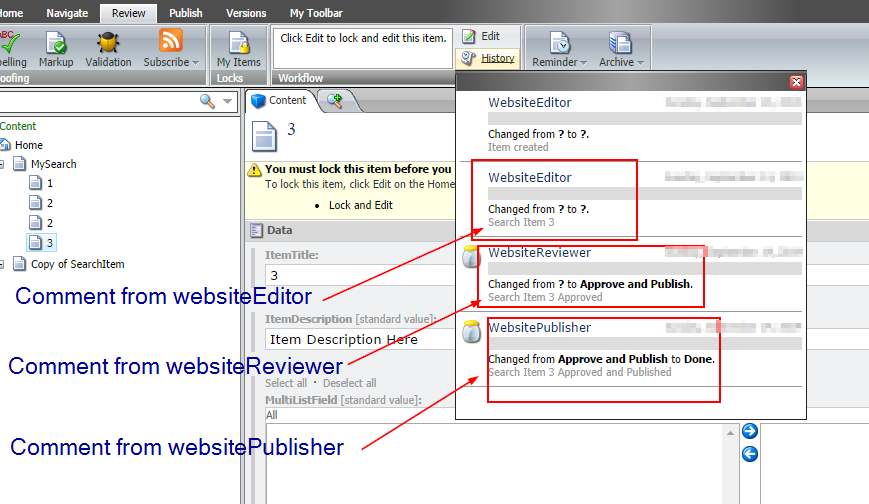
Now where do comments go when Editor/Reviewer/Publisher apply comments to a workflow item?
You can see comments in the History section in Review Tab.
Let me know if you face any challenges or if you have any better idea. Suggestions/Comments/Feedback are most welcome.
I am very much thankful to Brijesh Patel (www.techitpro.com), Nilesh Thakkar (www.nileshthakkar.com) and Kiran Patil (sitecorebasics.wordpress.com) for helping me out in understanding the fundas.
References:
Sitecore Workflow QuickStart Guide: Part-2
This series is divided into three parts:
Part 1 : Sitecore Workflow QuickStart Guide : Part-1
Part 2 : Sitecore Workflow QuickStart Guide : Part-2
Part 3 : Sitecore Workflow QuickStart Guide : Part-3
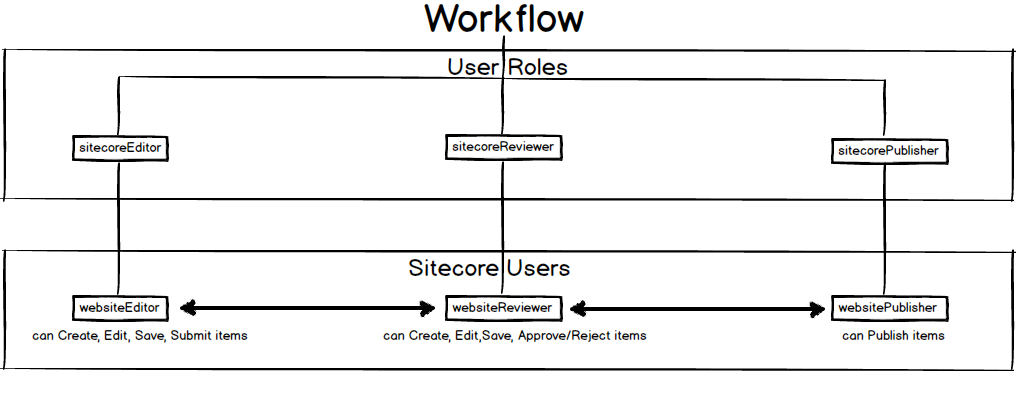
In Part-1 we saw creating workflow in sitecore, Now let’s create roles and users and assign workflow states to appropriate roles.
1) Creating Roles
Its best practice to assign workflow rules to the roles and not to the users, so we will first create the roles and then assign it to users. We will create three roles.
1) sitecoreEditor
2) sitecoreReviewer
Now as we have created roles we have to assign roles to a role for authoring a user with this particular role to login into sitecore and do some actions.
We will assign Sitecore Client Authoring to all the three roles.
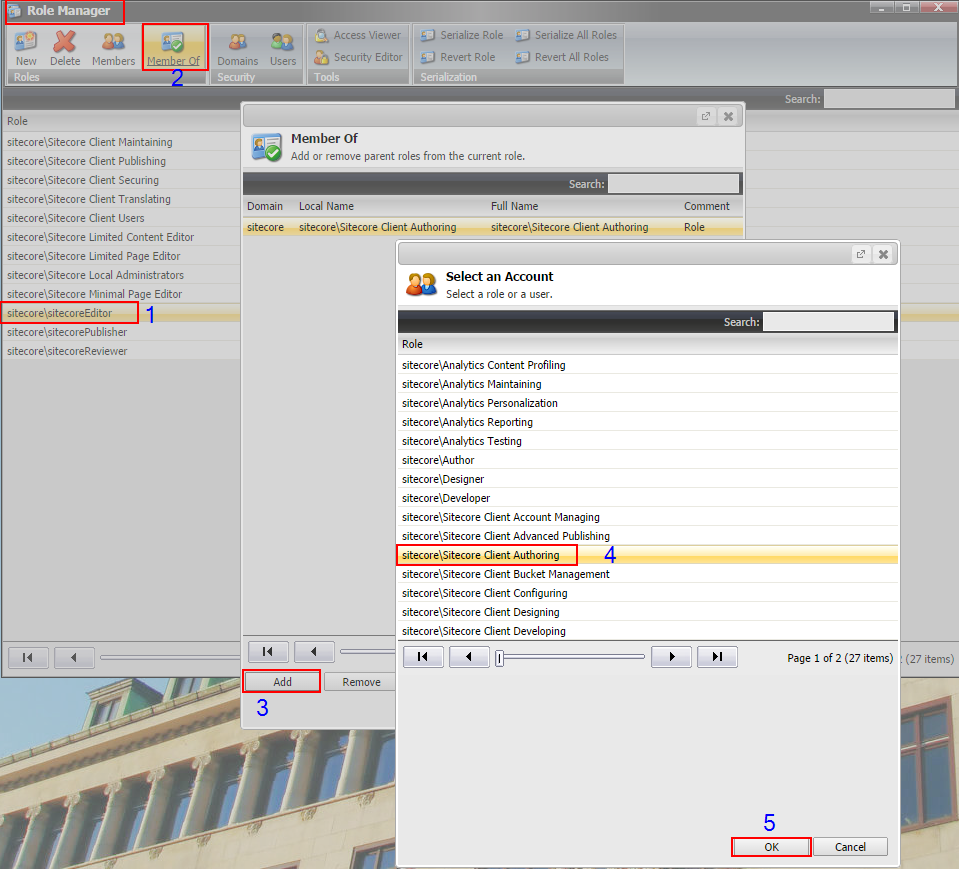
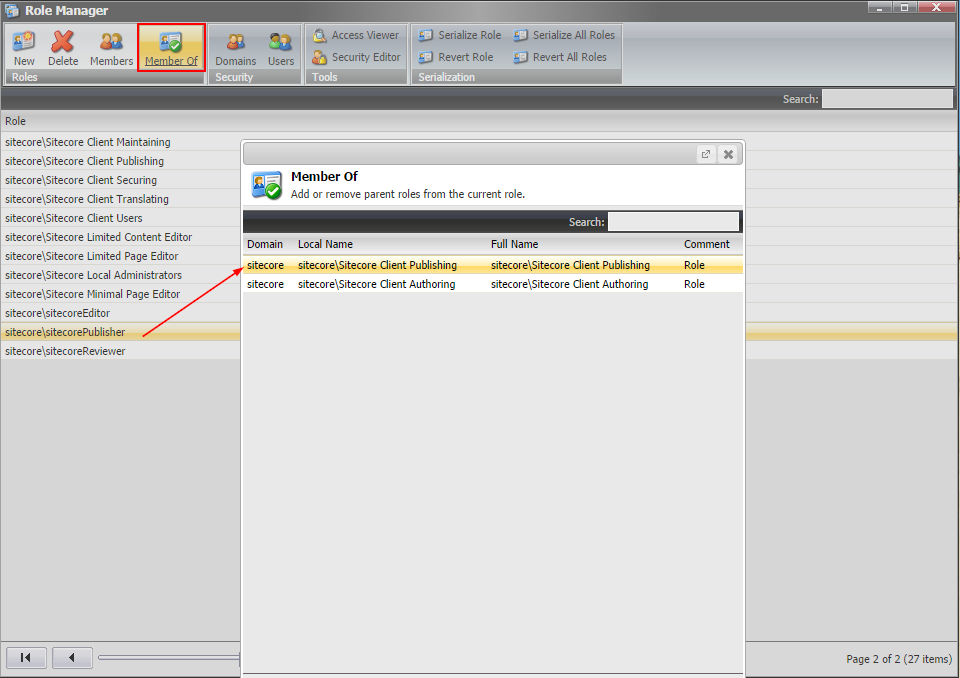
Open Role Manager and follow the steps given in screenshot.
Open Role Manager and follow the steps given in screenshot.
1) Click on sitecore\SitecoreEditor
2) Click on Member Of
3) Click on Add
4) Click on sitecore\Sitecore Client Authoring
5) Click OK
Similarly apply Sitecore Client Authoring to sitecoreReviewer and sitecorePublisher.
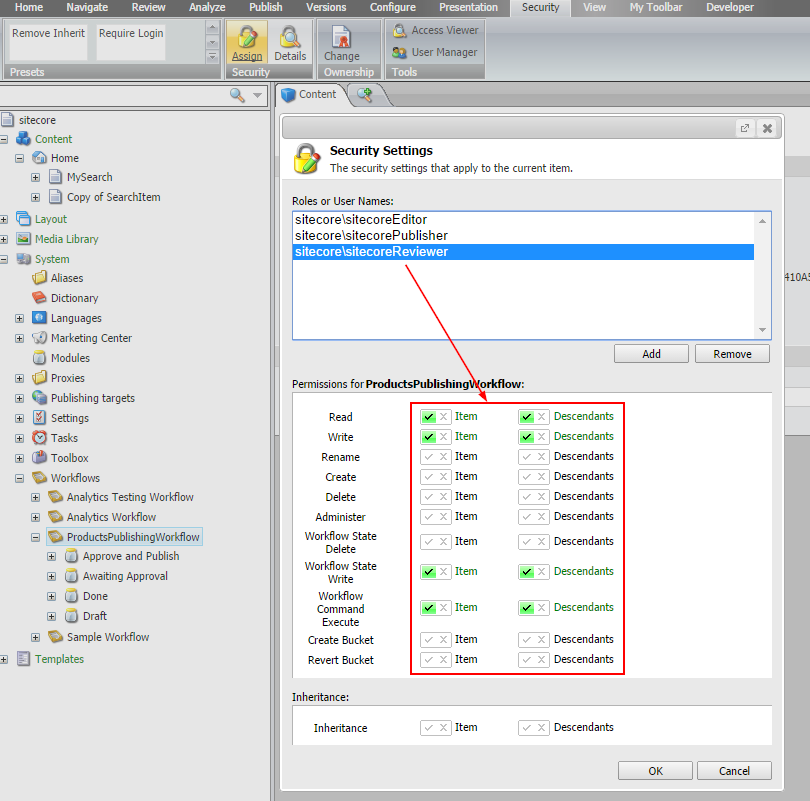
Additionally we need to assign Sitecore Client Publishing role to sitecorePublisher. sitecorePublisher should be able to publish items so this guy needs Sitecore Client Publishing role. sitecoreEditor and sitecoreReviewer won’t be able to publish any item of ProductPublishingWokflow workflow.
Now for each particular role we have to assign what items that particular user having these roles should be able to access or perform actions.
It’s good to assign access on roles rather than on user because in future if you need to create multiple user who must be able to perform similar actions than it would be easy to create by just assigning the role.
By default Read access is assigned to all the roles.
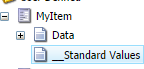
In my case MySearch is the root item and child items are in workflow. Child item’s template is MyItem template as shown in figure above to whom we have assigned the workflow in standard values items.
In my case MySearch is the root item and child items are in workflow. Child item’s template is MyItem template as shown in figure above to whom we have assigned the workflow in standard values items.
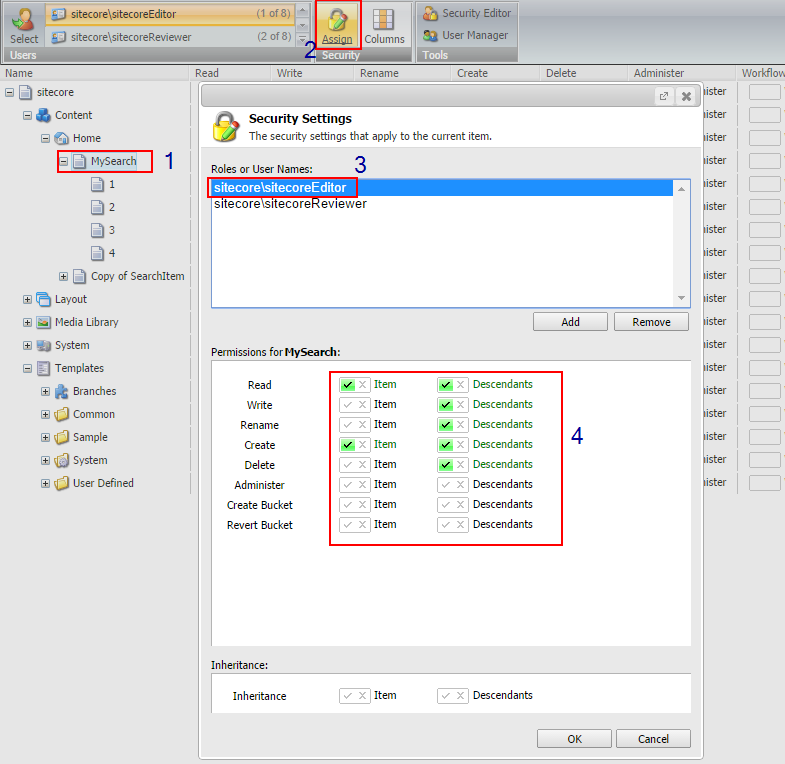
Here we are assigning Read and Create access to MySearch Item and Read, Write, Rename, Create and Delete access to Descendants (Sub Items / Child Items).
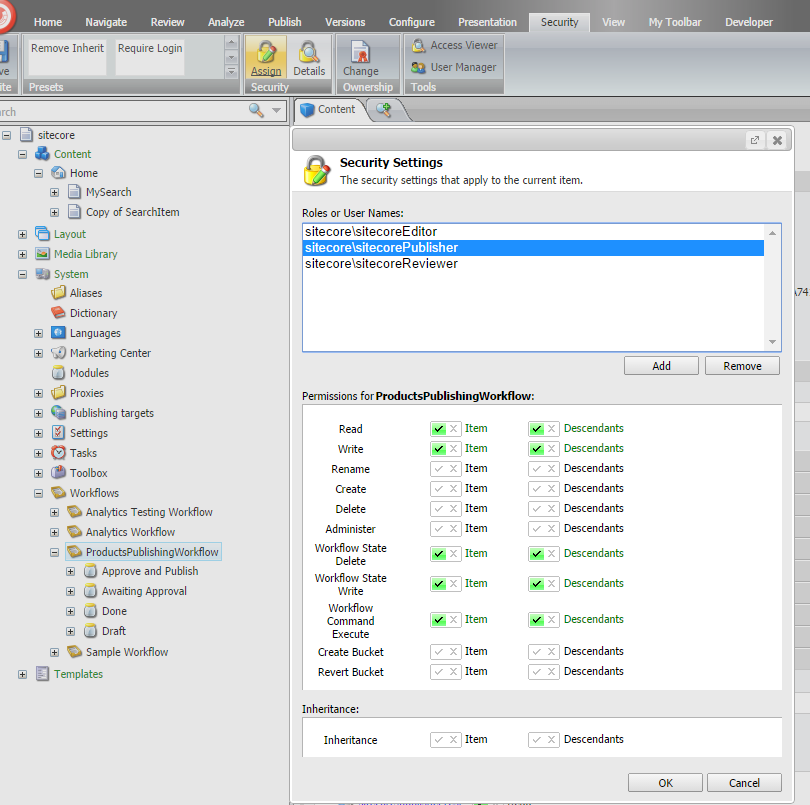
Similarly we assign Read, Write access to sitecoreReviewer role.
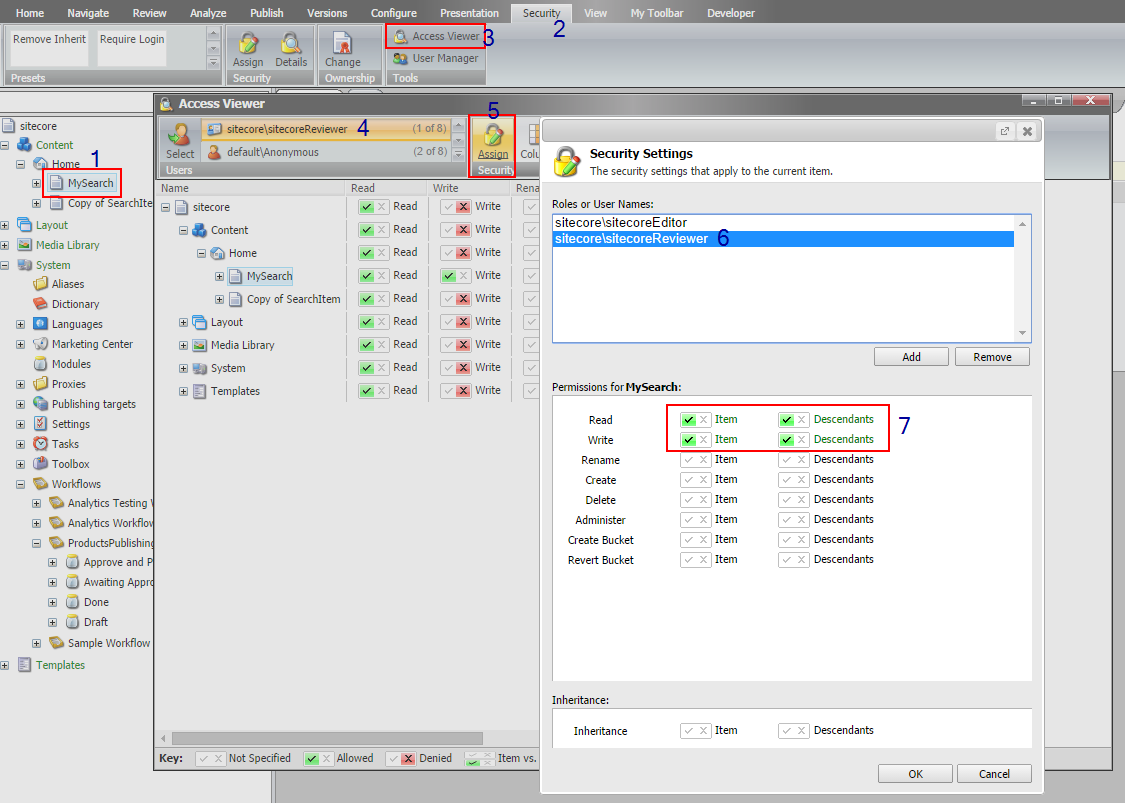
Publisher can approve/reject and publish the items, once publisher approves the item, it will be moved to Done state and it will be automatically published. So similarly provide read/write access as in sitecoreReviewer role to sitecorePublisher role. We already have given an additional role to publisher for publishing the items so publisher can publish the items that are moved Done state incase if the item is in workflow.
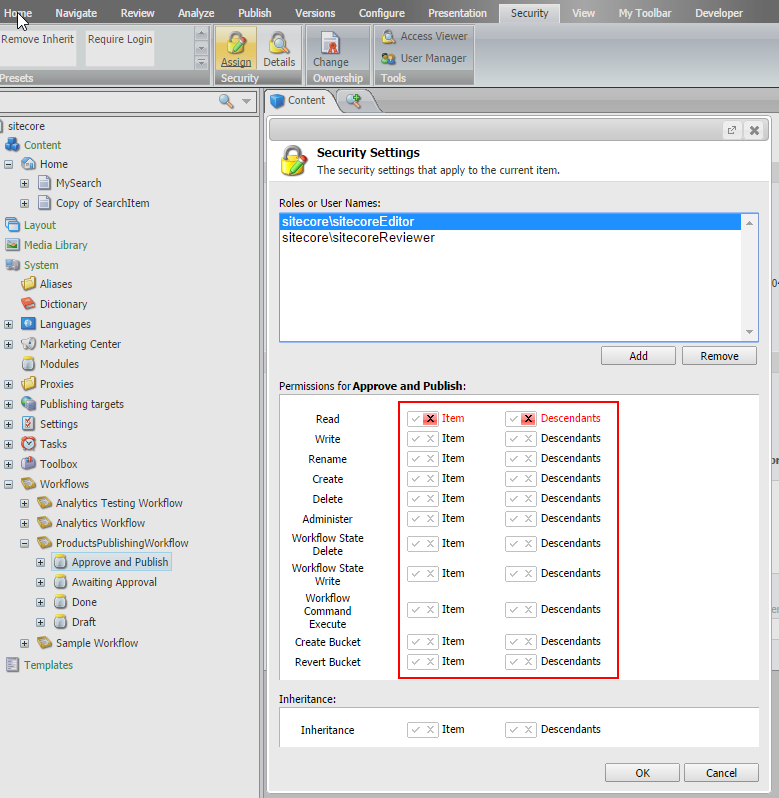
Now the very important thing is we have to give proper access of workflow States to these three roles.
Let’s do step by step. First assign it to sitecoreEditor

Ok now sitecoreEditor should only be able to create, edit and submit item to reviewer so we have to assign workflow states accordingly. sitecoreEditor should not be able to Approve or Publish Items. We have already assigned security settings to ProductsPublishingWorkflow and its Descendants. So Draft State is by default applied to the sitecoreEditor. Now we have to deny read access to Awaiting Approval, Approve and Publish and Done states from sitecoreEditor roles
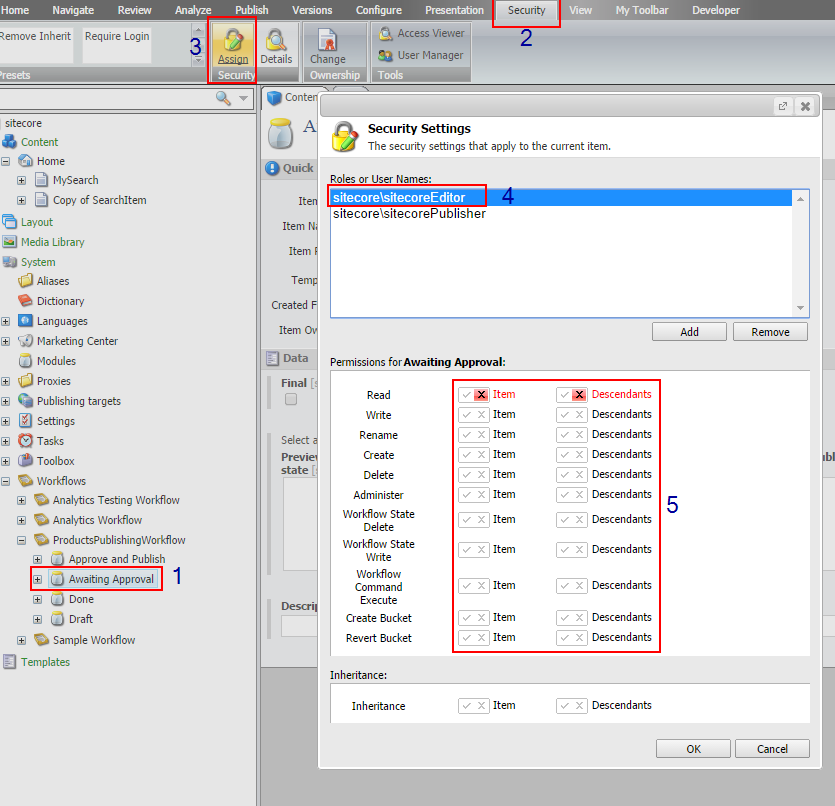
Similarly sitecoreReviewer should not be able to create or submit item. It should only be able to approve or reject items.
sitecoreReviewer needs Awaiting Approval State access so we already have assigned it to Workflow and its descendants so it is by default applied to Awaiting Approval state. No need to assign or deny anything to Awaiting Approval state for sitecoreReviewer.
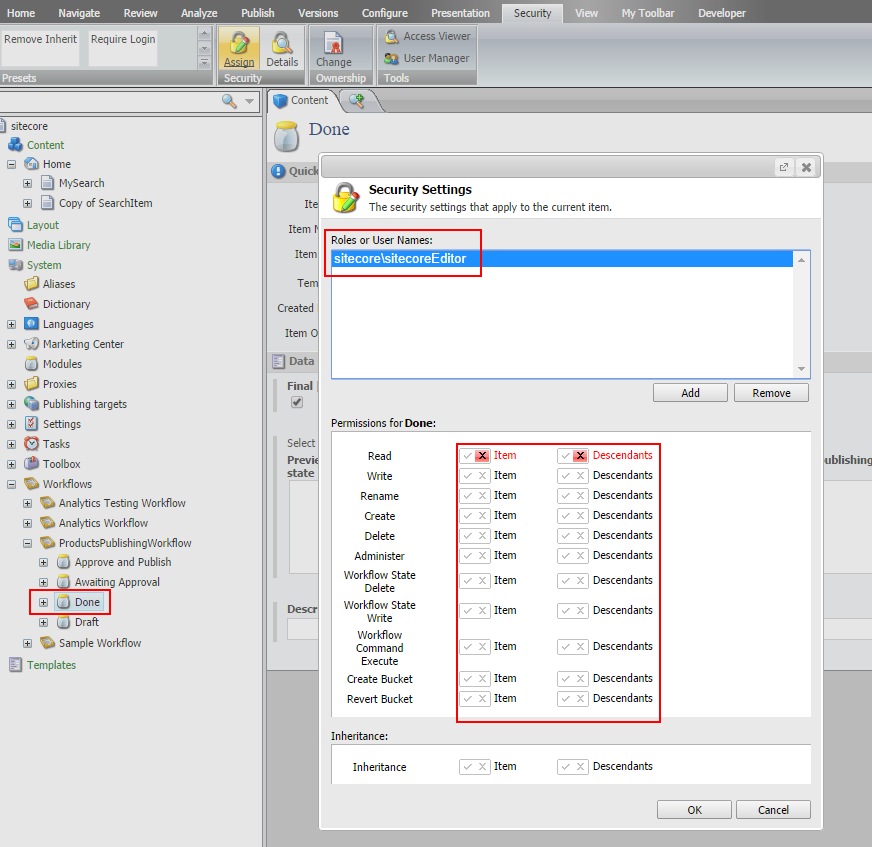
Remove Draft, Done, Approve and Publish states access from sitecoreReviewer as reviewer is not allowed to so.
And similarly for sitecorePublisher. Sitecore Publisher won’t be able to create item. It can only approve item for publish or reject item. So we have to deny read access for Awaiting Approval and Draft State.
2) Creating Users
Now we will create three users and assign these three roles respectively.
1) WebsiteEditor
2) WebsiteReviewer
3) WebsitePublisher
Refer this link to know how to create new roles [pg. 29] and how to create new users [pg. 15].
While creating user you will get an option to assign the roles to each user so assign the appropriate roles i.e. WebsiteEditor user will have sitecoreEditor role, WebsiteReviewer user will have sitecoreReviewer role and WebsitePublisher user will have sitecorePublisher role respectively.
Refer below screen to create a user and assigning roles.
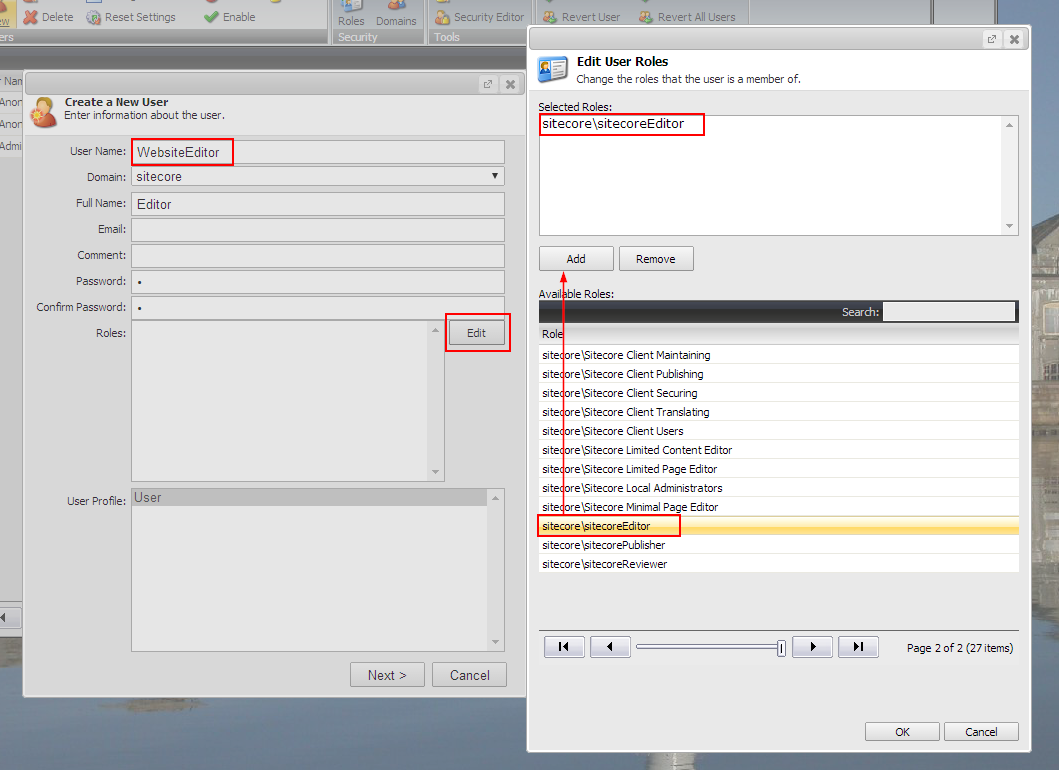
That’s it. We are done.
You can now test it with different users.
You can now test it with different users.
Continued in Part-3.
Sitecore Workflow QuickStart Guide: Part-1
This series is divided into three parts:
Part 1 : Sitecore Workflow QuickStart Guide : Part-1
Part 2 : Sitecore Workflow QuickStart Guide : Part-2
Part 3 : Sitecore Workflow QuickStart Guide : Part-3


Part 2 : Sitecore Workflow QuickStart Guide : Part-2
Part 3 : Sitecore Workflow QuickStart Guide : Part-3
Workflow in sitecore ensures that items move through a predefined set of states before they are publishable, usually, it’s to ensure that content is reviewed appropriately before publishing on the live website.
Important things to consider in workflow are
1) State
2) Command
3) Action
- States are building blocks of the workflow. It represents steps in the workflow.
- Commands allows users to transition content items from one state to another.
- Actions automate functions in the workflow.
We will assign workflow to item template’s standard values so all the items that are published based on that template enters into the workflow which has to be followed.
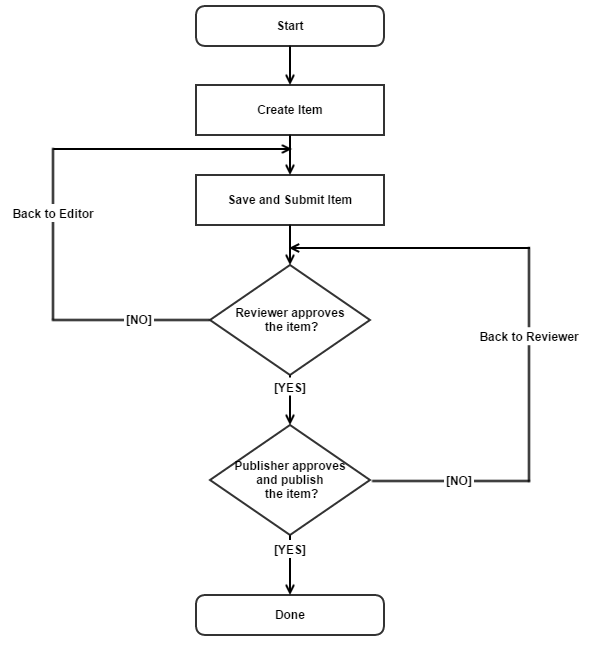
In real scenario content item is created by one user it is then submitted and reviewed by another user, who will approve which will change the state to Approved then finally the publisher will approve and publish the item.
Workflow Item follows ERP Formula.
Editor Reviewer Publisher
Editor creates item. Reviewer Approves item or Reject item.
If Item is rejected by reviewer then it will go back to Editor. If reviewer approves item it will then be in Approve and Publish state and can be approved and published by Publisher.
If Item is rejected by reviewer then it will go back to Editor. If reviewer approves item it will then be in Approve and Publish state and can be approved and published by Publisher.
At the end we should have the following workflow implementation in sitecore:
1) Creating workflow
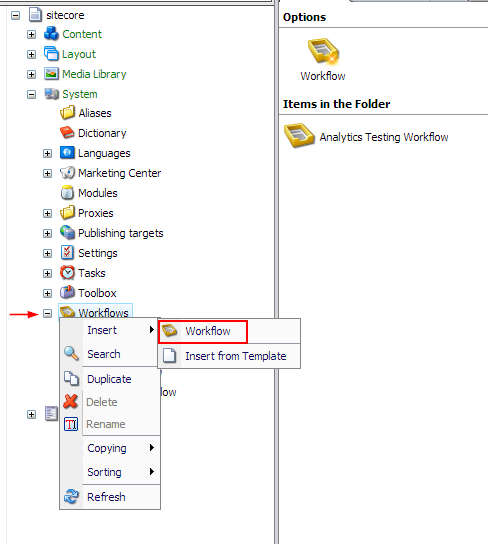
Create a workflow using /sitecore/System/Workflows/ and enter the name
Before assigning the initial state to this workflow, we first have to create the state.
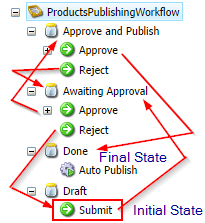
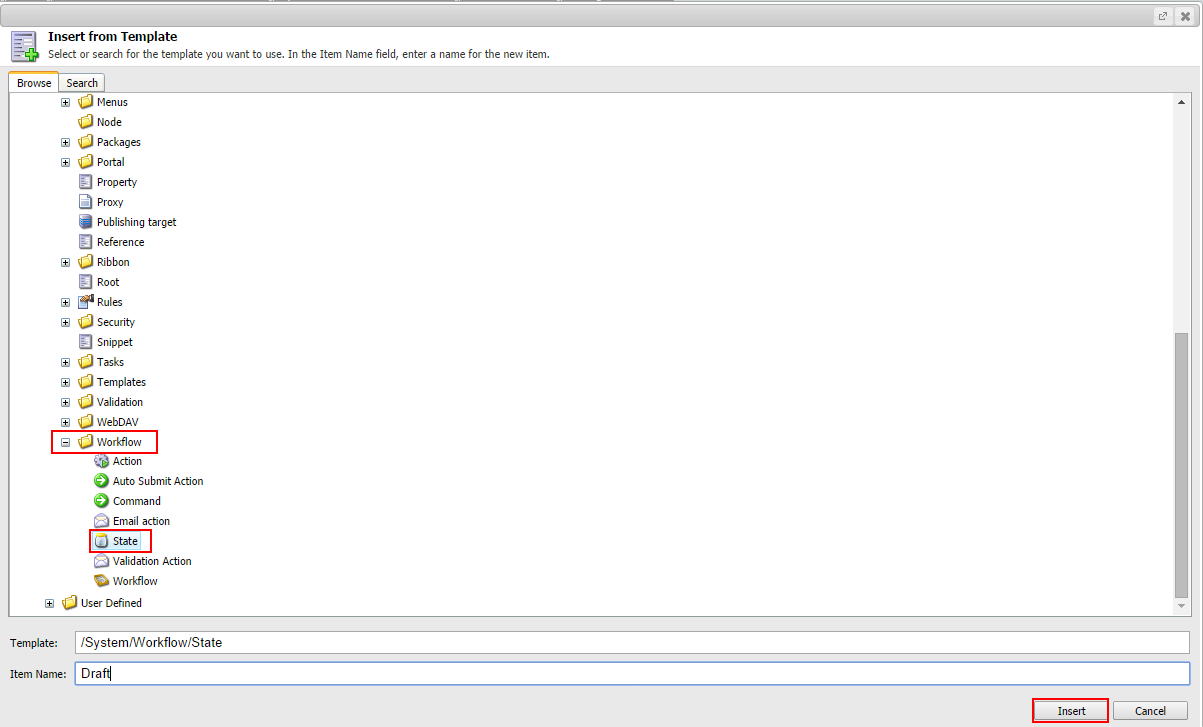
2) Creating Workflow States
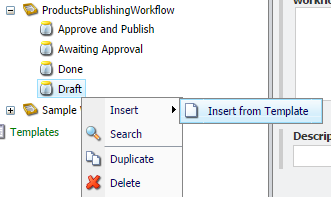
For that select workflow definition item and the select Insert from Template command and create the new workflow state using the /System/Workflow/State template.
Call the first state “Draft”.
Call the first state “Draft”.
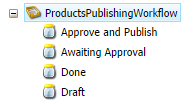
Similarly create three more workflow states –Awaiting Approval, Approve and Publish, Done.
It’s up to the requirement whether you have to create two levels or three of workflow. Here we will look at three levels of workflow where in as sitecore item reaches its final state i.e. Done then it will Auto Publish to Web Database.
At the end of this step you should have the following:
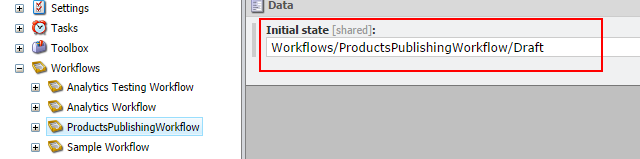
Now let’s set the Initial State as a Draft.
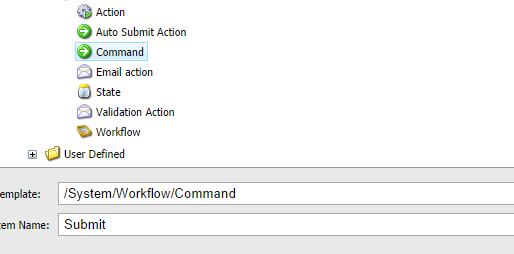
3) Creating Workflow Commands
To add command to a workflow
state:
state:
Create commands as shown in below diagram.
Note: You can give any valid name to commands. Commands will appear to user. For example here publisher will have access to Approve and Publish State where we have provided Approve and Reject options, instead you can provide Approve and Publish or Reject.
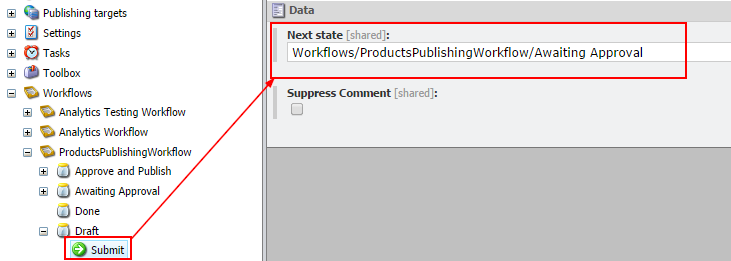
Now let’s set the transition from one state to another with the help of commands.
Click on Submit Command in Draft State and set the Next State to Awaiting Approval State.
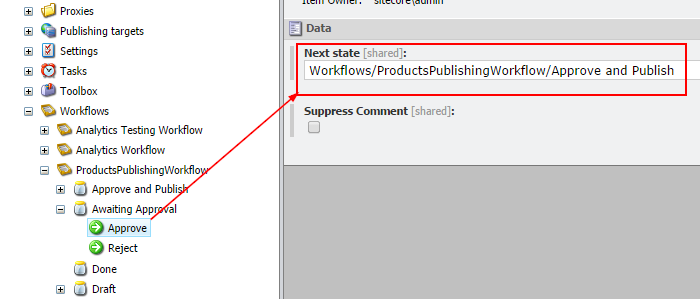
Similarly select Approve in Awaiting Approval and set the Next State to Approve and Publish.
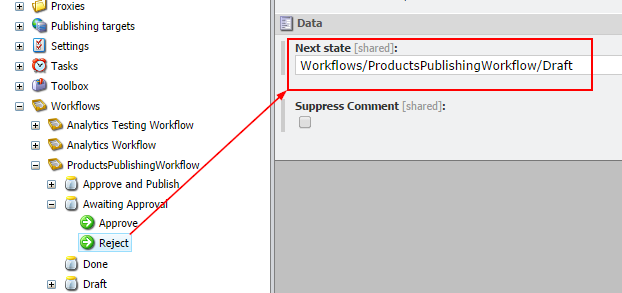
Select – Reject in Awaiting Approval State and set the Next State to Draft.
Similarly from Approve and Publish state Approve Command will point the Next state as Done and Reject Command will point the Next State to Awaiting Approval State.
Note: Suppress Comment: This checkbox defines whether or not users are prompted to enter a comment when a workflow command is executed. If the checkbox is cleared, users are prompted. If the checkbox is selected, users are not prompted.
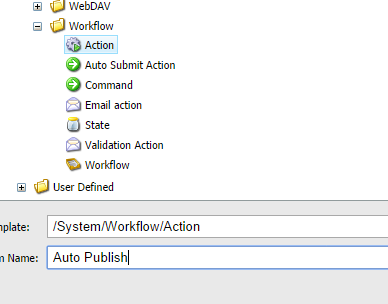
4) Creating Workflow Actions
a. Validation Actions
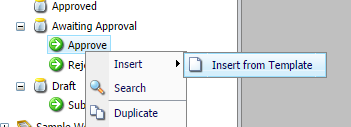
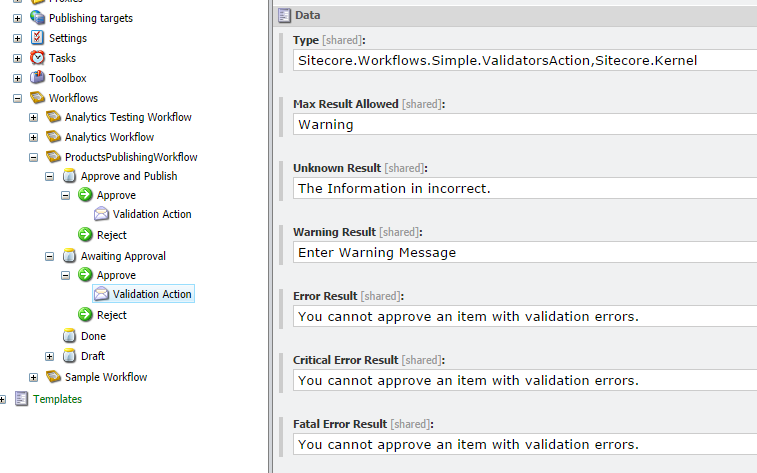
Select Approve Workflow Command, Right click and select Insert from Template Command and create the new workflow action using /System/Workflow/Validation Action template. Call the new command “Validation Action”.
You will get the below screen. Enter the following information in Fields.
Type Field: Sitecore.Workflows.Simple.ValidatorsAction,Sitecore.Kernel.
Max Result Allowed: Warning
The maximum response from the validator.
The possible values are:
Unknown
Valid
Suggestion
Warning
Error
CriticalError
FatalError
If the value of this field is “Error”, then items which have errors will pass, but the items which have critical errors will not pass.
Fill the error results with proper error messages that you want a user to see in case of validation errors.
Similarly add Validation Action at Approve in Approve and Publish State.
b. Auto Publish Action
The data section of this workflow action contains the following fields:
Type:
The namespace.class, assembly name of the implementation class.
The namespace.class, assembly name of the implementation class.
For Example: Sitecore.Workflows.Simple.PublishAction, Sitecore.Kernel
Parameters:
The deep parameter that specifies whether or not the child items should be
published.
The deep parameter that specifies whether or not the child items should be
published.
deep=1
— publish children
— publish children
deep=0
— do not publish children
— do not publish children
related=1
— publish children (Sitecore 7.2 onwards)
— publish children (Sitecore 7.2 onwards)
For more details about parameters please refer: http://www.sitecore.net/en-gb/Community/Technical-Blogs/Reinnovations/Posts/2014/03/Auto-Publish-Workflow-Action-Updates.aspx
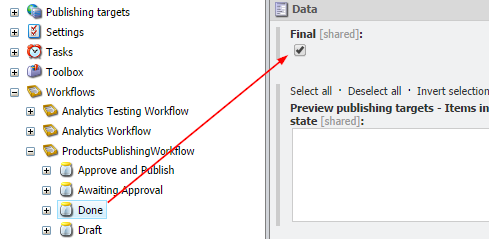
5) Defining Workflow Final State
Select the state which is supposed to be the final state in workflow and select the Final Checkbox in the Data field:
Only those items which are approved by publisher in Approve and Publish state will move on to Done State of workflow and it will be published automatically.
6) Assigning workflow to a Template
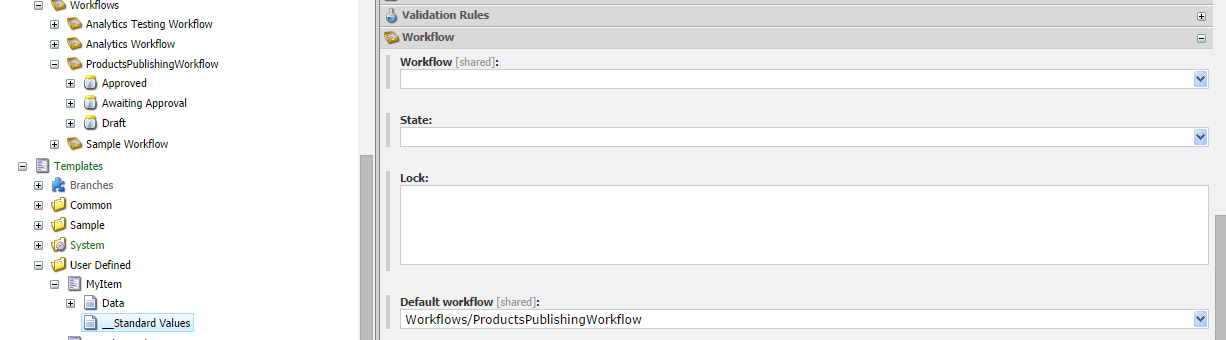
It is always the best practice to assign the workflow to the standard values item of a template.
Select the Standard Fields Checkbox.
Leave the Workflow and the State field’s blank, as they will be filled automatically upon the item creation basing on the workflow settings. Leave the Lock field as it is.
Save the template and now it is ready to use with workflow support. First phase of creating a workflow is complete.
Now let’s see how to use workflow for creating-reviewing-publishing items in Part-2
Lucene Search in Sitecore
Lucene is an open source search engine used in Sitecore CMS for indexing and searching the contents of the website. Here you will see the simple and easy way to perform Lucene search in Sitecore. Lucene search can be performed on any item or fields of item(s). In this post we will look at performing Lucene search on Sitecore item field.
We will use the default search index provided by Sitecore. Default search index i.e. sitecore_master_index. This default search index uses syncMaster search strategy which will rebuild automatically based on certain events. Every time you update, create or delete an item Sitecore runs a job that updates the indexes. The process is usually complete by the time you have saved or published an item. So as you do any changes to an item then it will automatically rebuild the search index.
For more information about search index strategies refer this blog: http://bit.ly/1rVMvB8
//Get the Search Index
using(var searchIndex = ContentSearchManager.GetIndex("sitecore_master_index").CreateSearchContext())
{
//Perform the search on index
var searchResult =
 searchIndex.GetQueryable<SearchResultItem>()
 .Where((item => item["ItemTitle"].Contains(SearchText)))
 .Where(item => item.Path.Contains("SearchItem"));

//Here we are searching on fieldname “ItemTitle” also only those items will be fetched whose path contains the string called “SearchItem”

    if (searchResult != null)
    {
     displaySearchResultRepeater.DataSource = searchResult;
     displaySearchResultRepeater.DataBind();
    }
}

// For displaying result in repeater control:
<asp:Repeater ID="displaySearchResultRepeater" OnItemDataBound="displaySearchResultRepeater_ItemDataBound" runat="server">
     <ItemTemplate>
         Title : <asp:Label ID="Title" runat="server"></asp:Label><br /><br />
         Description : <asp:Label ID="Description" runat="server"></asp:Label><br /><br/>
     </ItemTemplate>
 </asp:Repeater>
For displaying result you just need to bind SearchResultItem with the event called displaySearchResultRepeater_ItemDataBound. For getting the result on the repeater data bound event you have to do the following:
var currentItem = (SearchResultItem) e.Item.DataItem;
var item = currentItem.GetItem();

Label Title = (Label) e.Item.FindControl("Title");
Label Description = (Label)e.Item.FindControl("Description");

Title.Text = item["ItemTitle"];
Description.Text = item["ItemDescription"];
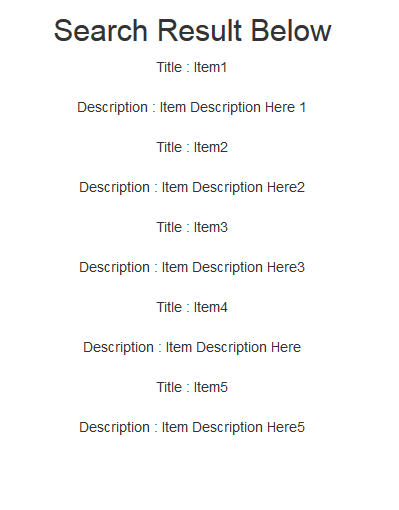
Output: when we pass “Item” in SearchText (e.g. SearchText = Item)