Automate Sitecore Workflow Approval Process and Email Report

Automation is the key to tech. It is the process by which tasks which were previously done by humans, are performed entirely by machines. In this post, I shall take you through how to automate Sitecore Workflow Approval for a more efficient way of working.

Why do you need Auto Approve?

Every project has a different set of requirements, and one of the requirements I was tasked to do was to automate the Workflow approval process. You may think, what is the purpose of having a workflow if you want things to be approved automatically. Well, as mentioned earlier, there are different scenarios that may deem such a requirement necessary.

It is not because of the risk in approving content that may be incorrect. It is due to that fact that there are a lot of items in the workflow coming in from the translation agency and in order to verify the content, it requires physical approval to push on to Stage. The automation to be implemented here will help us to know that translations are coming in and send it to the respective content team member to verify. Once verification is done, then in one simple, a user can push it Live.

Read More

Sitecore Package Assistant | Sitecore Module

Hey Sitecore Devs,

This module is for you. It will help you track Sitecore items which you worked on and create a package of it easily. If you want to skip any item, you can just ignore it and that will never be tracked. This will be helpful when you are working on many items in the Sitecore and once you are done creating the module you can easily package it using Sitecore Package Assistant.

The idea for this module popped to Saad Ansari and he shared it via blog post: Sitecore Package Creator – The untracked/unpackaged changes while creating the packages

I took his views and started conversation with him for creating a module of his idea. We started one by one with the requirements and implimented this module.

Pre-requisite: This module works based on Sitecore PowerShell Extensions. So before you install this module it is must to have Sitecore PowerShell Extensions.

Download: Sitecore Package Assistant

Source Code: GitHub

This module will:

  • Track item on items created and saved.
  • It will show an icon in the gutter for the items which are getting track.
  • You can track/untrack any item once it is updated.
  • You can easily create the package of the items which have been tracked and on complete, the tracking is removed.

After installation, you’ll have to first enable Sitecore Package Assistant in the Sitecore Gutter.

Now, as you work on the Sitecore items, which ever items you have added/updated, you’ll start seeing an  icon. On hover, you’ll see a tool-tip: This item is being tracked by SPA. Click to untrack. You can click on the gutter icon and that item will be added as untrack item. You’ll see an  icon.

In case you don’t see the icon in the Sitecore Gutter. Open Sitecore PowerShell ISE, go to Settings and Rebuild Content Editor Gutter.

The details about the item track/untrack is logged at: /sitecore/system/Modules/Sitecore Package Assistant/SPA

Once you are done with your functionality in the Sitecore, you can right click on any item and create a package of tracked items using Sitecore Package Assistant. It will give you an option to Download the Package.

This will be helpful for the Devs, so that you don’t miss any item while creating a Sitecore Package.

You can also refer Saad Ansari’s blog: Sitecore Package Assistant — Where you can know more about this module in very detail and benefits of it.

There is much more that can be done. Your suggessions/feedback/ideas are worth sharing in the comments below.

Happy Sitecoring!

Sitecore Gutter using Sitecore PowerShell Extentions

Hey Sitecore folks,

Do you know that you can create Sitecore Gutter using Sitecore PowerShell Extensions?

Yes, it’s easy to create Sitecore Gutter using Sitecore PowerShell Extensions. We’ll see how you can easily create gutter and trigger an event on click of it.

Let’s take an example of multi-linqual site in the Sitecore. For example, Content Authors switch the language to Japanese then in the Sitecore gutter we’ll show an add icon for the items which are not having the Japanese version. I will write a simple PowerShell Script which will show Add icon if an item doens’t have any version in the context language.

<#
    .NAME 
        This item does not have any version in the current language
 
    .SYNOPSIS
        Renders gutter indicating an item doesn't have any version in the current language.
      
    .NOTES
        Nikki Punjabi
#>

$currentItem = $item = Get-Item . -Language $SitecoreContextItem.Language.Name -ErrorAction SilentlyContinue

if($currentItem -eq $null) {
    
    $gutter = New-Object Sitecore.Shell.Applications.ContentEditor.Gutters.GutterIconDescriptor
    
    $gutter.Icon = "applicationsv2/32x32/add.png"
    $gutter.Tooltip = "Item doesn't have any version in " + $SitecoreContextItem.Language.Name + ". Click to create item version."   
 
    $gutter
}

Save this script as: /sitecore/system/Modules/PowerShell/Script Library/Sitecore Item Version/Sitecore Item Version/Content Editor/Gutters/Sitecore Item Version

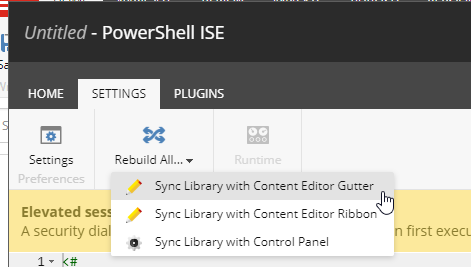
Now rebuild Sitecore Gutter library using Sitecore PowerShell ISE.

Enable the Sitecore Item Version in Sitecore Gutter.

Change the language and you’ll see the add icon if item doesn’t have any version in the language you have selected.

Now let’s suppose you want to provide the flexibility to create the version on click of the gutter icon, we’ll write the Sitecore command, which will execute on click of the gutter icon and create an item version.

First let’s update the script for allowing the click on an icon.

Add the following line after $gutter.Tooltip

#Sitecore Gutter Click Event
    $gutter.Click = [String]::Format("item:createnewitemversion(id={0})", $SitecoreContextItem.ID)

Create Command Class with the following code:

public class Command : Sitecore.Shell.Framework.Commands.Command
    {
        public override void Execute(CommandContext context)
        {
            if (context.Items != null && context.Items.Length > 0)
            {
                Item contextItem = context.Items[0];
                if (contextItem != null)
                {
                    contextItem.Versions.AddVersion();
                    Context.ClientPage.SendMessage(this, string.Format("item:load(id={0})", (object)contextItem.ID));
                }
            }
        }
    }

When user click on the gutter icon we have to execute above piece of code which will create item version and open the item in the content editor. Wait, this won’t work directly, we have to add the command in the config file.

I’ve created a separate Class Library Project for this demo. You can refer GitHub:  https://github.com/nikkipunjabi/Sitecore-Item-Versioning

Create a config file and add the following code:

<?xml version="1.0"?>

<configuration xmlns:patch="http://www.sitecore.net/xmlconfig/">
  <sitecore>
    <commands>
      <command name="item:createnewitemversion" type="Sitecore.SharedSource.CreateItemCommand.Command,Sitecore.SharedSource.CreateItemCommand" />
    </commands>
  </sitecore>
</configuration>
Note: Do update the type appropriately as per the solution

Deploy the config and dll file in the webroot sitecore site.

Click on the icon and you’ll see an item version is created and it will get open in the content editor.

Happy Sitecoring!

Get Sitecore Workflow Items

In this post, you’ll see how to get Sitecore workflow items that are in the specific state of the workflow. I’ve described both the possible ways by which you can do it, Code and Sitecore PowerShell. 🙂

We need, workflow Id and workflow state Id.

var db = Factory.GetDatabase("master");
var workflow = db.WorkflowProvider.GetWorkflow(txtWorkflowID.Text);
var listofWorkflowItems = workflow.GetItems(txtWorkflowStateID.Text);

Above code, will get list of items in the given workflow state. I needed the report of these items along with the URLs. So I added the following code to get the required data. I are going to make use of this piece of code and bring in some more automation in further requirement. I’ll share more details in the upcoming posts.

Layout look as following:

<body>
    <form id="form1" runat="server">
        <h2>Get List of Workflow Items!</h2>
        <table>
            <tr>
                <td>Workflow ID:</td>
                <td>
                    <asp:TextBox ID="txtWorkflowID" runat="server" Width="400" Text="{115CBA9C-D124-49D5-B9D1-314B32155AAB}"></asp:TextBox></td>
            </tr>
            <tr>
                <td>Workflow State ID:</td>
                <td>
                    <asp:TextBox ID="txtWorkflowStateID" runat="server" Width="400" Text="{C8CB5D17-7F02-4A34-B2AE-36D1DB4A7089}"></asp:TextBox></td>
            </tr>
            <tr>
                <td>
                    <asp:Label ID="lblSummary" CssClass="positionAbsolute" Visible="false" Text="" runat="server"></asp:Label></td>
            </tr>
            <tr>
                <td>
                    <asp:Button ID="btnGetWorkflowItems" runat="server" Text="Get Items in Workflow" OnClick="btnGetItemsInWorkflow_Click" />

                </td>
            </tr>
            <tr>
                <td>
                    <asp:Label ID="lblCount" runat="server"></asp:Label></td>
            </tr>
            <tr>
                <td colspan="4">
                    <asp:GridView ID="grdLanguageReport" CssClass="table-style-three" runat="server"></asp:GridView>
                </td>
            </tr>
        </table>
    </form>
</body>

I created the DataTable and fed in the required data into it. Converted the path to URL if an item has any renderings.

Code:

        StringBuilder sb;
        DataTable tb;
        protected override void OnLoad(EventArgs e)
        {
            base.OnLoad(e);
            if (Sitecore.Context.User.IsAuthenticated == false)
            {
                Response.Redirect("login.aspx?returnUrl=GetWorkflowItems.aspx");
            }
        }

        protected void btnGetItemsInWorkflow_Click(object sender, EventArgs e)
        {
            lblSummary.Text = "";
            try
            {
                if (!string.IsNullOrEmpty(txtWorkflowID.Text) && !string.IsNullOrEmpty(txtWorkflowStateID.Text))
                {
                    tb = new DataTable();
                    tb.Columns.Add("Item ID");
                    tb.Columns.Add("Item Path");
                    tb.Columns.Add("Item URL");

                    var db = Factory.GetDatabase("master");
                    if (db != null)
                    {
                        var workflow = db.WorkflowProvider.GetWorkflow(txtWorkflowID.Text);

                        var listofWorkflowItems = workflow.GetItems(txtWorkflowStateID.Text);
                        if (listofWorkflowItems == null || listofWorkflowItems.Count() == 0)
                        {
                            lblSummary.Text = "No Items found";
                            lblSummary.Visible = true;
                        }
                        else
                        {
                            List<string> listofItemsInTheWorkflow = new List<string>();

                            foreach (var ii in listofWorkflowItems)
                            {
                                var currentItem = db.GetItem(ii.ItemID);

                                DataRow itemRow = tb.NewRow();
                                itemRow["Item ID"] = ii.ItemID.ToString();

                                //For Item Path == Get Item ID
                                itemRow["Item Path"] = currentItem.Paths.FullPath;

                                //convert Item Path to URL
                                string getURLWithLanguage = "";
                                if (currentItem.Fields["__Renderings"] != null && currentItem.Fields["__Renderings"].ToString() != string.Empty)
                                {
                                    string urlWithLanguage = "https://www.companywebsite.com/" + ii.Language + "/";
                                    
                                    //Here you can do additional processing if needed
                                    
                                    getURLWithLanguage = currentItem.Paths.FullPath.Replace("/sitecore/content/Home/", urlWithLanguage);
                                    
                                }

                                itemRow["Item URL"] = getURLWithLanguage.ToLower();
                                tb.Rows.Add(itemRow);
                            }
                        }
                    }
                    lblCount.Text = "Total items: " + tb.Rows.Count.ToString();
                    grdLanguageReport.DataSource = tb;
                    grdLanguageReport.DataBind();
                }
            }
            catch (Exception ex)
            {
                lblSummary.Text = ex.StackTrace.ToString();
            }

There is an option to provide the Sitecore Workflow Id and State Id in the text box, and fetch the results based on it. You can add the feature to download the report into a sheet.

Another best way to get it done is using Sitecore PowerShell, if you have power to access on a required environment.

Provide the workflow state ID, find the referrence items using Get-ItemReferrer and then do the required processing. As simple as that.

$workflowStateID = Get-Item -Path master: -ID "{46DA5376-10DC-4B66-B464-AFDAA29DE84F}"
$referringItems = Get-ItemReferrer -Item $workflowStateID

#EmptyArray
$listofWorkflowItems = @()

#$listofWorkflowItems

#Skip System Items
Foreach($item in $referringItems) { 

    $itemPaths = $item.Paths.FullPath
    if($item.Paths.FullPath.contains('/sitecore/content/'))
    {
        $rendering = $item | Get-Rendering
        
        $addInList = New-Object System.Object
        $addInList | Add-Member -type NoteProperty -name ID -Value $item.ID
        $addInList | Add-Member -type NoteProperty -name Path -Value $item.FullPath
        if($rendering){
            $addInList | Add-Member -type NoteProperty -name URL -Value $item.FullPath.Replace("/sitecore/content/Home","https://www.nikkipunjabi.com")
        }
        
        $listofWorkflowItems += $addInList
    }
}

$listofWorkflowItems | Show-ListView

Output:

Hope this will help you as well if you are looking for any similar solution.

Happy Sitecoring!


Schedule Publishing Items in Sitecore

Hello Sitecorians,

You can now easily configure Sitecore Items for Scheduled Publishing using Sitecore PowerShell Extensions. PowerShell has a great Power. It saves developer life a lot by providing the way of Integrated Scripting Environment and without Web Deployment, you can execute the script on the different environments easily.

Schedule Publishing Items – A Sitecore MarketPlace Module 🙂

Schedule Publishing Items

It allows you to set the following options:

  • Items To Publish
  • Date and Time
  • Publishing Target
  • Publishing Language
  • Publish subitems

On date-time arrival – once the scheduled task is executed the script will start publishing items if the values are selected properly.

Make sure item is not in workflow and is allowed to publish, otherwise it won’t be published.

This module has following Items:

1) PowerShell Script – /sitecore/system/Modules/PowerShell/Script Library/Schedule Publishing Items/Internal/ISE Plugins/Scheduled Publish
2) Schedule Task: /sitecore/system/Tasks/Schedules/Schedule Publishing Items
3) Template Configuration: /sitecore/templates/Modules/Scheduled Item Publish/Schedule Items
4) Configured Item for Scheduled Publishing: /sitecore/system/Modules/Schedule Publishing Items/Schedule Items_DD-MM-YYYY

You can create any number of configured items for publishing at – /sitecore/system/Modules/Schedule Publishing Items/

Schedule Items_DD-MM-YYYY — This is just a sample item without properly selected values. You just need to add the values properly and Enable the checkbox for publishing at Scheduled Time.

Scheduled Publish Item

There is an option to disable an item or delete an item once publishing is done so that it should never process next time when the scheduler looks for the scheduled publishing task. If you do not select to disable an item after publishing is done and do not select to delete an item then it will execute every time the scheduler check for schedule items to publish as the time is passed away.

Note: The script will execute, once the scheduler starts scheduling jobs. The default time is 10 minutes, so every 10 minutes system will check for scheduled publishing. Therefore, while setting the time you need to be aware of the scheduled task execution time. Refer below in your config. If you have changed the value then it will work accordingly.

<!– An agent that processes scheduled tasks embedded as items in the master database. –>
<agent type=”Sitecore.Tasks.DatabaseAgent” method=”Run” interval=”00:10:00″ name=”Master_Database_Agent”>
<param desc=”database”>master</param>
<param desc=”schedule root”>/sitecore/system/tasks/schedules</param>
<LogActivity>true</LogActivity>
</agent>

PowerShell will to your scheduled publishing.

Reaction GIF - Find & Share on GIPHY

And you can enjoy your weekend.

Thread GIF - Find & Share on GIPHY

Happy Scheduling! 🙂

Publish Bulk Items in Sitecore using Sitecore Powershell Extensions

Every Sitecore site will have a different set of requirement and one of the requirement could be Publish Bulk Items in Sitecore. If you have the same requirement then you are at right place. 🙂

Publish Bulk Items In Sitecore


This post is in accordance with my previous two posts:

  1. Export Sitecore Items
  2. Update Sitecore Items

This might be the case for your requirement, first Export Sitecore Items, then it could be Update Sitecore Items in bulk and then I’m sure there would be the third one to Publish Sitecore Items in Bulk.

I’ve written Sitecore Powershell script which would do the job easier. In Update Sitecore Items — I provided the sample file, the same file you can use for Bulk Publish.

Sample CSV File: pt_Publish_Sitecore_Items (I generally prefix the file with language so that we know which language version items are getting published)

Below script will first ask the user for the CSV File. Then it will ask for Target Database to publish Sitecore Items — The reason for providing this option is because every Sitecore site have the staging environment and it’s always better to verify the changes. So you can accordingly select the target database and after verifying you can push it Live. Once processing is done file will be deleted. Publish Mode is set to Smart.

Note, Sample CSV File has two important columns which are required by this script, ItemPath and Language — Items will be published in the provided language.

Read More

Update Sitecore Items using Sitecore PowerShell with CSV Data

Hello Sitecorians,


Are you looking for a quick and easy way to update Sitecore Items — Sitecore PowerShell does that job very easily.


In my previous blog — I provided the PowerShell script/module by which you can export data using Sitecore PowerShell Extensions. If you see that script/file properly – The first two header rows are “ItemPath” and “Language“. These columns are required for the below script to update the data. I’ve kept the language column as required for this because I work on Sitecore Site having more than 10 languages and in that case, we need a language option so that the correct language version gets updated. And other header rows in the file are the field names. Once I have exported the data in CSV – do the required updates in Excel and import the same file using the below script. It will import updated data back to Sitecore Items.


I referred to a couple of blogs for importing CSV files and in all, we have to provide the Path for the file but for providing the path, that file should reside on the server. So I looked for some other way around it and found an easy way to upload the file, process it, and then delete it. Let me know if you have any other ideas/suggestions for it.

Read More

Export Sitecore Item Data using Sitecore PowerShell

I heard a lot about Sitecore PowerShell – it’s the great tool and one of the best module on Sitecore Marketplace. Also the most downloaded module crossing SIM. One fine day I was installing SXA, that also said — Before you install the SXA package, please make sure that you have installed: Sitecore PowerShell extensions (full 4.5 for Sitecore 8) from https://marketplace.sitecore.net/Modules/S/Sitecore_PowerShell_console.aspx. Then I started exploring PowerShell from the Video Series by Michael West on YouTube. These are awesome videos to learn and understand Sitecore PowerShell. And once you have viewed the videos, after that when you look at the script, you will easily understand it. For every Sitecore Developer, it’s worth exploring Sitecore PowerShell. You’ll really like and enjoy with it. You won’t open Visual Studio to code, you will only open Sitecore for scripting – as it says – Sitecore PowerShell ISE (Integrated Scripting Environment).


Export Sitecore Items Data — We are using this tool a lot to give the reports or data to the client, created in a .aspx file – It was written by my friend. And then I modified it based on requirements. After exploring PowerShell. I thought to implement it in PowerShell. And it got ready in couple of hours as I knew how to work with Sitecore PowerShell 😉

Read More