Sitecore Workflow QuickStart Guide: Part-1

This series is divided into three parts:
Part 1 : Sitecore Workflow QuickStart Guide : Part-1
Part 2 : Sitecore Workflow QuickStart Guide : Part-2
Part 3 : Sitecore Workflow QuickStart Guide : Part-3

Workflow in sitecore ensures that items move through a predefined set of states ­­­­before they are publishable, usually, it’s to ensure that content is reviewed appropriately before publishing on the live website.
Important things to consider in workflow are

1)      State
2)      Command
3)      Action

  • States are building blocks of the workflow. It represents steps in the workflow.
  • Commands allows users to transition content items from one state to another.
  • Actions automate functions in the workflow.

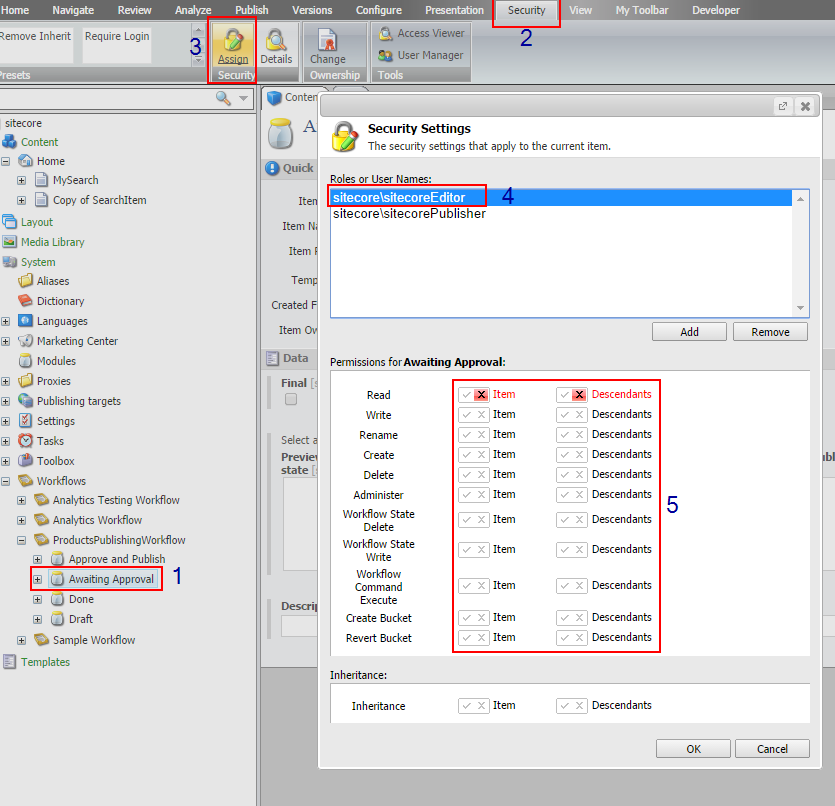
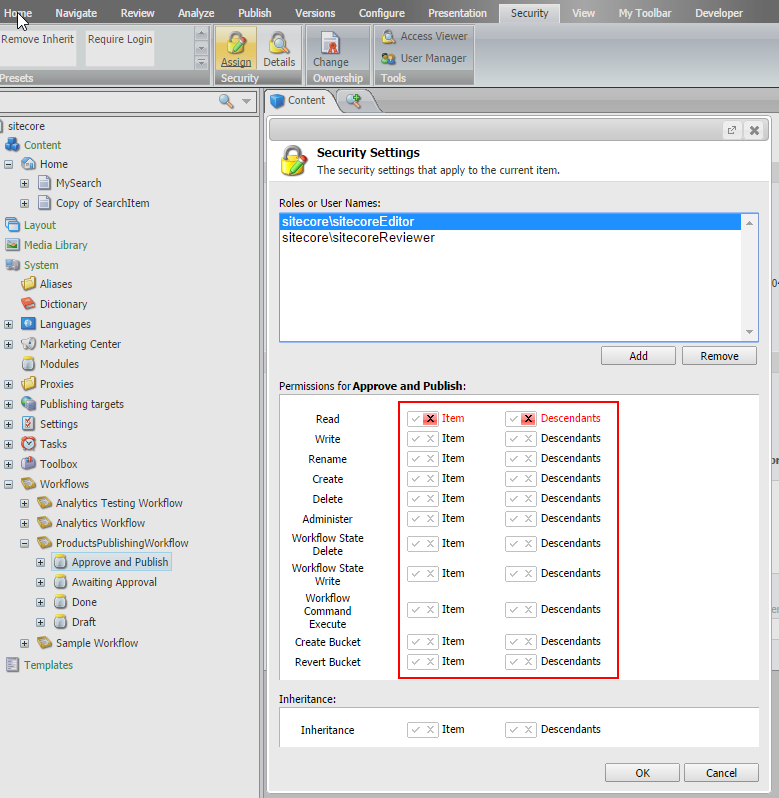
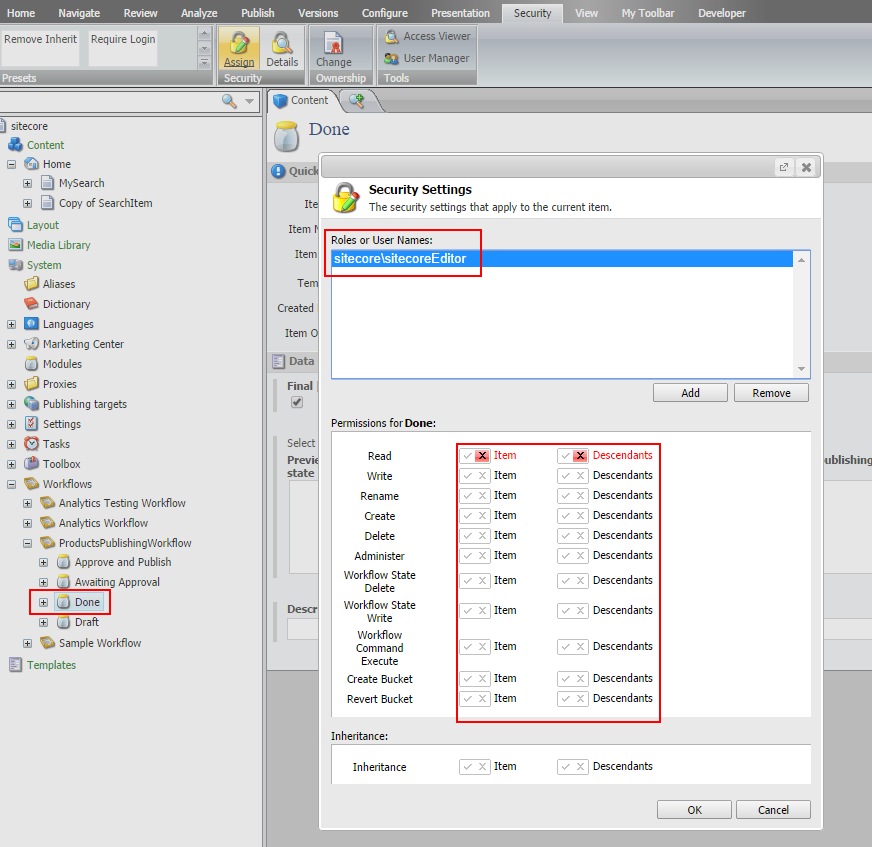
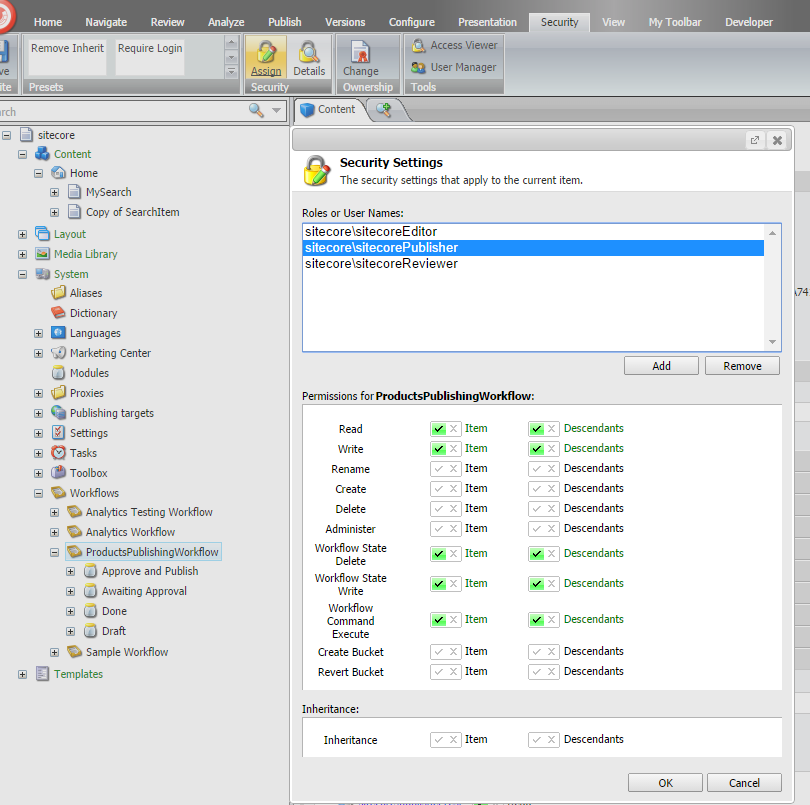
We will assign workflow to item template’s standard values so all the items that are published based on that template enters into the workflow which has to be followed.

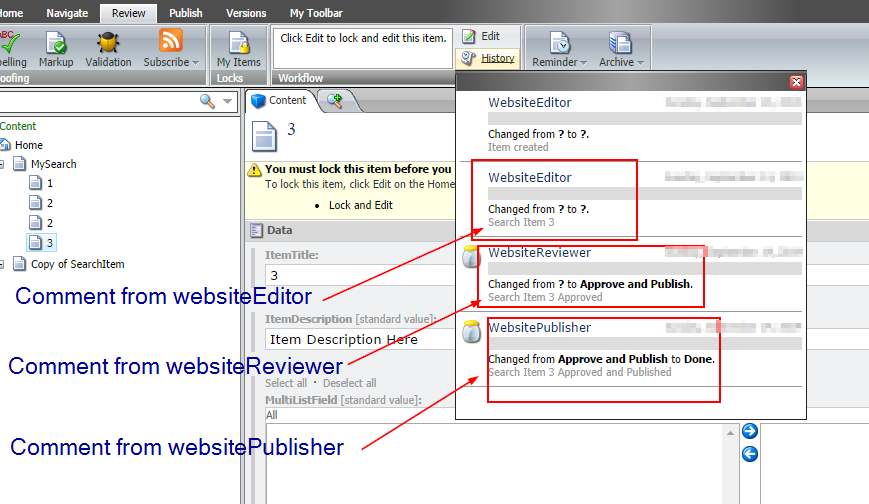
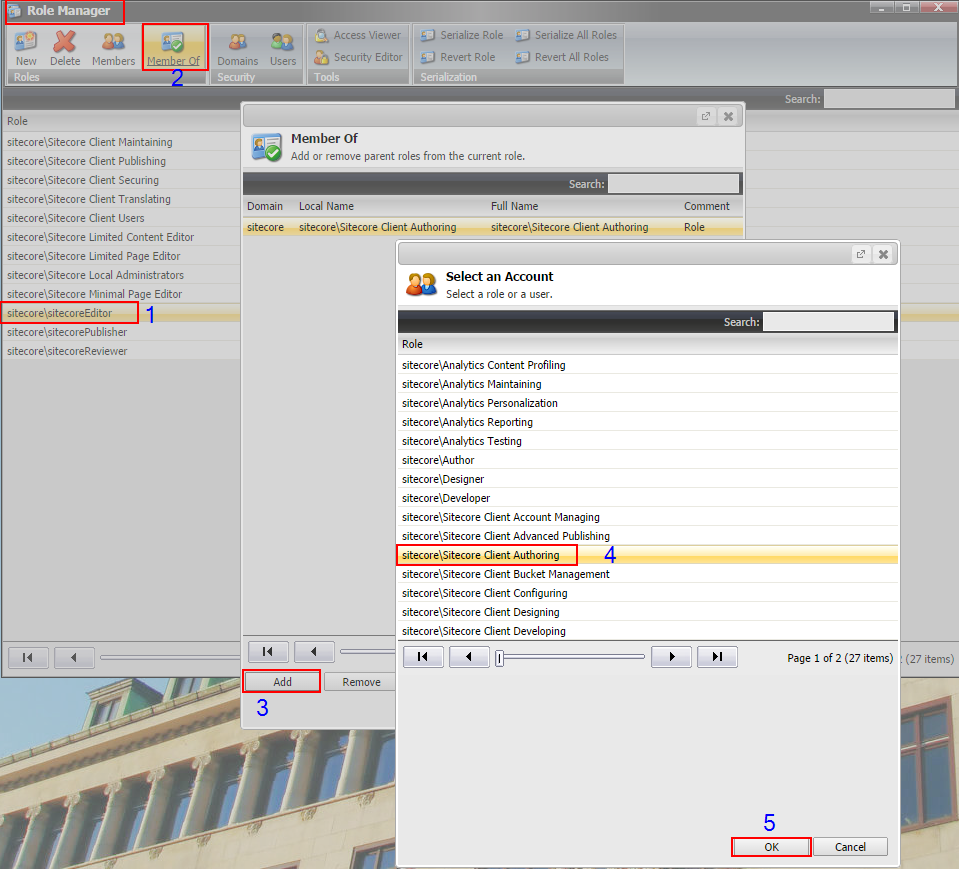
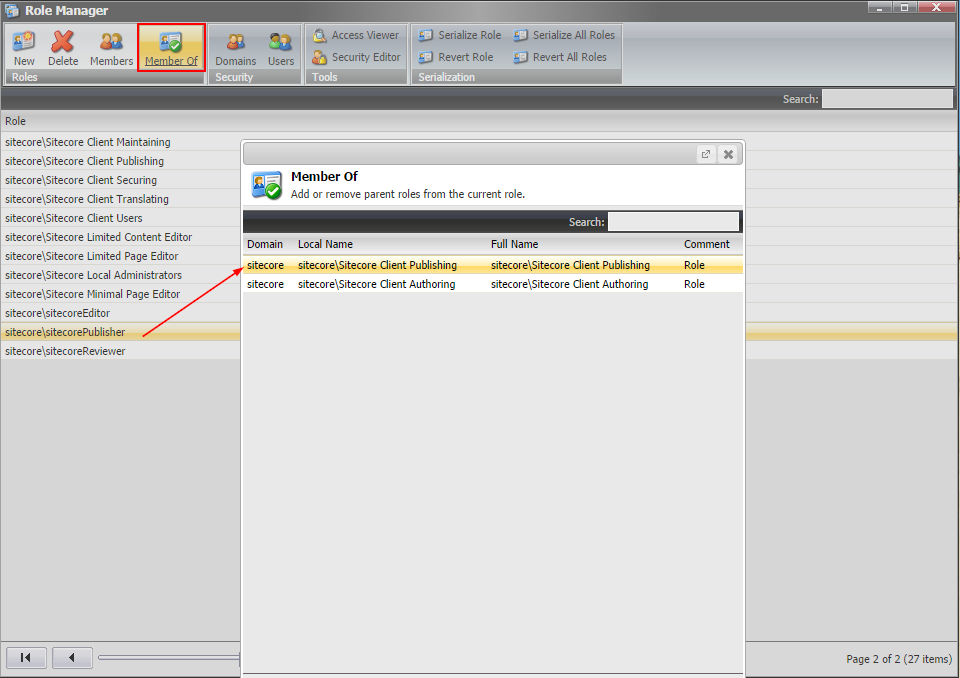
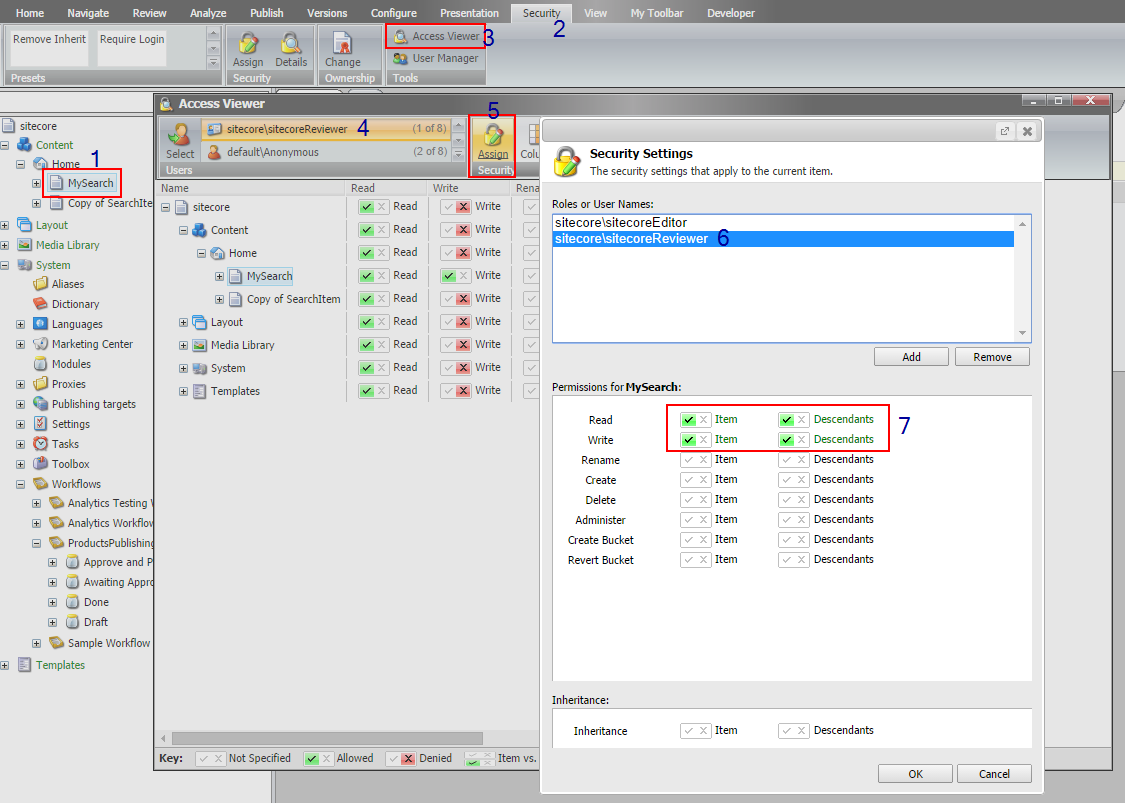
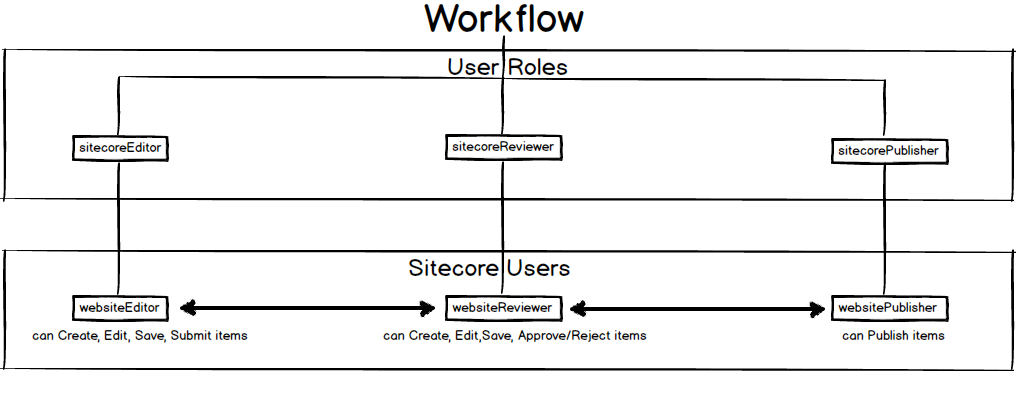
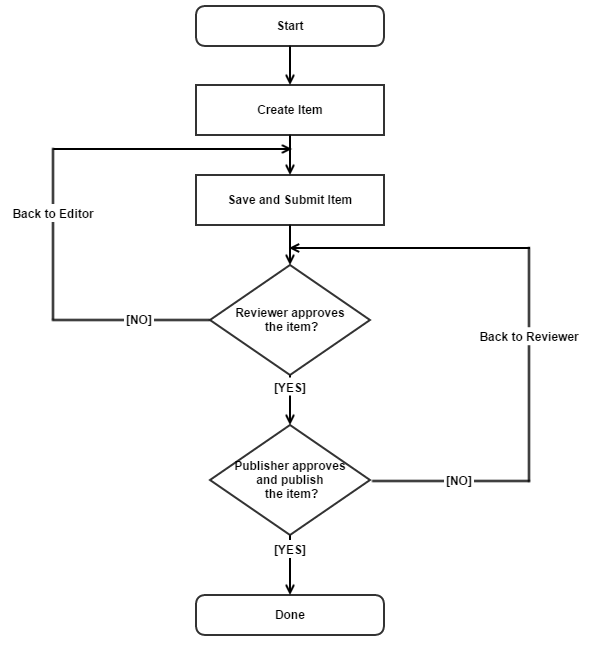
In real scenario content item is created by one user it is then submitted and reviewed by another user, who will approve which will change the state to Approved then finally the publisher will approve and publish the item.
Workflow_1
Workflow Item follows ERP Formula.
Editor Reviewer Publisher
Editor creates item. Reviewer Approves item or Reject item.
If Item is rejected by reviewer then it will go back to Editor. If reviewer approves item it will then be in Approve and Publish state and can be approved and published by Publisher.
At the end we should have the following workflow implementation in sitecore:
1)      Creating workflow
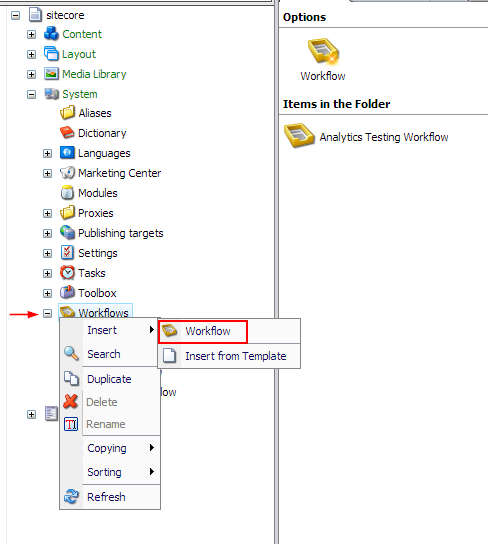
Create a workflow using /sitecore/System/Workflows/ and enter the name
Before assigning the initial state to this workflow, we first have to create the state.
2)      Creating Workflow States
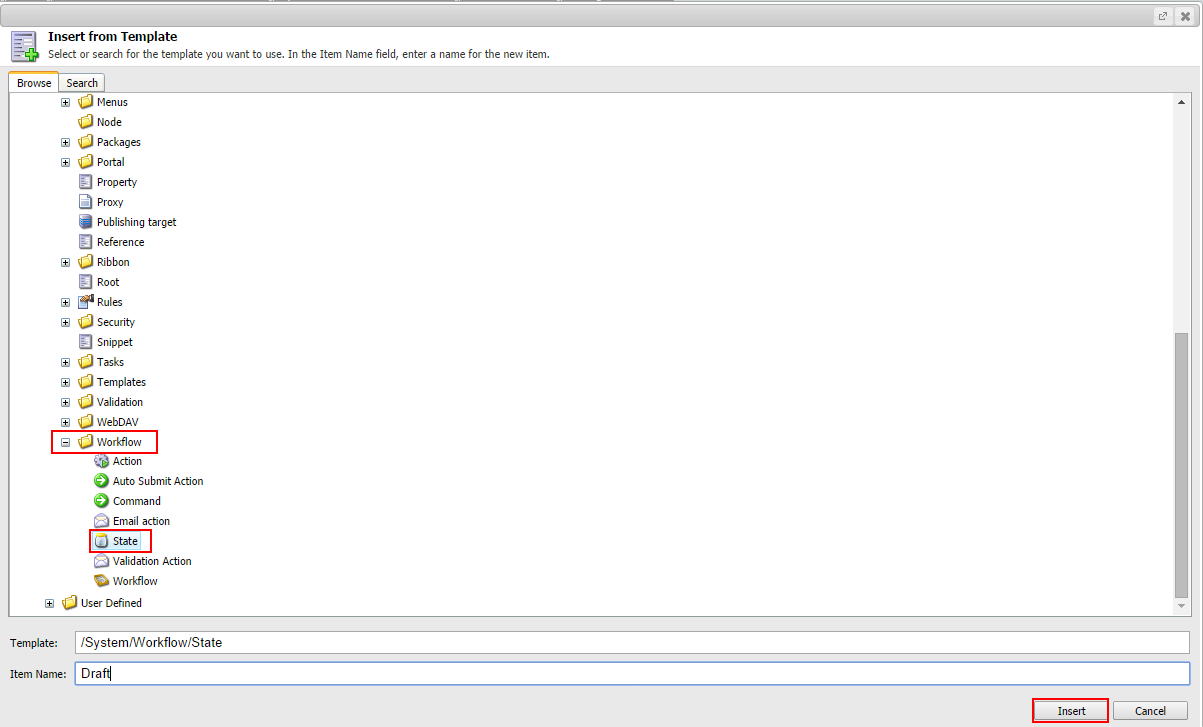
For that select workflow definition item and the select Insert from Template command and create the new workflow state using the /System/Workflow/State template.
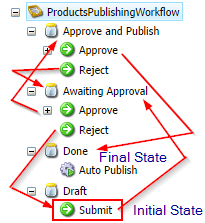
Call the first state “Draft”.
 
Creating_Workflow_2_1
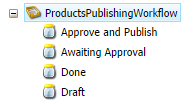
Similarly create three more workflow states –Awaiting Approval, Approve and Publish, Done.
It’s up to the requirement whether you have to create two levels or three of workflow. Here we will look at three levels of workflow where in as sitecore item reaches its final state i.e. Done then it will Auto Publish to Web Database.
At the end of this step you should have the following:
Sitecore_Workflow_2_2
Now let’s set the Initial State as a Draft.
3)      Creating Workflow Commands
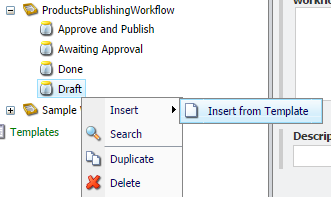
To add command to a workflow
state:
Creating_Workflow_Commands_3_1


Creating_Workflow_Commands_3_2
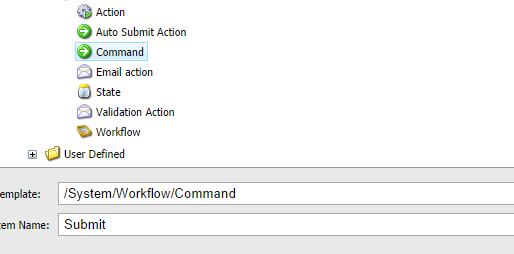
Create commands as shown in below diagram.
Creating_Workflow_Commands_3_3


Note: You can give any valid name to commands. Commands will appear to user. For example here publisher will have access to Approve and Publish State where we have provided Approve and Reject options, instead you can provide Approve and Publish or Reject.

Now let’s set the transition from one state to another with the help of commands.
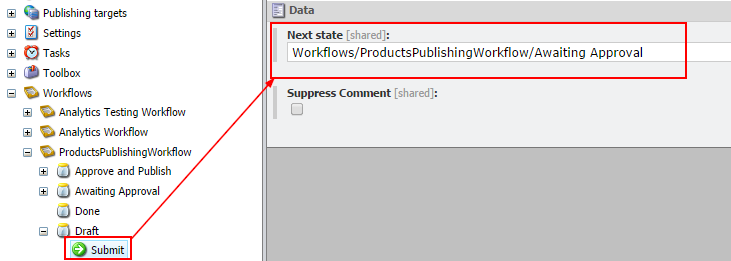
Click on Submit Command in Draft State and set the Next State to Awaiting Approval State.


Creating_Workflow_Commands_3_4

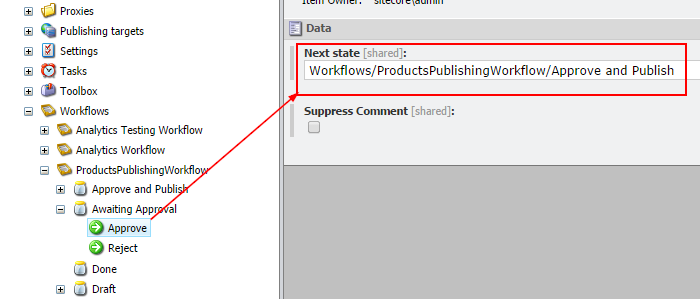
Similarly select Approve in Awaiting Approval and set the Next State to Approve and Publish.

Creating_Workflow_Commands_3_5
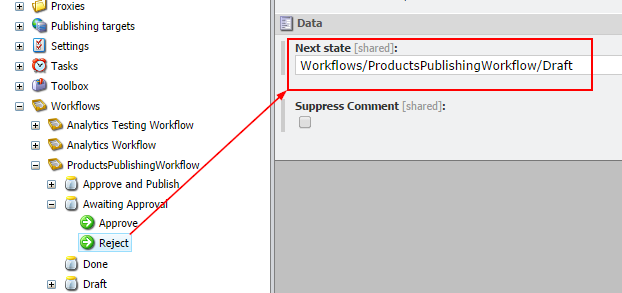
Select – Reject in Awaiting Approval State and set the Next State to Draft.
Creating_Workflow_Commands_3_6
Similarly from Approve and Publish state Approve Command will point the Next state as Done and Reject Command will point the Next State to Awaiting Approval State.
 
Note: Suppress Comment: This checkbox defines whether or not users are prompted to enter a comment when a workflow command is executed. If the checkbox is cleared, users are prompted. If the checkbox is selected, users are not prompted.
4)      Creating Workflow Actions
a.       Validation Actions
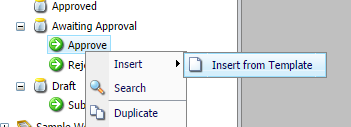
Select Approve Workflow Command, Right click and select Insert from Template Command and create the new workflow action using /System/Workflow/Validation Action template. Call the new command “Validation Action”.
Creating_Workflow_Actions_4_1
Creating_Workflow_Actions_4_2
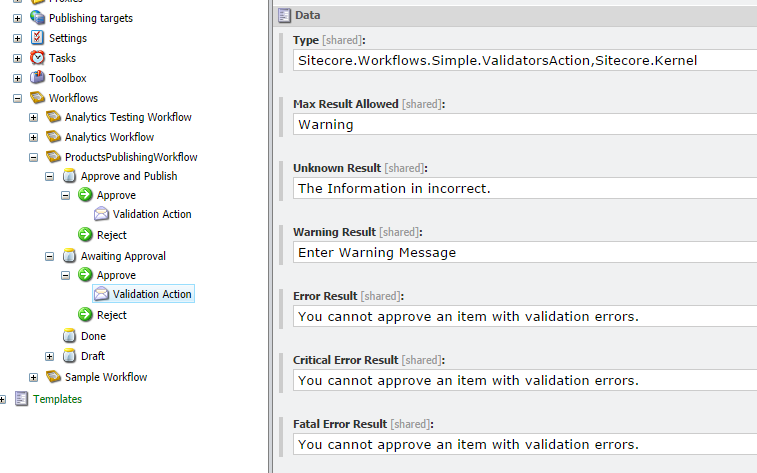
You will get the below screen. Enter the following information in Fields.
Type Field: Sitecore.Workflows.Simple.ValidatorsAction,Sitecore.Kernel.
Max Result Allowed: Warning
The maximum response from the validator.
The possible values are:
Unknown
Valid
Suggestion
Warning
Error
CriticalError
FatalError
If the value of this field is “Error”, then items which have errors will pass, but the items which have critical errors will not pass.
Fill the error results with proper error messages that you want a user to see in case of validation errors.
Similarly add Validation Action at Approve in Approve and Publish State.
 
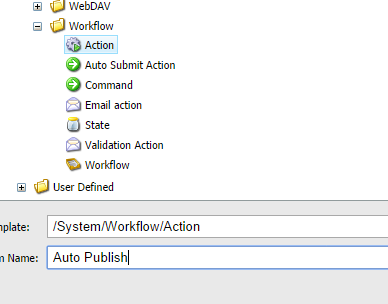
b.       Auto Publish Action
 
 
The data section of this workflow action contains the following fields:
Type:
The namespace.class, assembly name of the implementation class.
            For Example: Sitecore.Workflows.Simple.PublishAction, Sitecore.Kernel
Parameters:
The deep parameter that specifies whether or not the child items should be
published.
                deep=1
— publish children
                deep=0
— do not publish children
                related=1
— publish children (Sitecore 7.2 onwards)
 
 
5)      Defining Workflow Final State
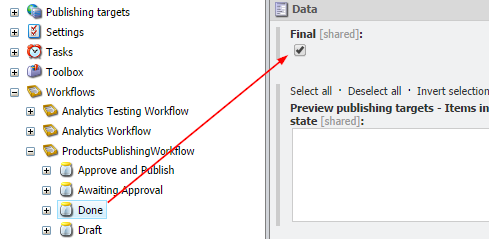
Select the state which is supposed to be the final state in workflow and select the Final Checkbox in the Data field:
Only those items which are approved by publisher in Approve and Publish state will move on to Done State of workflow and it will be published automatically.
6)      Assigning workflow to a Template
It is always the best practice to assign the workflow to the standard values item of a template.
Select the Standard Fields Checkbox.
Leave the Workflow and the State field’s blank, as they will be filled automatically upon the item creation basing on the workflow settings. Leave the Lock field as it is.
Save the template and now it is ready to use with workflow support. First phase of creating a workflow is complete.
Now let’s see how to use workflow for creating-reviewing-publishing items in Part-2

Lucene Search in Sitecore

Lucene is an open source search engine used in Sitecore CMS for indexing and searching the contents of the website. Here you will see the simple and easy way to perform Lucene search in Sitecore. Lucene search can be performed on any item or fields of item(s). In this post we will look at performing Lucene search on Sitecore item field.

We will use the default search index provided by Sitecore. Default search index i.e. sitecore_master_index. This default search index uses syncMaster search strategy which will rebuild automatically based on certain events. Every time you update, create or delete an item Sitecore runs a job that updates the indexes. The process is usually complete by the time you have saved or published an item. So as you do any changes to an item then it will automatically rebuild the search index.
For more information about search index strategies refer this blog: http://bit.ly/1rVMvB8
//Get the Search Index
using(var searchIndex = ContentSearchManager.GetIndex("sitecore_master_index").CreateSearchContext())
{
//Perform the search on index
var searchResult =
 searchIndex.GetQueryable<SearchResultItem>()
 .Where((item => item["ItemTitle"].Contains(SearchText)))
 .Where(item => item.Path.Contains("SearchItem"));
 
//Here we are searching on fieldname “ItemTitle” also only those items will be fetched whose path contains the string called “SearchItem”

    if (searchResult != null)
    {
     displaySearchResultRepeater.DataSource = searchResult;
     displaySearchResultRepeater.DataBind();
    }
}

// For displaying result in repeater control:
<asp:Repeater ID="displaySearchResultRepeater" OnItemDataBound="displaySearchResultRepeater_ItemDataBound" runat="server">
     <ItemTemplate>
         Title : <asp:Label ID="Title" runat="server"></asp:Label><br /><br />
         Description : <asp:Label ID="Description" runat="server"></asp:Label><br /><br/>
     </ItemTemplate>
 </asp:Repeater>
For displaying result you just need to bind SearchResultItem with the event called displaySearchResultRepeater_ItemDataBound. For getting the result on the repeater data bound event you have to do the following:
var currentItem = (SearchResultItem) e.Item.DataItem;
var item = currentItem.GetItem();
 
Label Title = (Label) e.Item.FindControl("Title");
Label Description = (Label)e.Item.FindControl("Description");
 
Title.Text = item["ItemTitle"];
Description.Text = item["ItemDescription"];
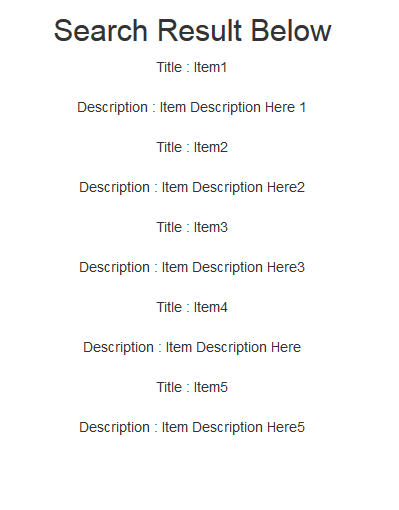
Output:  when we pass “Item” in SearchText (e.g. SearchText = Item)
Output

Microsoft Student Partners Program

What is Microsoft Student Partner?

Microsoft is the well-renowned company all over the globe.
Everyone in the world uses Microsoft Products
Microsoft is always up and running with the new technology and ahead of all the others.
Microsoft Student Partner Program is from Microsoft which encourages developers/coders to come and join Microsoft technology and take advantage of it and develop new innovated applications with them.
The Microsoft Student Partner Program (MSP) is a worldwide educational program initiated by Microsoft in 2001 to sponsor students majoring in disciplines related to technology.

This Program attempts to enhance the skills of interested technology enthusiast student in the field of Development with the hands on Microsoft Technologies.


Each year Microsoft identifies top students who are passionate about technology and Microsoft and want to share their knowledge with students and faculty on campus.  Students will serve for next academic year of selection, and get numerous benefits including competitive compensation, Microsoft software, training and work experience that looks great on a resume.

If you are passionate about technology, love throwing fun events on campus, and aren’t shy about sharing your enthusiasm for the latest Microsoft products, you could be the perfect fit for the Microsoft Student Partners Program! Whether you’re a tech junkie or a marketing guru, you could have the chance to be the Microsoft Rockstar of your campus.
I was not knowing about this program, one of my friend was going through this program since last one year but as soon as he told me about this program I just started preparing myself to take part in it and crack to become MSP.
Any Student who is interested in technologies can become MSP.
In the year 2012-2013, there were three simple round that one need to complete to become MSP.
There were points in each round, and a candidate will be selected as an MSP based on points received & the number of currently active MSPs in his/her college. Well Microsoft never discloses the points received by a MSP.
It’s was not mandatory to take part in all the rounds but it would be good for you and there will be higher chances for you to get selected for MSP.
Initial Round : Registration (Last Date 26th August 2012)
The form is needed to be filled complete and accurate information should be provided.
Round 1: Video Submission – 100 Points (Last Date 26th August 2012)
Here we were told to create a video giving answer of three questions
  • Why would you like to become Microsoft Student Partners?
  • Skills that will make you great MSP?
  • Explaining why you are exited for new Windows 8/ Windows Phone/ Internet Explorer 10?
Initially because of work load from our university and my business, I thought to skip taking part in this program but because of watching benefits and information that I have collected, I thought that is should do it and go for it. So on 26th as Sunrise I started making the video and after working for whole day my video was successfully completed at 9.00 p.m. sharp. I was in hurry to upload video because only 3 hours were left so I somehow decreased the quality and size of the video and uploaded at 11.00 p.m. even though I was knowing that quality and content of the video matters for the selection process but due to lack of time I had taken this step. And on 27th I gone through the site and I found that date has been extended to 5th Nov where I got disappointed as I uploaded video with low quality but we should upload the link only once over the site so I had been with that only. Next step was to share the video as maximum viewers can lead to good number of points.
Round 2: App Development – 100 Points per Windows 8 app and 50 Points per Windows Phone app (Last Date 26th September 2012)
(Later on date was extended to 15th November)
This was the step where I was bothering because I haven’t developed any app like such which would be available to the world, but I tried hard to get it done. I developed app named “Quiz Center”
It was some-what difficult task for me to learn and explore and develop an app on new technology, new platform and that also within one month. Thanks to my university who had organized the Metro Style App Development Workshop which helped me to crack this step and finally my app was successfully up and running over the store on 11th Nov 2012.
App takes minimum 7 days for certification process.
 Round 3: Participation in Imagine Cup 2013 Quizzes – 50 Points (Last Date 30th November 2012)
I was in very much hurry as there was 30 questions and time limit was not shown so I thought that session might get expired so finally after hard time I scored 22 out of 30 and minimum required was 15.
Microsoft with this also taught us the patience as it told us that results will be declared on 7th Dec and I was having exams from 19th but I was very much exited for the result, I haven’t started studies till 7th and then suddenly there was announcement that result will be declared on 10th which was very difficult time for me.
But at last I got selected as the Microsoft Student Partner.
Benefits:
Welcome letter
MSDN subscription after successful completion of probation period
Rewards & Recognition for top performers
Networking opportunities
Technical training & resources
Specific Microsoft events
Interaction with MVPs & Microsoft Employees
Internship & Recruitment announcements for high performers
Responsibilities
If you get selected as an MSP, here’s an indication of some of short term goals:
     Learn & implement emerging technologies like Windows 8 apps and Windows Phone apps.
     Conduct at least 1 technical session per month in your college.
     Participate and drive entries for Imagine Cup.
If you get selected as an MSP, here’s an indication of some of long term goals:
     Publish high quality apps into the Windows Store and the Windows Phone Marketplace.
     Organize city-level events by collaborating with other MSPs and the local Microsoft User Group.
     Mentor other MSPs.
This is the new beginning with a dream to work with Microsoft.
To Conclude this post I hope that you got all about Microsoft Student Partner and I will keep on blogging to make you aware with new Technologies.

Objective C, Thread 1 Program Received Signal SIGABRT

This problem came to me in Xcode 4.2 because I had added one property on the button and then that property is synthesized. As I remove that property and synthesize paraphrase. my program stop working. I thought to create a new project and try again. I did that twice but got the same error. Then when I developed a calculator and searched over the net but did not get the problem solved.
Then after a long search, I came to know that button’s delegate was still assigned.
So I went to “Show the connections inspector” in the right corner and removed the delegate…and my program started working..!!
Hope this would help you guys…..

Thank You..!!