Hello Sitecorians,
Hope you all are enjoying the Sitecore Experience 🙂
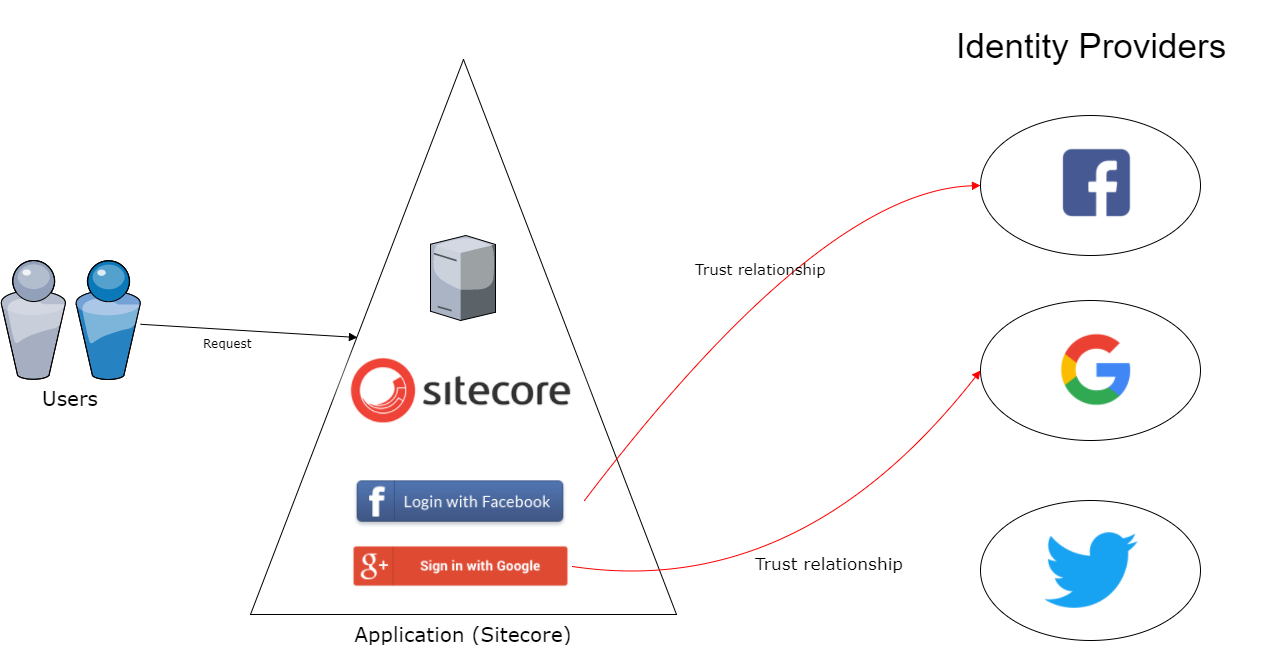
Sitecore has brought about a lot of exciting features in Sitecore 9. One of the features available out of the box is Federated Authentication. I will show you a step by step procedure for implementing Facebook and Google Authentication in Sitecore 9. Before we dive in, it’s always good to understand how the system works and the basic of Federated Authentication System.
So, what’s Authentication?
Authentication is the act of confirming the truth of an attribute of a single piece of data claimed true by an entity. In contrast with identification, which refers to the act of stating or otherwise indicating a claim purportedly attesting to a person or thing’s identity, authentication is the process of actually confirming that identity. It might involve confirming the identity of a person by verifying the authenticity of a website with a digital certificate.
What is OAuth?
OAuth is an Authorization Protocol. It’s an open standard for access delegation, commonly used as a way for Internet users to grant websites or applications access to their information on other websites but without giving them the passwords. This mechanism is used by companies such as Amazon, Google, Facebook, Microsoft and Twitter to permit the users to share information about their accounts with third-party applications or websites.
What’s OWIN Middleware?
It stands for Open Web Interface for .Net. It is a new standardized interface between web servers and applications. It stands as a middleware to be used in a pipeline to handle requests and associated responses. OWIN provides a decoupling layer that allows two frameworks with disparate object models to be used together.
What’s Federated Authentication?
It is also called as Federated Identity or SSO (Single Sign-On)
A federated identity in information technology is the means of linking a person’s electronic identity and attributes, stored across multiple distinct identity management systems.
Sitecore uses the ASP.NET Membership provider for the Sitecore user login. Now we can integrate external identity provider login easily by writing few lines of code. ASP.NET Provides the external identity functionality based on OWIN-Middleware. Sitecore has implemented the OWIN Pipeline very nicely directly into the core platform.

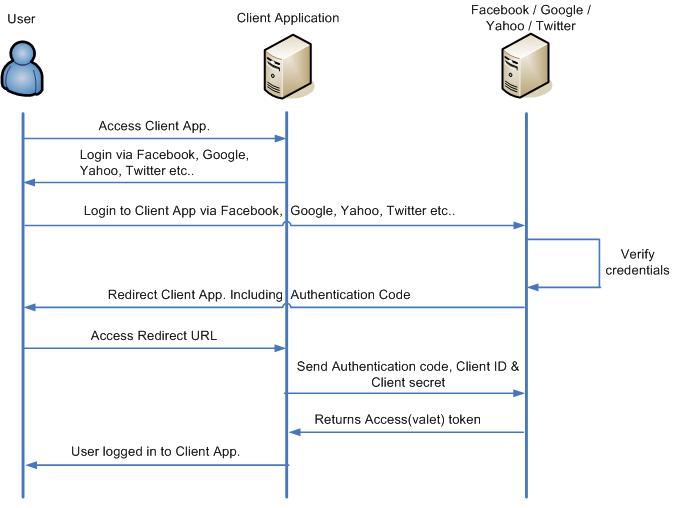
How it works?

- The user accesses Client application on the web.
- The client application provides various Identity providers list which supports OAuth protocol.
- Users choose it preferred Identity provider, Client application redirect the authentication request to the preferred Identity provider and a user provides its credentials.
- Identity provider validates the user credentials and redirects the request to Client App. including authentication code.
- The user accesses the redirected Client App URL with an authentication code.
- Client App. send this authentication code along with its Client ID & Client secret which it got during registering with the Identity provider initially.
- Identity provider validates authentication code, Client ID & Client secret and returns an access token(valet key) which is a lifetime token.
- This completes the user authentication process & Client App logged in user.
OAuth Client App. & Oauth Provider go through a registration process before Client App. allows its users to provide their identity through a trusted Identity Provider. The client application must first register itself with the Identity provider(authorization server). A registration process is typically a one-time task. Once registered, the registration remains valid, unless the Client app. registration is revoked by the Identity Provider. At the time of registration, the client application is assigned a client ID and a client secret (password) by the Identity provider(authorization server). Client ID and the secret is unique to the client application on that Identity provider(authorization server). The client application also needs to register redirect URI which is used to redirect the user post authentication by the Identity provider(Authorization Server).
Let’s go through step by step on adding Facebook and Google Identity Providers Authentication for Sitecore CMS. There are many other Identity Providers which you can integrate, but for now, we’ll go with Google and Facebook OAuth Authentication.

Enable Federated Authentication
By default, Sitecore Federated Authentication is disabled. You can enable it just by renaming the patch file located at /AppConfig/Include/Examples/Sitecore.Owin.Authentication.Enabler.config.example with Sitecore.Owin.Authentication.Enabler.config
Note: It will be good to copy the Sitecore.Owin.Authentication.Enabler.config.example file, rename it and drop at proper place as per your structure. For this post, we’ll update the same (one) file only. You can create a separate patch file and update the configuration as you go through with the post.
Add Image
Add an appropriate 24×24 size Facebook and Google Images at /sitecore/shell/themes/standard/Images/24×24/
In order to save your time, You can download 24×24 the images easily by clicking Facebook and Google here.
Configure an Identity Providers
As we are going to create the Facebook and Google Authentication, we need to create the appropriate Identity Providers and do some configurations for it to work. We’ll configure both the identity provider together in the same config file. You can create the separate file and do the configuration changes.
Add the following configuration in the Sitecore.Owin.Authentication.Enabler.config file after </services>
<!--Federated Authentication-->
<federatedAuthentication>
	<!--Definitions of providers-->
    <identityProviders hint="list:AddIdentityProvider">
		<identityProvider id="Facebook" type="Sitecore.Owin.Authentication.Configuration.DefaultIdentityProvider, Sitecore.Owin.Authentication">
			  <param desc="name">$(id)</param>
			  <param desc="domainManager" type="Sitecore.Abstractions.BaseDomainManager" resolve="true" />
			  <!--This text will be showed for button-->
			  <caption>Log in with Facebook</caption>
			  <icon>/sitecore/shell/themes/standard/Images/24x24/Facebook.jpg</icon>
			  <!--Domain name which will be added when create a user-->
			  <domain>sitecore</domain>
			  <!--list of identity transfromations which are applied to the provider when a user signin-->
			  <transformations hint="list:AddTransformation">
			  <!--SetIdpClaim transformation-->
			<transformation name="set idp claim" ref="federatedAuthentication/sharedTransformations/setIdpClaim" />
				<!--transformation for Facebook provider-->
				<transformation name="devRole" type="Sitecore.Owin.Authentication.Services.DefaultTransformation, Sitecore.Owin.Authentication">
				  <sources hint="raw:AddSource">
					<claim name="idp" value="Facebook" />
				  </sources>
				  <targets hint="raw:AddTarget">
					<claim name="http://schemas.microsoft.com/ws/2008/06/identity/claims/role" value="Sitecore\Developer" />
				  </targets>
				  <keepSource>true</keepSource>
				</transformation>
			  </transformations>
		</identityProvider>

	<identityProvider id="Google" type="Sitecore.Owin.Authentication.Configuration.DefaultIdentityProvider, Sitecore.Owin.Authentication">
		  <param desc="name">$(id)</param>
		  <param desc="domainManager" type="Sitecore.Abstractions.BaseDomainManager" resolve="true" />
		  <!--This text will be showed for button-->
		  <caption>Log in with Google</caption>
		  <icon>/sitecore/shell/themes/standard/Images/24x24/Google.jpg</icon>
		  <!--Domain name which will be added when create a user-->
		  <domain>sitecore</domain>
		  <!--list of identity transfromations which are applied to the provider when a user signin-->
		  <transformations hint="list:AddTransformation">
			<!--SetIdpClaim transformation-->
			<transformation name="set idp claim" ref="federatedAuthentication/sharedTransformations/setIdpClaim" />
			<!--transformation for Google provider-->
			<transformation name="devRole" type="Sitecore.Owin.Authentication.Services.DefaultTransformation, Sitecore.Owin.Authentication">
			  <sources hint="raw:AddSource">
				<claim name="idp" value="Google" />
			  </sources>
			  <targets hint="raw:AddTarget">
				<claim name="http://schemas.microsoft.com/ws/2008/06/identity/claims/role" value="Sitecore\Developer" />
			  </targets>
			  <keepSource>true</keepSource>
			</transformation>
		  </transformations>
		</identityProvider>
	</identityProviders>

	<!--Property mappings initializer-->
    <propertyInitializer type="Sitecore.Owin.Authentication.Services.PropertyInitializer, Sitecore.Owin.Authentication">
		<!--List of property mappings
			Note that all mappings from the list will be applied to each providers-->
		<maps hint="list">
			<map name="FacebookAdmin" type="Sitecore.Owin.Authentication.Services.DefaultClaimToPropertyMapper, Sitecore.Owin.Authentication">
				<data hint="raw:AddData">
				  <!--claim name-->
				  <source name="idp" value="Facebook" />
				  <!--property name-->
				  <target name="IsAdministrator" value="true" />
				</data>
			</map>

			<map name="GoogleAdmin" type="Sitecore.Owin.Authentication.Services.DefaultClaimToPropertyMapper, Sitecore.Owin.Authentication">
				<data hint="raw:AddData">
				  <!--claim name-->
				  <source name="idp" value="Google" />
				  <!--property name-->
				  <target name="IsAdministrator" value="true" />
				</data>
			</map>
		</maps>
	</propertyInitializer>

	<identityProvidersPerSites hint="list:AddIdentityProvidersPerSites">
		<!--The list of providers assigned to all sites-->
		<mapEntry name="Facebook" type="Sitecore.Owin.Authentication.Collections.IdentityProvidersPerSitesMapEntry, Sitecore.Owin.Authentication">
		  <sites hint="list">
			<site>shell</site>
			<site>login</site>
			<site>admin</site>
			<site>service</site>
			<site>modules_shell</site>
			<site>modules_website</site>
			<site>website</site>
			<site>scheduler</site>
			<site>system</site>
			<site>publisher</site>
		  </sites>
			<identityProviders hint="list:AddIdentityProvider">
				<identityProvider ref="federatedAuthentication/identityProviders/identityProvider[@id='Facebook']" />
			</identityProviders>
			<externalUserBuilder type="Sitecore.Owin.Authentication.Services.DefaultExternalUserBuilder, Sitecore.Owin.Authentication">
                                <param desc="isPersistentUser">true</param>
			</externalUserBuilder>
		  </mapEntry>
		  <mapEntry name="Google" type="Sitecore.Owin.Authentication.Collections.IdentityProvidersPerSitesMapEntry, Sitecore.Owin.Authentication">
		  <sites hint="list">
			<site>shell</site>
			<site>login</site>
			<site>admin</site>
			<site>service</site>
			<site>modules_shell</site>
			<site>modules_website</site>
			<site>website</site>
			<site>scheduler</site>
			<site>system</site>
			<site>publisher</site>
		  </sites>
			<identityProviders hint="list:AddIdentityProvider">
				<identityProvider ref="federatedAuthentication/identityProviders/identityProvider[@id='Google']" />
			</identityProviders>
			<externalUserBuilder type="Sitecore.Owin.Authentication.Services.DefaultExternalUserBuilder, Sitecore.Owin.Authentication">
                                <param desc="isPersistentUser">true</param>
			</externalUserBuilder>
		  </mapEntry>
    </identityProvidersPerSites>

</federatedAuthentication>
- Identity Providers
- We created a new node for Google and Facebook Identity Providers.
- Enter proper values for caption, icon, domain, and transformations in each identity providers respectively.
- We specified how the claim will be transformed that is being passed in from the identity provider to be mapped across the identity providers. We’ll look into this further in next post for adding Name claim to the FullName and then we can make use of the FullName value for mapping it to the Sitecore User Profile FullName.
- If the user is valid and idp match to facebook or google than a user will be assigned with a sitecore\Developer role
- Set Property Initializer
- It includes all the mappings from the list that will be applied to each provider.
- We can set the claims value to the User Profile properties in Sitecore.
- If the claim value match with the current claim from where the user is coming from and has the defined value then it will be set to the Property.
- For IDP – If the Claim Identity match with the Idp user is coming from then it will set the given value to that user. For example: Here we have set the value of the Administrator as True.
- Identity Provider Per Sites
- For each identity provider, we need to set a new <mapEntry> to specify which Sitecore sites are allowed to use the identity provider for authentication purpose.
- We can specify separate identity provider for Sitecore admin and site.
- It also contains externalUserBuilder node, which is responsible for creating the Sitecore user, based on the external user info and assign roles based on claim transformation configured above. By default, we are going to keep the DefaultExternalUserBuilder which is provided by Sitecore. In upcoming post, we’ll see how to customize it in order to create a user with the proper email address and details on Sitecore Property.
We have done the required configurations for the Authentication. In the next post, we’ll create a new Facebook and Google App to get the App ID and App Secret Key and Client ID and Client Secret Key respectively. Then will write the custom processor to pass the appropriate keys for the apps that we’ve created in Facebook and Google which will load the middleware system.
Good Reads:
Enable federated authentication and configure Auth0 as an identity provider in Sitecore 9.0
Configure federated authentication
Federated Authentication In Sitecore 9 – Part 1: Overview
Happy Authenticating 🙂
Thanks Nikki, for such detailed step by step info, it helps a lot while implementing federated authentication.
Good to know that. Thanks for referring this post.
Hi Nikki,
Thanks for such a detailed step by step information , it helped a lot while implemented federated authentication.
Hi Nikki Punjabi,
I followed the blog as mentioned but,
I Am getting an issue as “Could not find configuration node: federatedAuthentication/sharedTransformations/setIdpClaim”
Please check if you have enabled federated authentication.
For more about federatedAuthentication/sharedTransformations — you can check: webroot\App_Config\Sitecore\Owin
Hi Mahesh,
We are also getting the same error. Did you find any resolution of it?
try use this ref instead: federatedAuthentication/sharedTransformations/transformation[@name=’set idp claim’]