Sitecore Package Assistant | Sitecore Module

Hey Sitecore Devs,

This module is for you. It will help you track Sitecore items which you worked on and create a package of it easily. If you want to skip any item, you can just ignore it and that will never be tracked. This will be helpful when you are working on many items in the Sitecore and once you are done creating the module you can easily package it using Sitecore Package Assistant.

The idea for this module popped to Saad Ansari and he shared it via blog post: Sitecore Package Creator – The untracked/unpackaged changes while creating the packages

I took his views and started conversation with him for creating a module of his idea. We started one by one with the requirements and implimented this module.

Pre-requisite: This module works based on Sitecore PowerShell Extensions. So before you install this module it is must to have Sitecore PowerShell Extensions.

Download: Sitecore Package Assistant

Source Code: GitHub

This module will:

  • Track item on items created and saved.
  • It will show an icon in the gutter for the items which are getting track.
  • You can track/untrack any item once it is updated.
  • You can easily create the package of the items which have been tracked and on complete, the tracking is removed.

After installation, you’ll have to first enable Sitecore Package Assistant in the Sitecore Gutter.
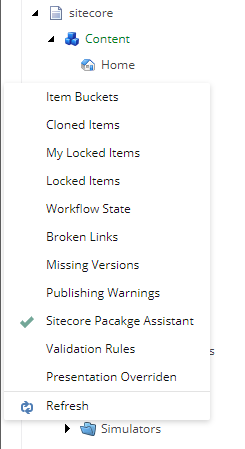
Now, as you work on the Sitecore items, which ever items you have added/updated, you’ll start seeing an  icon. On hover, you’ll see a tool-tip: This item is being tracked by SPA. Click to untrack. You can click on the gutter icon and that item will be added as untrack item. You’ll see an  icon.

In case you don’t see the icon in the Sitecore Gutter. Open Sitecore PowerShell ISE, go to Settings and Rebuild Content Editor Gutter.
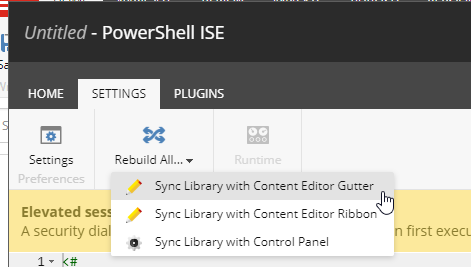
The details about the item track/untrack is logged at: /sitecore/system/Modules/Sitecore Package Assistant/SPA

Once you are done with your functionality in the Sitecore, you can right click on any item and create a package of tracked items using Sitecore Package Assistant. It will give you an option to Download the Package.
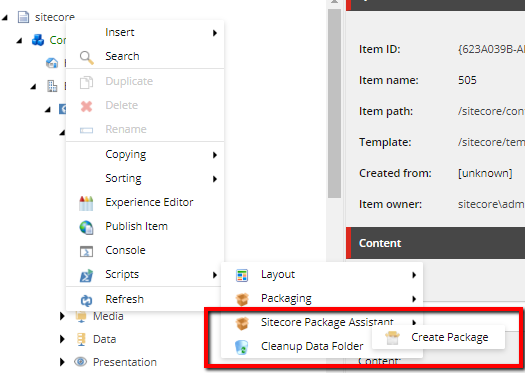
This will be helpful for the Devs, so that you don’t miss any item while creating a Sitecore Package.

You can also refer Saad Ansari’s blog: Sitecore Package Assistant — Where you can know more about this module in very detail and benefits of it.

There is much more that can be done. Your suggessions/feedback/ideas are worth sharing in the comments below.

Happy Sitecoring!

Sitecore Gutter using Sitecore PowerShell Extentions

Hey Sitecore folks,

Do you know that you can create Sitecore Gutter using Sitecore PowerShell Extensions?

Yes, it’s easy to create Sitecore Gutter using Sitecore PowerShell Extensions. We’ll see how you can easily create gutter and trigger an event on click of it.

Let’s take an example of multi-linqual site in the Sitecore. For example, Content Authors switch the language to Japanese then in the Sitecore gutter we’ll show an add icon for the items which are not having the Japanese version. I will write a simple PowerShell Script which will show Add icon if an item doens’t have any version in the context language.

<#
    .NAME 
        This item does not have any version in the current language
 
    .SYNOPSIS
        Renders gutter indicating an item doesn't have any version in the current language.
      
    .NOTES
        Nikki Punjabi
#>

$currentItem = $item = Get-Item . -Language $SitecoreContextItem.Language.Name -ErrorAction SilentlyContinue

if($currentItem -eq $null) {
    
    $gutter = New-Object Sitecore.Shell.Applications.ContentEditor.Gutters.GutterIconDescriptor
    
    $gutter.Icon = "applicationsv2/32x32/add.png"
    $gutter.Tooltip = "Item doesn't have any version in " + $SitecoreContextItem.Language.Name + ". Click to create item version."   
 
    $gutter
}

Save this script as: /sitecore/system/Modules/PowerShell/Script Library/Sitecore Item Version/Sitecore Item Version/Content Editor/Gutters/Sitecore Item Version

Now rebuild Sitecore Gutter library using Sitecore PowerShell ISE.

Enable the Sitecore Item Version in Sitecore Gutter.

Change the language and you’ll see the add icon if item doesn’t have any version in the language you have selected.

Now let’s suppose you want to provide the flexibility to create the version on click of the gutter icon, we’ll write the Sitecore command, which will execute on click of the gutter icon and create an item version.

First let’s update the script for allowing the click on an icon.

Add the following line after $gutter.Tooltip

#Sitecore Gutter Click Event
    $gutter.Click = [String]::Format("item:createnewitemversion(id={0})", $SitecoreContextItem.ID)

Create Command Class with the following code:

public class Command : Sitecore.Shell.Framework.Commands.Command
    {
        public override void Execute(CommandContext context)
        {
            if (context.Items != null && context.Items.Length > 0)
            {
                Item contextItem = context.Items[0];
                if (contextItem != null)
                {
                    contextItem.Versions.AddVersion();
                    Context.ClientPage.SendMessage(this, string.Format("item:load(id={0})", (object)contextItem.ID));
                }
            }
        }
    }

When user click on the gutter icon we have to execute above piece of code which will create item version and open the item in the content editor. Wait, this won’t work directly, we have to add the command in the config file.

I’ve created a separate Class Library Project for this demo. You can refer GitHub:  https://github.com/nikkipunjabi/Sitecore-Item-Versioning

Create a config file and add the following code:

<?xml version="1.0"?>

<configuration xmlns:patch="http://www.sitecore.net/xmlconfig/">
  <sitecore>
    <commands>
      <command name="item:createnewitemversion" type="Sitecore.SharedSource.CreateItemCommand.Command,Sitecore.SharedSource.CreateItemCommand" />
    </commands>
  </sitecore>
</configuration>
Note: Do update the type appropriately as per the solution

Deploy the config and dll file in the webroot sitecore site.

Click on the icon and you’ll see an item version is created and it will get open in the content editor.

Happy Sitecoring!

Get Sitecore Workflow Items

In this post, you’ll see how to get Sitecore workflow items that are in the specific state of the workflow. I’ve described both the possible ways by which you can do it, Code and Sitecore PowerShell. 🙂

We need, workflow Id and workflow state Id.

var db = Factory.GetDatabase("master");
var workflow = db.WorkflowProvider.GetWorkflow(txtWorkflowID.Text);
var listofWorkflowItems = workflow.GetItems(txtWorkflowStateID.Text);

Above code, will get list of items in the given workflow state. I needed the report of these items along with the URLs. So I added the following code to get the required data. I are going to make use of this piece of code and bring in some more automation in further requirement. I’ll share more details in the upcoming posts.

Layout look as following:

<body>
    <form id="form1" runat="server">
        <h2>Get List of Workflow Items!</h2>
        <table>
            <tr>
                <td>Workflow ID:</td>
                <td>
                    <asp:TextBox ID="txtWorkflowID" runat="server" Width="400" Text="{115CBA9C-D124-49D5-B9D1-314B32155AAB}"></asp:TextBox></td>
            </tr>
            <tr>
                <td>Workflow State ID:</td>
                <td>
                    <asp:TextBox ID="txtWorkflowStateID" runat="server" Width="400" Text="{C8CB5D17-7F02-4A34-B2AE-36D1DB4A7089}"></asp:TextBox></td>
            </tr>
            <tr>
                <td>
                    <asp:Label ID="lblSummary" CssClass="positionAbsolute" Visible="false" Text="" runat="server"></asp:Label></td>
            </tr>
            <tr>
                <td>
                    <asp:Button ID="btnGetWorkflowItems" runat="server" Text="Get Items in Workflow" OnClick="btnGetItemsInWorkflow_Click" />

                </td>
            </tr>
            <tr>
                <td>
                    <asp:Label ID="lblCount" runat="server"></asp:Label></td>
            </tr>
            <tr>
                <td colspan="4">
                    <asp:GridView ID="grdLanguageReport" CssClass="table-style-three" runat="server"></asp:GridView>
                </td>
            </tr>
        </table>
    </form>
</body>

I created the DataTable and fed in the required data into it. Converted the path to URL if an item has any renderings.

Code:

        StringBuilder sb;
        DataTable tb;
        protected override void OnLoad(EventArgs e)
        {
            base.OnLoad(e);
            if (Sitecore.Context.User.IsAuthenticated == false)
            {
                Response.Redirect("login.aspx?returnUrl=GetWorkflowItems.aspx");
            }
        }

        protected void btnGetItemsInWorkflow_Click(object sender, EventArgs e)
        {
            lblSummary.Text = "";
            try
            {
                if (!string.IsNullOrEmpty(txtWorkflowID.Text) && !string.IsNullOrEmpty(txtWorkflowStateID.Text))
                {
                    tb = new DataTable();
                    tb.Columns.Add("Item ID");
                    tb.Columns.Add("Item Path");
                    tb.Columns.Add("Item URL");

                    var db = Factory.GetDatabase("master");
                    if (db != null)
                    {
                        var workflow = db.WorkflowProvider.GetWorkflow(txtWorkflowID.Text);

                        var listofWorkflowItems = workflow.GetItems(txtWorkflowStateID.Text);
                        if (listofWorkflowItems == null || listofWorkflowItems.Count() == 0)
                        {
                            lblSummary.Text = "No Items found";
                            lblSummary.Visible = true;
                        }
                        else
                        {
                            List<string> listofItemsInTheWorkflow = new List<string>();

                            foreach (var ii in listofWorkflowItems)
                            {
                                var currentItem = db.GetItem(ii.ItemID);

                                DataRow itemRow = tb.NewRow();
                                itemRow["Item ID"] = ii.ItemID.ToString();

                                //For Item Path == Get Item ID
                                itemRow["Item Path"] = currentItem.Paths.FullPath;

                                //convert Item Path to URL
                                string getURLWithLanguage = "";
                                if (currentItem.Fields["__Renderings"] != null && currentItem.Fields["__Renderings"].ToString() != string.Empty)
                                {
                                    string urlWithLanguage = "https://www.companywebsite.com/" + ii.Language + "/";
                                    
                                    //Here you can do additional processing if needed
                                    
                                    getURLWithLanguage = currentItem.Paths.FullPath.Replace("/sitecore/content/Home/", urlWithLanguage);
                                    
                                }

                                itemRow["Item URL"] = getURLWithLanguage.ToLower();
                                tb.Rows.Add(itemRow);
                            }
                        }
                    }
                    lblCount.Text = "Total items: " + tb.Rows.Count.ToString();
                    grdLanguageReport.DataSource = tb;
                    grdLanguageReport.DataBind();
                }
            }
            catch (Exception ex)
            {
                lblSummary.Text = ex.StackTrace.ToString();
            }

There is an option to provide the Sitecore Workflow Id and State Id in the text box, and fetch the results based on it. You can add the feature to download the report into a sheet.

Another best way to get it done is using Sitecore PowerShell, if you have power to access on a required environment.

Provide the workflow state ID, find the referrence items using Get-ItemReferrer and then do the required processing. As simple as that.

$workflowStateID = Get-Item -Path master: -ID "{46DA5376-10DC-4B66-B464-AFDAA29DE84F}"
$referringItems = Get-ItemReferrer -Item $workflowStateID

#EmptyArray
$listofWorkflowItems = @()

#$listofWorkflowItems

#Skip System Items
Foreach($item in $referringItems) { 

    $itemPaths = $item.Paths.FullPath
    if($item.Paths.FullPath.contains('/sitecore/content/'))
    {
        $rendering = $item | Get-Rendering
        
        $addInList = New-Object System.Object
        $addInList | Add-Member -type NoteProperty -name ID -Value $item.ID
        $addInList | Add-Member -type NoteProperty -name Path -Value $item.FullPath
        if($rendering){
            $addInList | Add-Member -type NoteProperty -name URL -Value $item.FullPath.Replace("/sitecore/content/Home","https://www.nikkipunjabi.com")
        }
        
        $listofWorkflowItems += $addInList
    }
}

$listofWorkflowItems | Show-ListView

Output:

Hope this will help you as well if you are looking for any similar solution.

Happy Sitecoring!


Sitecore Federated Authentication – Part 3 – Sitecore User and Claims Identity

If you have followed my previous post, I hope you should now be able to login to Sitecore using External Identity Provider. In this post, we will see more about Claims Identity and store required values in Sitecore User Profile also we’ll create a user with the user’s email address instead of the hash code.

Claims Identity

Claims-based identity is a common way for applications to acquire the identity information they need about users inside their organization, in other organizations, and on the Internet.

Both Google and Facebook provide different claim identity name and value. So in order to bind properly, we have to update the configuration as below. You should explore Facebook Graph API from Facebook and OAuth 2.0 Playground from Google in order to get more information about the user.

In order to store the Full Name value of a user in Sitecore, I was trying to add http://schemas.xmlsoap.org/ws/2005/05/identity/claims/name claim directly to a Full Name Property in Sitecore User Profile for a user in Property Initializer Mapping. But each time I try to add it always store sitecore\APTixbqulVz0qp5xEbNrkA in the Full Name instead storing Nikki Punjabi as a name, which I was getting from both the identity providers as a claim value.

Solution:

<!--Add Full Name Claim Transformation-->
<transformation name="name" type="Sitecore.Owin.Authentication.Services.DefaultTransformation,Sitecore.Owin.Authentication">
	<sources hint="raw:AddSource">
	        <claim name="http://schemas.xmlsoap.org/ws/2005/05/identity/claims/name" />
	</sources>
	<targets hint="raw:AddTarget">
	        <claim name="FullName" />
	</targets>
</transformation>

Read More

Sitecore Federated Authentication – Part 2 – Google and Facebook App and the Custom Processor

In the previous post, we did the required configuration for the authentication with Google and Facebook Identity Providers. Now we need to write the processor which will connect the Sitecore instance with External Identities. Before that, we need the Client ID and Client Secret keys from Google and App ID and App Secret keys from Facebook.

Create Facebook App

Create the Facebook app – https://developers.facebook.com/

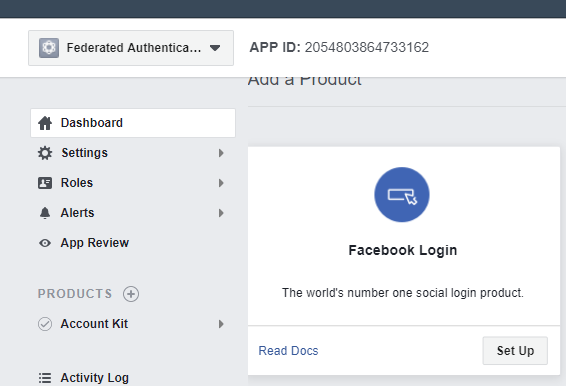
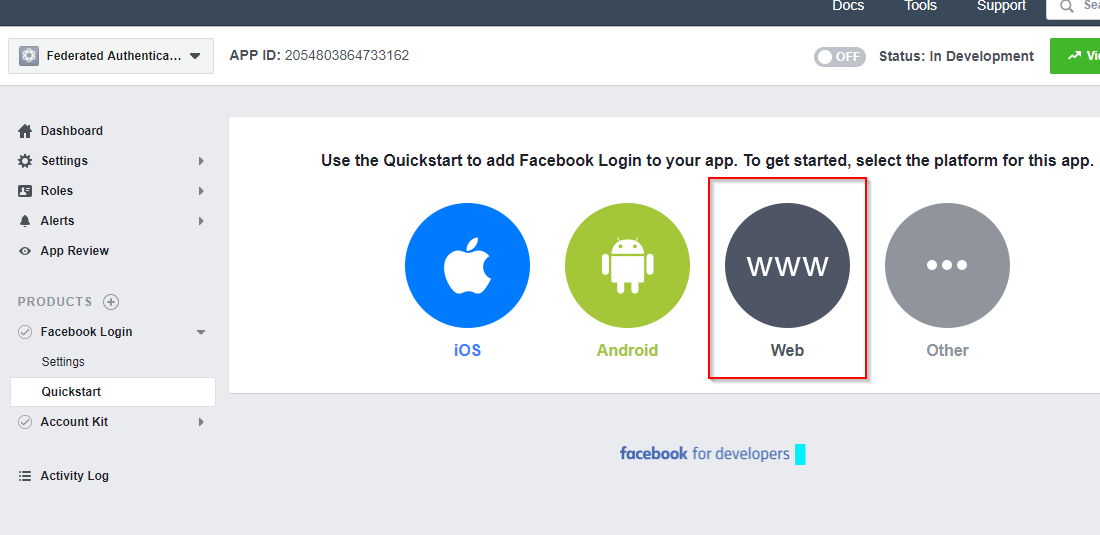
Set up the Facebook Login and create a Web App.

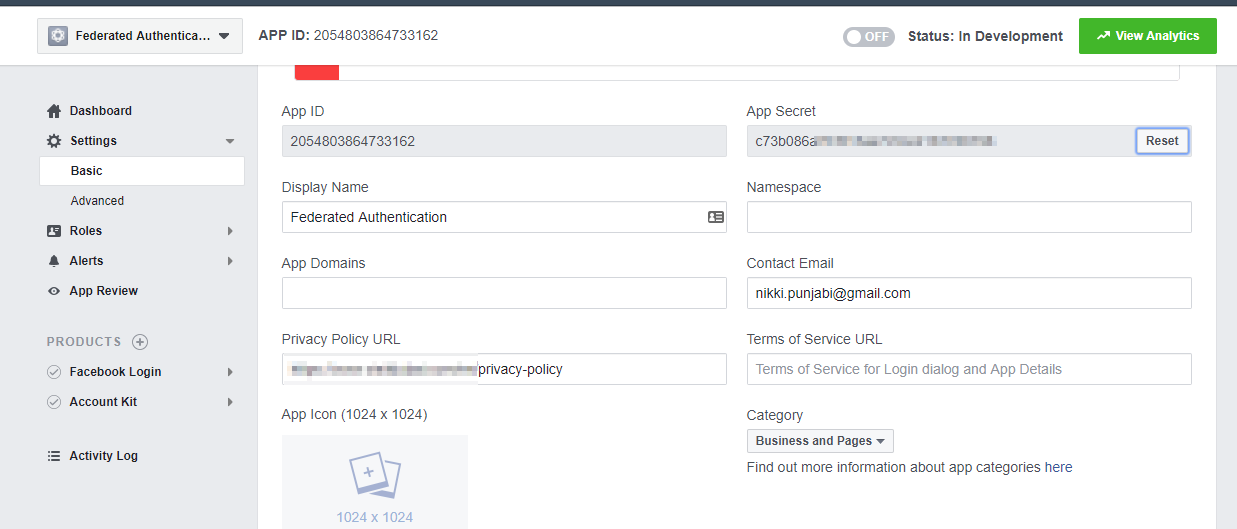
Go to Basic and copy the App ID and App Secret keys. We’ll need it at the later stage. You’ll need to add the Privacy-Policy URL.

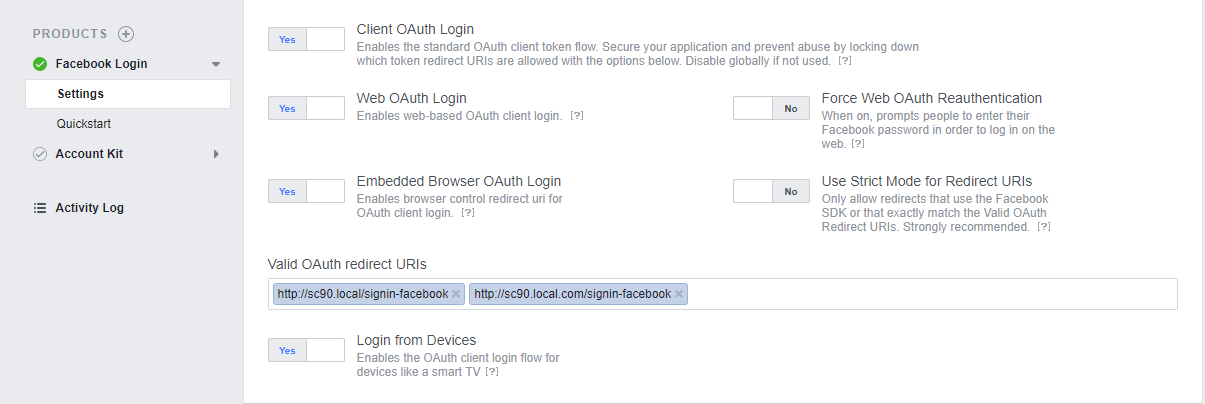
Click on Settings – Enter the proper value for Valid OAuth redirect URIs. This will be <hostname> + “/signin-” + <identityprovidername>. In my case it’s https://sc90.local.com/signin-facebook

Create Google App

Create the new Google Project – https://console.developers.google.com/

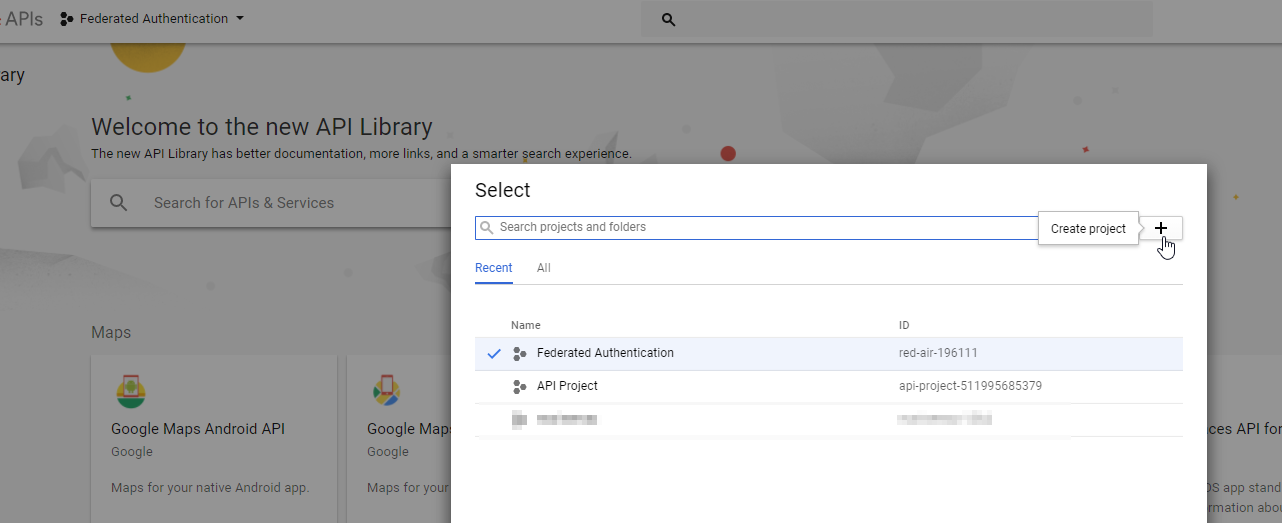
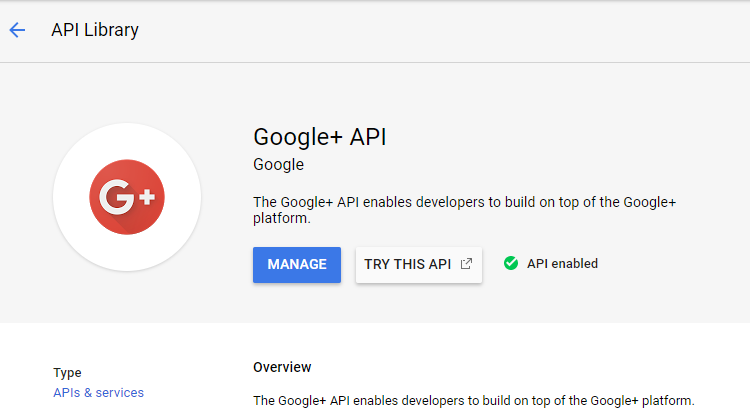
In the API Library, Enable Google+ API. Go to API Library, navigate to Social, you’ll find the Google+API. Select and Click on Enable. Our google app is now enabled for the OAuth Authentication.

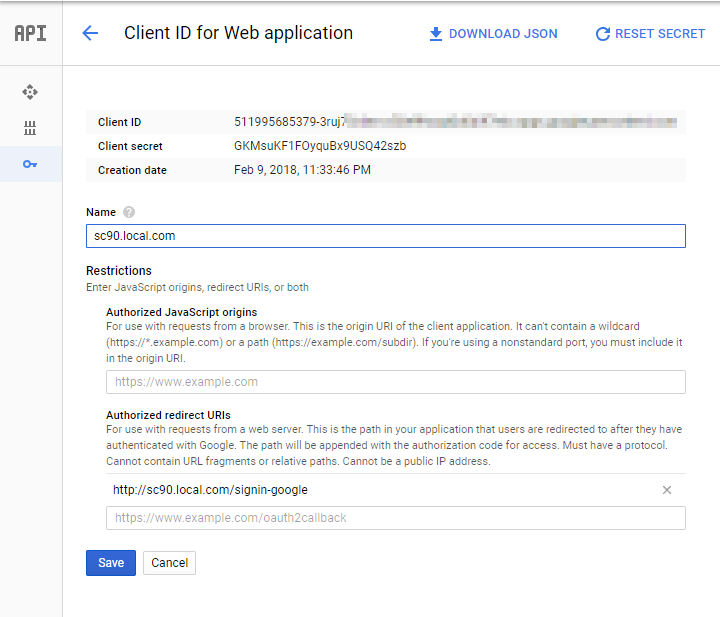
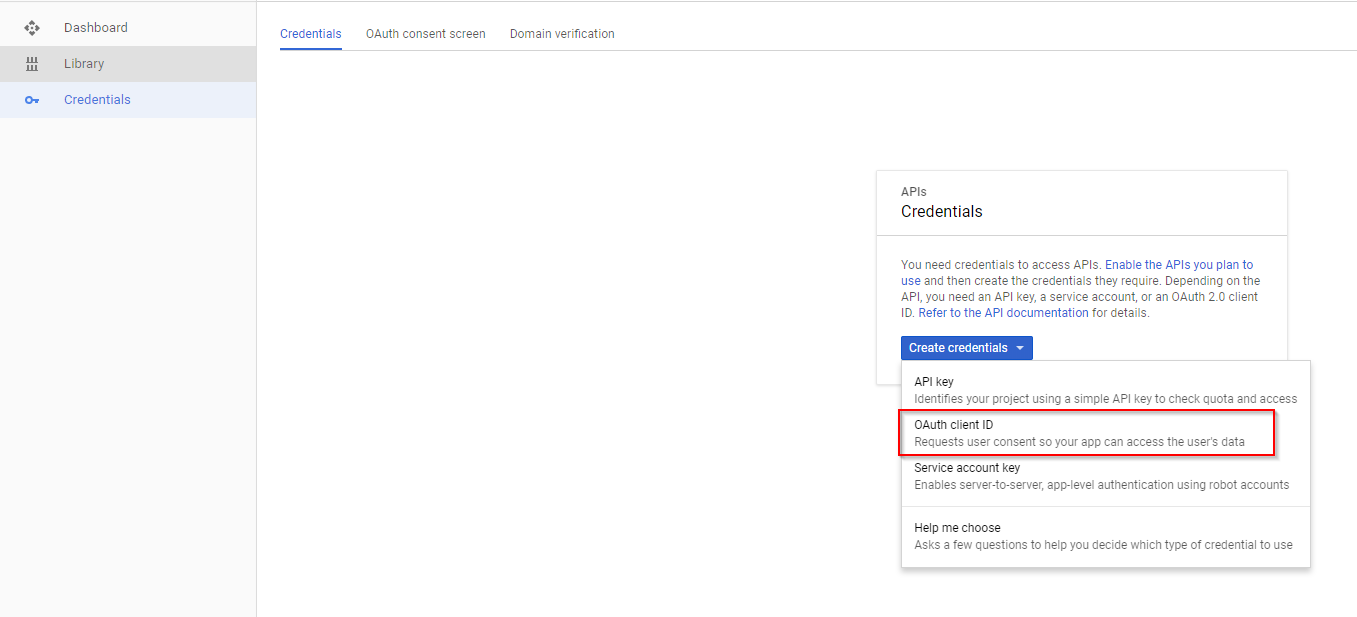
Navigate to Credentials and Create OAuth client ID credentials  — This will provide you the Client ID and Secret Key.

Provide Authorized redirect URIs, as we provided for Facebook, similarly provide for Google. In my case, it’s http://sc90.local.com/signin-google

We have created the application on Facebook and Google for the OAuth Authentication to work properly. Now we have to write the custom processor and pass the proper keys for Facebook and Google identity providers.

Read More

Sitecore Federated Authentication – Part 1 – Authentication with Google and Facebook Identity Providers

Hello Sitecorians,

Hope you all are enjoying the Sitecore Experience 🙂

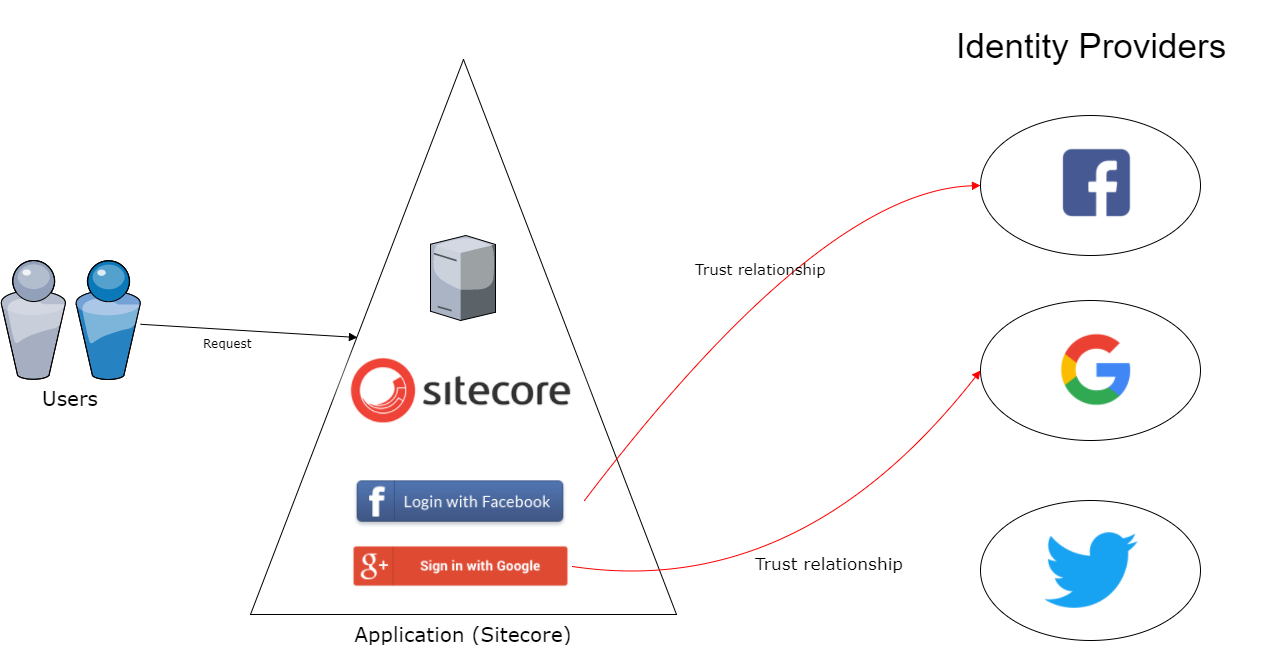
Sitecore has brought about a lot of exciting features in Sitecore 9. One of the features available out of the box is Federated Authentication. I will show you a step by step procedure for implementing Facebook and Google Authentication in Sitecore 9. Before we dive in, it’s always good to understand how the system works and the basic of Federated Authentication System.

So, what’s Authentication?

Authentication is the act of confirming the truth of an attribute of a single piece of data claimed true by an entity. In contrast with identification, which refers to the act of stating or otherwise indicating a claim purportedly attesting to a person or thing’s identity, authentication is the process of actually confirming that identity. It might involve confirming the identity of a person by verifying the authenticity of a website with a digital certificate.

wikipedia

What is OAuth?

OAuth is an Authorization Protocol. It’s an open standard for access delegation, commonly used as a way for Internet users to grant websites or applications access to their information on other websites but without giving them the passwords. This mechanism is used by companies such as Amazon, Google, Facebook, Microsoft and Twitter to permit the users to share information about their accounts with third-party applications or websites.

wikipedia

What’s OWIN Middleware?

It stands for Open Web Interface for .Net. It is a new standardized interface between web servers and applications. It stands as a middleware to be used in a pipeline to handle requests and associated responses. OWIN provides a decoupling layer that allows two frameworks with disparate object models to be used together.

What’s Federated Authentication?

It is also called as Federated Identity or SSO (Single Sign-On)

A federated identity in information technology is the means of linking a person’s electronic identity and attributes, stored across multiple distinct identity management systems.

wikipedia

Sitecore uses the ASP.NET Membership provider for the Sitecore user login. Now we can integrate external identity provider login easily by writing few lines of code. ASP.NET Provides the external identity functionality based on OWIN-Middleware. Sitecore has implemented the OWIN Pipeline very nicely directly into the core platform.

How it works?

Read More

Sitecore 9 Forms – Google reCAPTCHA form element

Hello Sitecorians,

Hope you’re playing around with Sitecore 9 and with the newly introduced cool features in it. Recently, I’ve been exploring Sitecore Forms and implemented the Google Re-captcha form element within the Sitecore forms. Re-captcha is the basic requirement for the form submission process and in order to implement this, we’ve to write some code to it.

Before you go through with this post in detail, you must know the basics of Sitecore Forms.

We will go through step by step process to implement the Google Recaptcha with Sitecore Forms using the custom form element. And will create a generic component which you can use for any other form as well.

Read More

Remove Sitecore Personalization Rules in Bulk

Hello Sitecorians,

Do you need to remove the Personalization Rules for many items in bulk or you would like to learn about that on how to do that quickly? If yes then you are at right place. 🙂

Recently there was a requirement to add personalization throughout the site. So the team did that at the template level for the required pages. But they didn’t want that for the specific node and all it’s child items and wanted to keep that away from all personalization and also it will never be applied to that items. There were approx. 1000+ items, so if they remove it manually for each item — it will take ample amount of time. In order to save the time we created a utility that will do the job in few minutes.

We need the following:

  • Parent Item ID – So that we can iterate through all the child items
  • Rendering/Sub-layout ID
  • Data-Source Value – If you would like to add/update
	
	// Remove Personalization Rules in Bulk and Update Data-Source
 
	// Default device from Sitecore
	var deviceItem = db.GetItem("{FE5D7FDF-89C0-4D99-9AA3-B5FBD009C9F3}");
	DeviceItem device = new DeviceItem(deviceItem);
 
  //Iterate through all the items
  foreach (Item childItem in parent.Axes.GetDescendants())
  {
    if (childItem.Fields != null && childItem.Fields["__Renderings"] != null && childItem.Fields["__Renderings"].ToString() != string.Empty)
    {
      // Get the rendering where personalization is needed to be removed.
	    var renderings = childItem.Visualization.GetRenderings(device, true).Where(r => r.RenderingID == Sitecore.Data.ID.Parse(txtRenderingID.Text)).ToArray();
 
      if (renderings.Count() == 0)
	    {
        string log = "Item not updated: " + childItem.Paths.Path + ", Info: Rendering with ID " + txtRenderingID.Text + " not found in the item presentation!";
        Sitecore.Diagnostics.Log.Info(log, this);
        continue;
      }
 
	     // Get the layout definitions and the device
       Sitecore.Data.Fields.LayoutField layoutField = new Sitecore.Data.Fields.LayoutField(childItem.Fields[Sitecore.FieldIDs.LayoutField]);
 
       if (!string.IsNullOrEmpty(layoutField.Value))
       {
 
          Sitecore.Layouts.LayoutDefinition layoutDefinition = Sitecore.Layouts.LayoutDefinition.Parse(layoutField.Value);
 
		      Sitecore.Layouts.DeviceDefinition deviceDefinition = layoutDefinition.GetDevice(device.ID.ToString());
 
		      var renderingItem = deviceDefinition.GetRendering(renderingID);
 
          if (renderingItem != null)
          {
            // Remove all the personalization rules
            renderingItem.Rules.RemoveAll();
 
            // Update the renderings datasource value
            renderingItem.Datasource = txtNewDataSourceID.Text;
 
            // Save the layout changes
            childItem.Editing.BeginEdit();
            layoutField.Value = layoutDefinition.ToXml();
            childItem.Editing.EndEdit();
          }
        }
    }
  }

Let me explain to you what I did in above code.

  1. Get the default device from Sitecore
  2. Iterate through all the child items
  3. Proceed further if an item has any rendering assigned to it
  4. Proceed further if an item has the required rendering, if not then continue with next item
  5. Get the layout definition and the device
  6. Get the rendering and remove all the rules
  7. Save the changes

This is the quickest and easiest solution I found, as there was no Sitecore Powershell installed. If you know any other better solution then do comment below.

Happy Sitecoring!
Add Sitecore Rendering in Bulk

Hey Sitecorians,

Hope you’re doing well with Sitecore.

Many a time we need an option to have some utility that will do the job easily and save the time for the content team to get things done faster and take the bunch out of the plate. One such requirement was for adding the sub-layout/rendering in bulk. I quickly built a utility that will do the job easier for the content team.

A simple utility that will do the following:

  1. Add Rendering
  2. Assign placeholder key to a newly added rendering
  3. Add appropriate data-source value

The utility will ask for the following:

  1. Parent-item ID
  2. Template ID – Which items, defined from the given template need to have the rendering.
  3. Rendering ID
  4. Data-Source Value
  5. Placeholder Key

Read More

Sitecore and GatherContent Integration Overview

The only reason people visit your website is for content. You have it; they want it.

Content plays a vital role on the website. Thus, when designing a website, we have to ensure that every silver of content – from microscopic blocks of text to enormous banner images and everything in between – is included.

Every website will try to have a rich content, which engages user to read. It will be packed with thousands of words, images, and interactions. How do we ensure that when a new website launch, it’s filled with right content in the right places?

GatherContent – that’s how.

Read More